![]()
I'm not the first person to put a T5 into a 240, by far, but I felt that a concise, step-by-step guide might be useful for people interested in this swap. I owe thanks to everyone who has done this before me. In this article, I will only cover the swap into a 200-series Volvo, since the swap into the 700-series has some differences and I have no experience in that regard. I am not a mechanic, and I disclaim any liability for anything you do to your car.
When I did this swap, the only source for adapters was John Parker at Vintage Performance. Since then, there have been significant developments in the T5 swap arena. Avalanche Performance now markets an adapter that doesn't require machining of the Volvo bellhousing. It also allows you to attach the T5 to an upright-mounted engine, if necessary. I've done business with Avalanche before, and if I need to do another T5 swap, I would probably buy an adapter from them. Be forewarned that some of my instructions may not apply to the Avalanche adapter. For instance, the Avalance adapter allows use of the Volvo fork and bearing, while the adapter I used required adapting the Mustang fork.
Volvo's manual transmissions that came in the 240 series, the M46 and M47, are not strong enough to indefinitely handle the power that modified redblocks are capable of putting out. At some point in any roadmap of Volvo modification, the transmission will become the weak link. In order to handle the power you're hoping to make, a transmission swap is in order. There are as many options as there are transmissions. People have swapped in the Volvo M90, the Getrag, Toyota Supra transmissions, and T5's, among others. Which is the best transmission is open to debate. Obviously, I chose the T5. The T5 was a very popular transmission in the US, appearing in both Fords and Chevrolets. It is common in junkyards, and well-known at any American transmission shop.
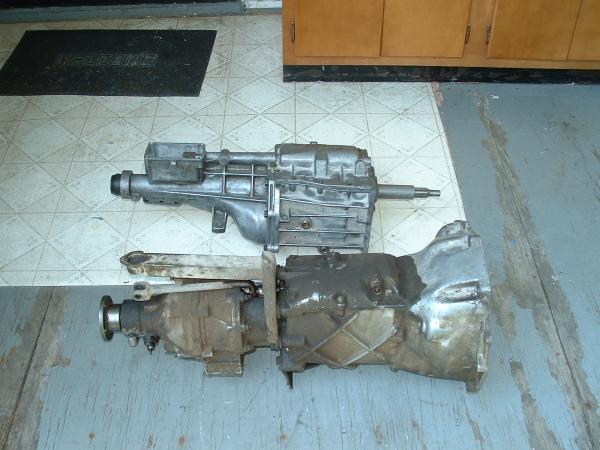
T5 without bellhousing on top, M46 on bottom
For installation in a 240, the desired transmission is a T5 from any V8 Ford Mustang from 1985 to 1993. While the T5 came in a much wider range of cars, for use in the 240, this is the most compatible of the T5s available.
The Borg Warner World Class T5 transmission is a strong manual gearbox with 5 forward gears and a reverse. It can handle from 300 to 330 ft/lbs of torque, depending on year. With an aftermarket short-throw shifter installed, it is a very pleasing transmission to drive. The gear ratios are very nice for a turbo redblock.

M46 on top, T5 with Volvo bellhousing on bottom
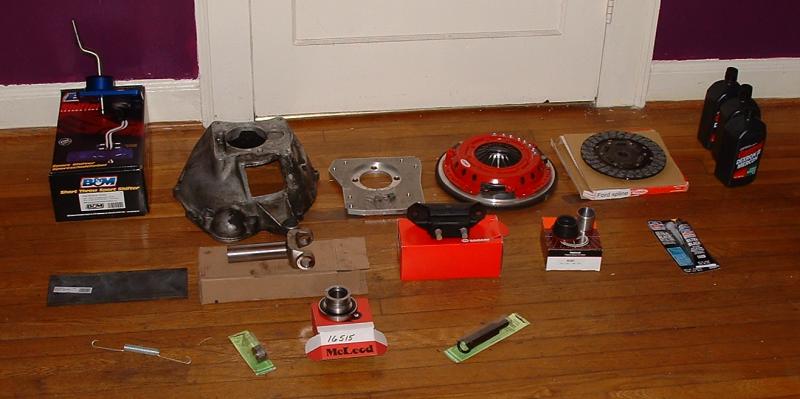
These are the things you'll need for the swap. Depending on your specific desires, you can add or subtract certain parts.
I assume that you've probably bought some sort of repair manual along the line that tells you how to remove the 240's transmission. Nevertheless, I am going to go through the entire swap from beginning to end. You'll probably want to refer to another reference for the removal steps in greater detail. (Haynes has some nice pictures.) I'm also going to assume that you either have all the tools needed to perform work of this magnitude or are willing to go out and buy them when the need arises. (It helps to have another car handy for parts runs.)
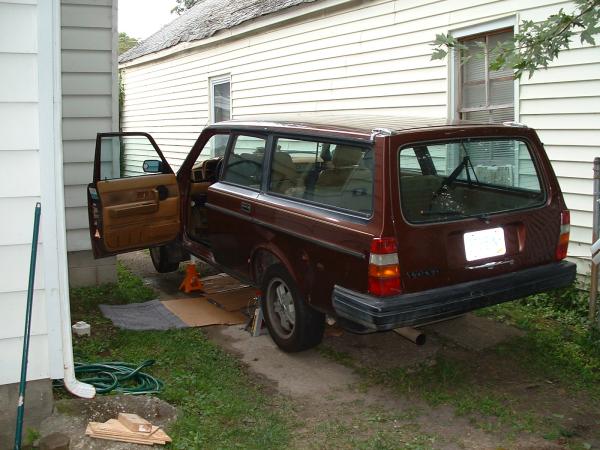
1. Find a nice, smooth, level surface to work on. Hopefully you have a driveway that no one will need for the duration of the swap. Put the car up on jack stands. For the best clearance, try to set the jack stands near their highest setting. Be sure the car is stable! After it's on the jack stands, check that each stand is level and holding weight. Push on the side of the car to be sure it doesn't rock at all.
2. Disconnect the negative battery cable. Always a good idea when you're doing any major work. A vital step if you have air bags.
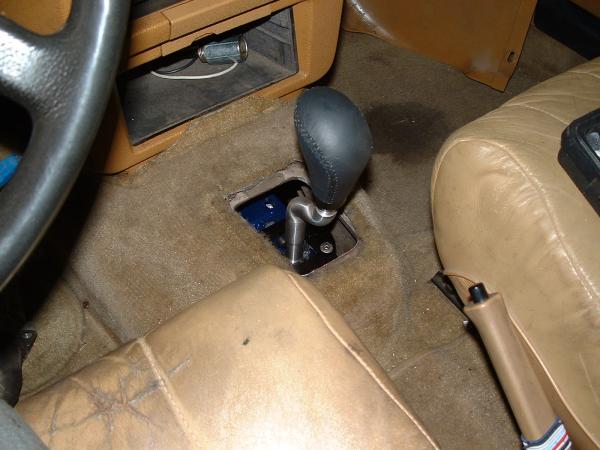
3. Remove the shift knob and boot. Drive out the pin and remove the outer shifter shaft. From underneath the car, remove the 4mm allen set screw from the bottom of the shifter. Drive the pin out from the side. From the top, remove the reverse lock-out bracket and remove the circlip holding the shifter in place. Remove the shifter. Pull the carpet back and disconnect the wiring for the overdrive.
4. Disconnect the driveshaft at the differential by removing the 4 14mm bolts. Let that end of the driveshaft hang. Remove the center support bracket. Remove the 4 bolts at the rear of the transmission. Remove the entire driveshaft from underneath the car.
5. Break loose the drain plug and drain the fluid out of the transmission. (Mine was so hopelessly stuck that I skipped this step.)
6. Disconnect the clutch cable from the fork and push it out of the way.
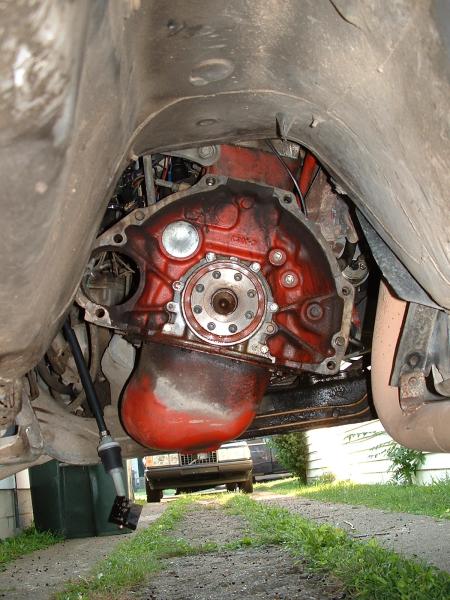
7. Remove the 6 17mm bolts that hold the inspection plate in place and remove the inspection plate. (This is the plate that attaches to the bottom front of the bellhousing and is curved to fit around the oil pan.)
8. Disconnect and label the wires going to the starter. Remove the two bolts holding the starter in place and remove it.
9. Loosen the remaining bolts holding the transmission bellhousing to the engine. I found that I needed to use an impact wrench to loosen a few of these. Be prepared to deal with hard-to-reach and stuck bolts.
10. Place a jack underneath the rear of the transmission and jack it up slightly. Use a piece of wood to protect the transmission from the jack.
11. Remove the top nut holding the transmission mount to the crossmember. Loosen the four bolts holding the crossmember in place and remove it.
12. Remove the bolts holding the bellhousing to the engine. The transmission is supported on a couple of guide pins and by the input shaft.
13. Support the transmission and slide it back off the engine. Once the input shaft clears the flywheel, you can set the transmission on the ground. Remove it from underneath the car.
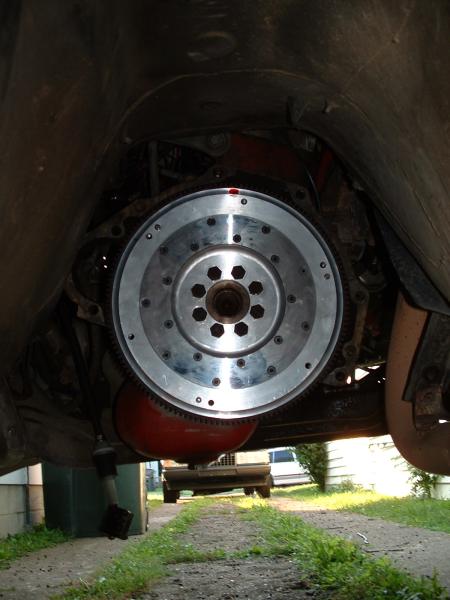
14. The pressure plate is held in place by six 6mm allen-head bolts. Remove them by slowly loosening them in a diagonal pattern to ease the pressure off the springs evenly. Remove the pressure plate and clutch. (If you are planning to reuse the pressure plate and flywheel, you should make alignment marks before you remove the pressure plate.)
15. Using a pair of needle-nose pliers, remove and retain the pilot bearing retaining circlip. The pilot bearing may now come out quite easily. If it seems stuck, use a slide hammer to remove it.
16. If you are replacing your current flywheel, remove the 8 flywheel retaining bolts. (Even if you are not, now is a good time to inspect your flywheel for excessive wear.)
17. Install the new flywheel by torquing the 8 flywheel retaining bolts to specifications.
(At this point in the swap, I was still waiting on a few parts to come in, including a new clutch fork to replace the broken one that was on the transmission I'd just pulled. I took this opportunity to test fit the transmission without the clutch, pressure plate or pilot bearing. I was able to measure the distance from the tip of the output shaft to the rear differential so that I could give the measurements to the driveshaft shop. If you already have all the parts you need to finish the installation, I would recommend not bothering with the test fit. You can take your measurements after the installation is complete. The next step continues as if all parts are available.)
18. Install the new Ford pilot bearing by carefully tapping it into place in the end of the crank. It is a perfect fit, but the retaining circlip will not reinstall.
19. Insert the clutch alignment tool through the middle of the clutch and insert it into the pilot bearing. Push the clutch flush against the flywheel.
20. Place the pressure plate over the clutch and align with the guide pins on the flywheel. Insert and hand-tighten the 6 allen-head pressure plate retaining bolts. Haynes instructs to tighten to 17 ft-lbs. If you're using John Parker's aluminum flywheel, these bolts are not the same size as the Volvo standard. They are an SAE thread. Make sure you use the right bolts--not the ones from Volvo.
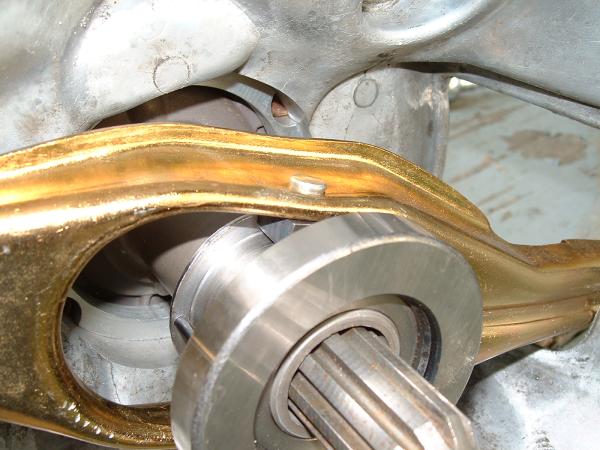
21. On the transmission, you will want to ensure that the clutch fork is in good shape. I recommend removing and cleaning it. Remove the old throwout bearing. Install the adapters and install the McLeod throwout bearing. I need to slightly widen the flange on the throwout bearing in order to fit over the adapters. It was also necessary to remove some material from one of the pegs on the fork itself, as I found that the pegs stuck out past the adapters and were too tight to allow fitment of the throwout bearing.
22. Now is also the time to begin modifying the transmission crossmember. You will need to have a 4" x 6" piece of flat steel welded to the bottom of the crossmember, with the excess facing the front of the car. I was able to procure the piece of steel from a home improvement store. If you don't weld, yourself, as I don't, try to find a local mechanic with a welder. I was able to have the job done very cheaply. Make sure the plate is welded so that it is centered from side to side. I painted the whole assembly before reinstalling, strictly for cosmetic reasons.
23. Now comes installation time. I can offer very little advice here, except to say that this is a somewhat difficult proposition without the ideal facilities. If you have a transmission jack and the car is on a lift, good for you! If not, you may find yourself struggling to bench-press the transmission into place. Just make sure that you have the transmission bolts nearby, and get some help from a friend, if possible. You need to grease the input shaft, and then lift the transmission into place. Bolt it down, and support the rear of the transmission with a jack, at least.
24. Once the transmission is in place, install the transmission crossmember using the forward-most mounting holes. Mark where the transmission mount bolts touch the plate you've welded on. (Be sure that you have the transmission centered when making your marks, or you'll end up drilling multiple holes.) Now remove the crossmember and drill the appropriate holes. Reinstall it and secure all the fasteners.

25. Take a measurement from the transmission to the differential for your driveshaft. Follow your driveshaft shop's recommendations for where to take measurements. Take the old driveshaft with you when you go, as well as the Mustang slip yoke. The shop will need to install the yoke with a new u-joint, and will also probably re-use the old flange at the differential, with a new u-joint.
26. Now that the transmission is in place, re-install the starter and reconnect its wiring.
27. Fill the transmission with automatic transmission fluid. Some people recommend filling through the shifter opening. If you go this route, you will obviously wait to install the shifter until after you've filled the transmission. I installed the shifter first, and then filled the transmission through the fill plug on the side. This can be difficult because of the tight clearances and requires a hand pump or lots of tubing!
28. If you haven't installed the shifter, do so. I used an aftermarket B&M shifter, but the stock Mustang unit will also work. Be sure to use liquid gasket on the mating surface.
29. Install the speedometer cable. Use zip ties to secure it as it runs under the vehicle.
30. Install the clutch cable. I found that the best setting for adjustment is allowing the fork to sit as far back as possible. This involves screwing the bushing as close to the transmission end of the cable as possible. I found that a hydraulic jack worked best for pushing the fork forward to allow installation (and subsequent adjustment) of the cable. Route the cable up to the driver's side upper corner of the firewall. With the fork at its forward-most position (using the jack), it should be rather easy to attach the clutch cable to the clutch pedal.
31. Grease the Mustang slip yoke and install the new driveshaft. Put the Mustang yoke into the transmission first, and then lift the rear end into place and bolt it to the differential.
32. There are three wiring harnesses that attached to the old transmission. The two from the right side of the console are for the overdrive unit. Disconnect these and leave them alone. (There are connectors at the side of the console that can be disconnected.) The one from the left side of the console is the reverse light harness. This harness needs to be attached to the T5 reverse switch on the left side of the transmission.
33. If you haven't already done so, reinstall the old rubber shift boot over the shifter. Install the shift knob. (I have found that the B&M shifter sits farther back, and the rubber boot likes to push the shifter out of 4th gear when the clutch is depressed (as when coasting in 4th). Using a different boot would be the ideal solution, but I have not found a suitable one yet.
34. Reinstall the inspection plate that sits between the bellhousing and the engine oil pan.
35. Reconnect the battery, remove the car from jack stands, and start the car.
36. You may find it necessary to adjust the clutch cable. Some people, including me, have found that the clutch is too thick initially. You may have trouble with the clutch slipping until it has worn down sufficiently. You may also find that it is difficult to put the car in gear until the clutch has worn down. Reverse is especially difficult, and sometimes requires you to shut off the car. However, this problem soon disappears. It took a mere two to three days of driving the car before the clutch stopped slipping, and it became easier to shift into every gear, including reverse.