Aces of Iron Productions, Inc. ~ info@acesofiron.com
|
Aces of Iron Productions, Inc. ~ info@acesofiron.com |
|
|
        
|
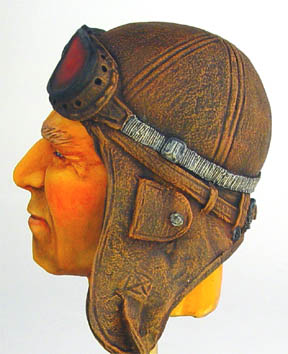
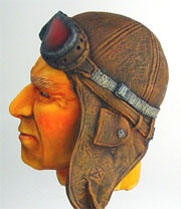
Basics of Figure Painting (Continued) By Michael Johnson
The following is a very basic process for painting Goggles.
Supplies:
Enamel Paint Colors Used
Oil Paints
Brushes/Miscellaneous
Part V: Goggles |
||

|
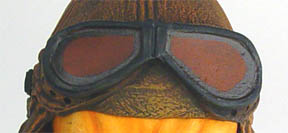
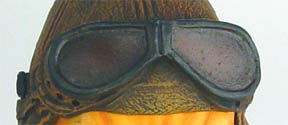
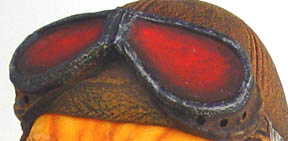
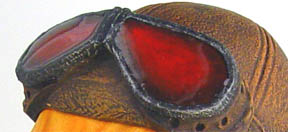
Step 1 (Base) - Paint the entire leather areas as described in the leather section. Paint the base of the lens with the same mid tone base color of the object the lens is covering (Here it is over leather so it is painted with burnt sienna). Paint the base of all metal parts and the goggle strap with flat black and allow paint to dry completely. | ||
|
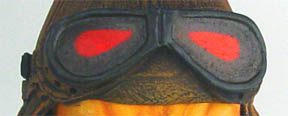
Step 2 (Lens Shadows) - Paint a line around the inside edges of the lenses with raw umber. Make the lines thicker towards the outer edges where the lens is out farther from the helmet. These shadows will create the illusion of depth behind the lenses. | ||
|
Step 3 (Lens Shadows, Blending)- Use the detail brush to gently draw the raw umber paint from the edges towards the center of the lens to blend the layer. Oils are translucent and a thick layer towards the edges with a thin layer towards the center will give the lens depth. | ||
|
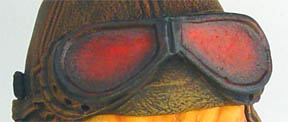
Step 4 (Lens Highlights)- Paint some cadmium red in the center of the lens. | ||
|
Step 5 (Lens Highlights, Blending) - Use the detail brush to gently draw the cadmium paint from the center towards the edges of the lens to blend the layer. The paint should be thick layer towards the center with a thin layer towards the edge of the lens. | ||
|
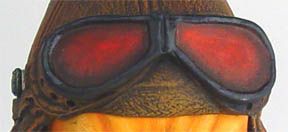
Step 6 (Dullcote) - Re-apply flat black to the metal edges around the lenses and spray the whole sculpture with dullcote to blend and seal. | ||
|
Step 7 (Strap Highlights) - Use the sand color and "Dry brush" the color to the raised areas of the goggle straps. Dry brushing is a process of first wiping most of the paint from the brush then gently dragging the brush over the surface of paint area. The paint will adhere to the raised areas and will not seep into the deep areas. | ||
|
Step 8 (Metal Highlights) - Use the steel color and "Dry brush" the color to the metal parts of the goggles. | ||
|
Step 9 (Epoxy) - Mix equal parts (small amount) of five minute epoxy taking care not to mix in air bubbles. Use a small applicator (I use a Q-tip with the cotton cut off) to apply a thick layer of the epoxy to one of the lenses. Keep the lens level as the epoxy cures so the layer remains uniform over the lens. When the epoxy is fully cured, repeat the process for the other lens. This is the final touch that will really create the high gloss effect and will accentuate the depth behind the lens. | ||
|
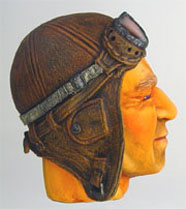
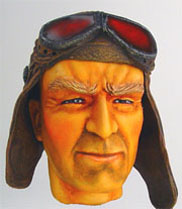
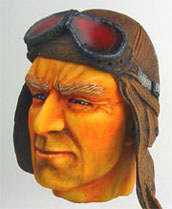
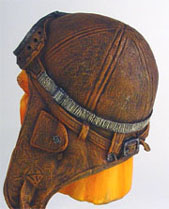
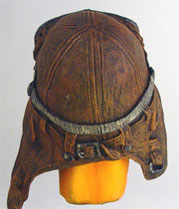
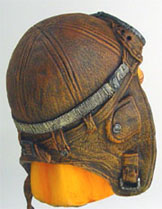
Multiple Views of Completed Figure
|
|||
|
|||
|
Continue to Part 6, Uniform:
All Text and Images Copyright © 2003-2019 Aces of Iron Productions Inc. All Rights Reserved. Text, graphics, and HTML code are protected by US and International Copyright Laws, and may not be copied, reprinted, published, translated, hosted, or otherwise distributed by any means without explicit permission from Aces of Iron Productions Inc. info@acesofiron.com
|
|||