Final Image with outside and inside exposures combined.
Just typing this article seems daunting for me, but hopefully once you've read it you will have the know-how to layer your own images.
Don't be scared.... I'll hold your hand all the way through this!
Layering can begin at capture with two different exposures, or in post process by editing the same file two different ways. This article will focus on the first one, but the whole thing can be easily applied to a combination of two different copies of the same image.
First, start off by capturing two different exposures. This is a process that I use all the time when shooting architecture or real estate. I will first nail my indoor exposure and make sure everything looks well exposed. If there are reflections in the windows, I really won't need to worry because that will be my 2nd exposure.
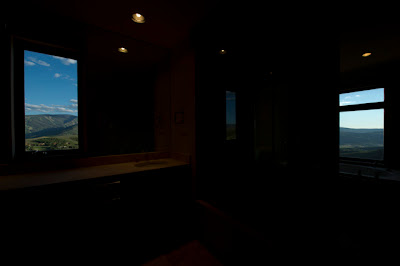
Inside exposure with reflections in window. (you can see my arm with a flash!)
To create the 2nd exposure, meter for the outside, but be careful not to move the camera. A tripod is a must for this, especially with wide lenses. I use spot meter and put a focus point over the window to get this right.
Now that you have the images, it's time for "The Hammer" as pro photographer Daniel Milchev calls it. Normal people just call it Photoshop.... Run your initial RAW processing and open both images in photoshop. Here I will use the indoor exposure as my main exposure, and "cut" the outdoor exposure into it.
View the outdoor exposure, and select the whole thing with the square marquee tool. It looks like a box with a dash as the edge. Copy this exposure, and move over to the indoor exposure. Paste the exposure on this one. You can use Ctrl+V or CMD+V as a paste shortcut, with Ctrl+C or CMD+C as your initial copy shortcut.

Outside Exposure to be combined with interior from above.
You should now see the outside exposure as a layer over the interior exposure with none of the interior exposure showing through. Select the top layer, or "outside exposure" layer in your layers panel. Then move the opacity slider down to about 50%. This is just to check that the exposures are well lined up and save you some time later. Just press your arrow keys to move the top layer around and line it up perfectly with the bottom one. Once you are satisfied with the alignment, slide opacity back to 100%.
With your top layer selected. Press the alt key while you click on the "Create new layer mask" button at the bottom of the layer's palette. The alt key automatically inverses the layer mask so that all you see is the bottom layer, or inside exposure. If you don't do this, you can still press Ctrl+I or CMD+I with the mask selected to inverse it.
Don't know what a mask is? Think of it as a mask for your face, when you put it on, it shows the mask, but not your face. When you take it off, you see your face with no mask. Apply this to Photoshop and you have the Layer mask. When it's black it means that none of the layer is showing, white means the whole layer is showing. If you have black with some white, only the white parts are what's showing of that layer.
Now it's time for the fun part. This part is exactly like when they finally "move the bus" on Extreme Home Makeover. I call this the "reveal". Here we replace the poor outside exposure, with a perfect no-reflections exposure, it's really amazing how much this changes the whole image!
There are several tools to help you do this. The paint brush, magic wand, the new "Quick Selection" tool in CS5, the lasso, polygonal lasso, and magnetic lasso. The marquees will work as well.
For windows the polygonal lasso makes the most sense. Select this tool to draw in your selection. If you mess up, click the option in the top bar that lets you subtract, or add from the selection, it looks like this (hover over each one in your copy of photoshop for a pop-up telling you what it does):

There is also an "add-to" selection option that you can use if you miss an area. Make sure you have black as a foreground color, and white as a background when using the lassos. If these are not correct, when you press delete later, nothing will happen. Flip these options if using the paint brush to paint-in the outside exposure.
Once you have the area selected that you want to replace with the new exposure, press delete to "cut" it out and reveal the new image in that area. If you mess up you can alway's press Ctrl+Z or CMD+Z to go back a step. If your happy with it, press Ctrl+D or CMD+D to de-select the area. Repeat for all needed windows/areas of an image.
That's pretty much it! Save your image and if you did this correctly it should look great! This technique works well with a single image also, just edit the same image two ways, and then layer the areas that you need. It also works to lighten exposures in certain areas by use of the soft paint-brush. Please comment below if any of this is confusing, and I will fix the article to clarify.
That's the BUZZ for Today! Please check back soon for more.


0 comments:
Post a Comment