ICE09 . playing with java, scala, groovy and spring .

Playing with Spring

Archive for the ‘Maven’ Category

QuickTip: SCP with Groovy, Maven and Eclipse

Posted by ice09 on December 20, 2010

Intention

It’s easy to use SCP with Java, Groovy and even with Maven. However, it gets more complicated if you want to use all of them simultaneously.

It should work this way: An (key-file-based) SCP-connection should take place in a Groovy, so the transferred file can be manipulated straight away. All this should be triggered by a Maven build process and alternatively, using Eclipse with the Groovy plugin, it should be possible to directly start the Groovy script.

Preparation

Either Eclipse with the Groovy plugin and the Maven plugin or the SpringSource Tool Suite (which includes both plugins) should be installed.

Maven config

The Maven config consists of two dependencies:

  1. The Ant-SCP-Plugin, which is based on JSch
  2. Embedded Groovy (groovy-all.jar)

And two Maven Plugins:

  1. GMaven
  2. The Exec Maven Plugin

<project xmlns="http://maven.apache.org/POM/4.0.0" xmlns:xsi="http://www.w3.org/2001/XMLSchema-instance"
 xsi:schemaLocation="http://maven.apache.org/POM/4.0.0 http://maven.apache.org/xsd/maven-4.0.0.xsd">
 <modelVersion>4.0.0</modelVersion>
 <groupId>de.ice09.scp</groupId>
 <artifactId>jsch</artifactId>
 <version>0.0.1-SNAPSHOT</version>
 <dependencies>
  <dependency>
   <groupId>org.apache.ant</groupId>
   <artifactId>ant-jsch</artifactId>
   <version>1.8.1</version>
  </dependency>
  <dependency>
   <groupId>org.codehaus.groovy</groupId>
   <artifactId>groovy-all</artifactId>
   <version>1.7.5</version>
  </dependency>
 </dependencies>
 <build>
  <plugins>
   <plugin>
    <groupId>org.codehaus.groovy.maven</groupId>
    <artifactId>gmaven-plugin</artifactId>
    <executions>
     <execution>
      <goals>
       <goal>generateStubs</goal>
       <goal>compile</goal>
       <goal>generateTestStubs</goal>
       <goal>testCompile</goal>
      </goals>
     </execution>
    </executions>
   </plugin>
   <plugin>
    <groupId>org.codehaus.mojo</groupId>
    <artifactId>exec-maven-plugin</artifactId>
    <version>1.1</version>
    <executions>
     <execution>
      <goals>
       <goal>java</goal>
      </goals>
     </execution>
    </executions>
    <configuration>
     <mainClass>de.ice09.scp.LogLoader</mainClass>
    </configuration>
   </plugin>
  </plugins>
 </build>
</project>

Groovy…

Here comes the Groovy part, in fact it’s quite short, since it focuses on the file transfer part. Obviously, it would be easy to manipulate the transferred files after the SCP-transfer, since we are inside a Groovy script and we can use whatever Java library we want since we are inside a Maven project. The universe is ours!


package de.ice09.scp

new AntBuilder()
 .scp(
  file:"root@server.com:/tmp/ls",
  todir:'C:/temp',
  verbose:true,
  trust:true,
  keyfile:'C:/portables/PuTTY/ossh.ppk',
  passphrase:'passphrase'
 )

The file must go to src/main/groovy for GMaven to work. The key must be OpenSSH-compliant. If you use PuTTY, you can export this format. Alternatively, you can use username/password instead.

Testing…

After creating a new Maven project with the pom.xml listed above, more than half of the work is done. With or without an IDE this can be tested. Just run

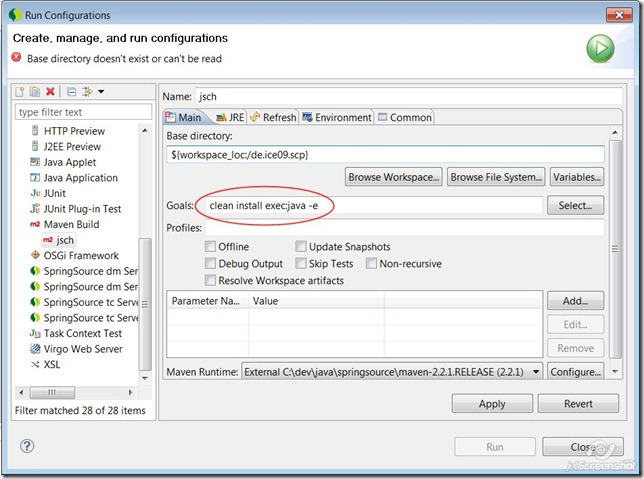
maven clean install exec:java

GMaven should generate the Java stubs, the Execution Plugin should execute the generated Java class file. The dependencies for JSch, Antbuilder etc. are handled by Maven or Groovy itself.

Eclipse config

The final step is to enable the Groovy nature in Eclipse. This leads us to a faster development cycle, since the Groovy script can be run “natively”, without having Maven to generate the Java stub before. There is no problem running the two options (Groovy with Maven and Eclipse) side-by-side, so it is really easy to develop and deploy, since there is no big difference. You always have a completely runnable version available, given that Maven is installed on the target system.

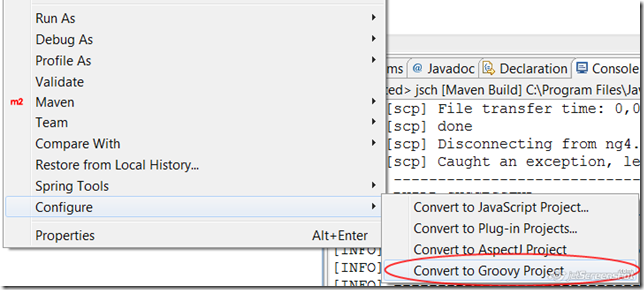
Convert to Groovy project

2010-12-20_23-16_Java

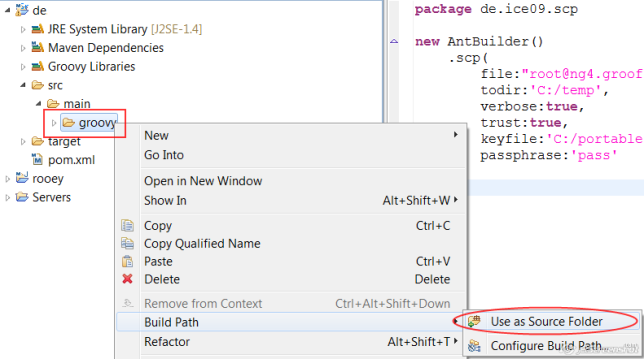
Add Groovy sources (from src/main/groovy) to classpath

2010-12-20_23-19_Java

The deployable way: start process using GMaven and Execution Plugin

2010-12-20_23-36_Run Configurations

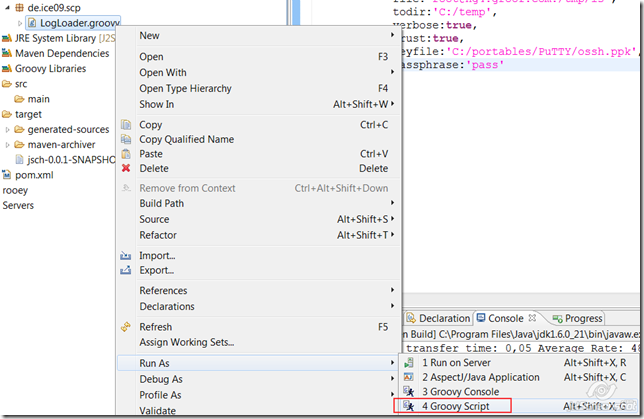
Start in development mode using the Groovy Eclipse Plugin

2010-12-20_23-38_Java

Posted in Groovy, Maven | 1 Comment »

Spring and Groovy, again…

Posted by ice09 on August 9, 2009

No real news here, just another example for Spring and Groovy in a simple web project.

Github for server version is here.
Github for client version is here.

What does it do?

We needed a simple Request/Response Mock for SOAP Web Services. Since the real sending component uses EJB and Weblogic t3-protocol specific stuff, I wanted to decorate this component.
The simplest way seemed to create an own endpoint, which accepts the SOAP web service requests, searches for templates based on the payload-root-element and evaluates the determined template (which itself is a Groovy template).

How does it work?

Quite straightforward. If a directory with the file template.groovy and the name of the root element of the payload exists, the template is loaded and evaluated with the input data and finally returned by the DispatcherServlet.
Spring MVC is used, however it was not necessary for this little sample.
The most interesting part is the injection (with @Autowired) of the Groovy script (which resides in src/main/resources/, which is not really correct).

<!-- this is really important to start the annotation processing in Spring -->
<context:annotation-config/>

<!-- the controller is instantiated, via @Autowired the Groovy Script is set -->
<bean id="RequestMockController" class="com.mock.sample.RequestMockController"/>

<!-- local repository (must be changed most likely) -->
<bean id="localRepo" class="java.lang.String">
   <constructor-arg value="c:/temp/repo/"/>
</bean>

<!-- instantiate Groovy as a Spring bean -->
<lang:groovy id="xml" script-source="classpath:XmlToolImpl.groovy"/>

IMPORTANT: to be able to use Groovy-Spring beans, the Groovy object should implement a Java interface (which is then used in the Java code).

How do I test it?

Use the client code with the parameters supplied in the README.
The request could look like this:

<soapenv:Envelope xmlns:soapenv="http://schemas.xmlsoap.org/soap/envelope/" xmlns:wss="http://wsssample.com.mock.sample">
  <soapenv:Header/>
    <soapenv:Body>
      <wss:getString>
        <wss:name>?</wss:name>
      </wss:gettring>
   </soapenv:Body>
</soapenv:Envelope>

For this request to succeed, the file REPO/getString/template.groovy must exist (see resources).

Specials

In the sample, there is one special behaviour, which requires two passes – if the template returns something like “>redirect”, the request is redirected to the new file (this works one time only and is just included to easy the “dispatching or controller pattern”)

Posted in Groovy, Maven | 1 Comment »

Consuming Services – the Spring Web Service Client

Posted by ice09 on August 25, 2008

There is a downloadable zipped Eclipse project at the end of this post.

Having created a sample (mail) web service some posts ago, we would like to have a client consuming this service.

With Spring Web Services, this can easily be done by using the ubiquitous Template Pattern and, in this special case, the WebServiceTemplate . As the project structure can be downloaded, only the two important snippets are shown here:

The application-config.xml:

<?xml version="1.0" encoding="UTF-8"?>
<beans xmlns="http://www.springframework.org/schema/beans" xmlns:xsi="http://www.w3.org/2001/XMLSchema-instance"
	xsi:schemaLocation="http://www.springframework.org/schema/beans http://www.springframework.org/schema/beans/spring-beans-2.0.xsd">

    <bean id="mailclient" class="de.mail.MailClient">
    	<property name="webServiceTemplate" ref="webServiceTemplate"/>
    </bean>

    <bean id="messageFactory" class="org.springframework.ws.soap.saaj.SaajSoapMessageFactory"/>

    <bean id="webServiceTemplate" class="org.springframework.ws.client.core.WebServiceTemplate">
        <constructor-arg ref="messageFactory"/>
        <property name="marshaller" ref="marshaller"/>
        <property name="unmarshaller" ref="marshaller"/>
        <property name="defaultUri" value="http://localhost:8080/mailservice"/>
    </bean>

    <bean id="marshaller" class="org.springframework.oxm.jaxb.Jaxb2Marshaller">
		<property name="classesToBeBound">
			<list>
				<value>org.mail.mailschema.MailRequest</value>
				<value>org.mail.mailschema.MailResponse</value>
			</list>
		</property>
	</bean>

</beans>

and the actual Web Service client:

package de.mail;

import org.mail.mailschema.MailRequest;
import org.mail.mailschema.MailResponse;
import org.springframework.ws.client.core.WebServiceTemplate;

public class MailClient {

	private WebServiceTemplate webServiceTemplate;

	public void setWebServiceTemplate(WebServiceTemplate webServiceTemplate) {
		this.webServiceTemplate = webServiceTemplate;
	}

	public boolean send(String user, String password, String from, String to, String subject, String content) {
		MailRequest request = new MailRequest();
		request.setFrom(from);
		request.setTo(to);
		request.setUser(user);
		request.setPassword(password);
		request.setContent(content);
		request.setSubject(subject);
		return ((MailResponse)webServiceTemplate.marshalSendAndReceive(request)).isResult();
	}

}

The servlet sample is not shown, since it is just for demonstration and not a nice piece of code. However, it exemplifies some Spring antipatterns, because DI is not used and the servlet is not Springified at all. But it’s only a sample showing how to use the Web Service client.
By deploying the servlet (or using mvn jetty:run again), a mail can be send by calling http://server/mailwebapp/Mailer?user=USER&password=PASSWORD&to=RECIPIENT@BLA.DE&from=me&subject=SUBJECT&content=MAILTEXT
But the actual code could be much nicer (also, it is definitely not safe – just a counter and a whitelist is added to prevent immediate abuse :))

Sample Mail Web Service client project:

Instructions:

  1. Download the wsclient-sample
  2. Download the mailwebapp-sample
  3. Download the maildatabinding

If correctly imported as Eclipse projects, the dependencies should be automatically resolved.
The mailwebapp can be deployed as a usual Web application which uses the Web Service client to call the Mail Web Service, which must be already deployed (compare the Spring Web Service post).

Posted in Mail, Maven, Spring Web Services | Tagged: , | 7 Comments »

Service Oriented Spring

Posted by ice09 on June 29, 2008

There is a downloadable zipped Eclipse project at the end of this post.

An interesting almost new subproject in the Spring environment is Spring Web Services.
In short: in finest Spring manner, DI and small little helper form a contract-first Web Service framework. The pros and cons about contract-first vs. contract-last Web Services is explained in the tutorial. From personal experience, contract-first requires more initial effort, but pays a lot afterwards. In our application, the aspect of versioning was underestimated first. By using contract-first, it was really easy to introduce detailed versioning (on basis of namespaces with the PayloadRootAnnotationMethodEndpointMapping)
Depending on the data structure which should be transferred, it may be better to choose the XPathParamAnnotationMethodEndpointAdapter
(for little payloads) over the GenericMarshallingMethodEndpointAdapter (for huge, object oriented payloads).

Excursion

When marshalling should be used, the Java classes for the XML Schema must be generated. There exist several framework to ease this process. In this sample, JAXB2 is used. There are several helper for using JAXB and automize the process of class generation.

  • Create a quickstart Maven project (using the Eclipse-Maven plugin, compare this post).
  • Overwrite the generated POM with the following
<project xmlns="http://maven.apache.org/POM/4.0.0" xmlns:xsi="http://www.w3.org/2001/XMLSchema-instance"
	xsi:schemaLocation="http://maven.apache.org/POM/4.0.0 http://maven.apache.org/maven-v4_0_0.xsd">
	<modelVersion>4.0.0</modelVersion>
	<groupId>javabinding</groupId>
	<artifactId>javabinding</artifactId>
	<packaging>jar</packaging>
	<version>0.0.1-SNAPSHOT</version>
	<name>javabinding</name>
	<url>http://maven.apache.org</url>
	<dependencies>
		<dependency>
			<groupId>junit</groupId>
			<artifactId>junit</artifactId>
			<version>3.8.1</version>
			<scope>test</scope>
		</dependency>
		<dependency>
			<groupId>javax.xml.bind</groupId>
			<artifactId>jaxb-api</artifactId>
			<version>2.0</version>
		</dependency>
	</dependencies>
	<repositories>
		<repository>
			<id>java.net</id>
			<name>java.net Maven Repository</name>
			<url>https://maven-repository.dev.java.net/nonav/repository</url>
			<layout>legacy</layout>
		</repository>
	</repositories>
	<build>
		<plugins>
			<plugin>
				<groupId>com.sun.tools.xjc.maven2</groupId>
				<artifactId>maven-jaxb-plugin</artifactId>
				<executions>
					<execution>
						<goals>
							<goal>generate</goal>
						</goals>
					</execution>
				</executions>
			</plugin>
			<plugin>
				<groupId>org.apache.maven.plugins</groupId>
				<artifactId>maven-compiler-plugin</artifactId>
				<configuration>
					<source>1.5</source>
					<target>1.5</target>
				</configuration>
			</plugin>
		</plugins>
	</build>
</project>

This POM includes several configuration and dependency information which allows for using the JAXB-Maven2-Plugin

  • You can put your XSDs into the subdirectory /src/main/resources.
  • Below is a sample XML Schema which defines a Request and Response object (this convention is necessary for automatic WSDL generation).
<?xml version="1.0" encoding="UTF-8"?>
<schema xmlns="http://www.w3.org/2001/XMLSchema" targetNamespace="http://www.example.org/WSSchema"
	xmlns:tns="http://www.example.org/WSSchema" elementFormDefault="qualified">

	<element name="SampleRequest">
		<complexType>
			<sequence>
				<element name="StringArgument" type="string"></element>
			</sequence>
		</complexType>
	</element>

	<element name="SampleResponse">
		<complexType>
			<sequence>
				<element name="StringArgument" type="string"></element>
			</sequence>
		</complexType>
	</element>
</schema>
  • Run Maven with goals clean,install.

Afterwards (and a refresh (F5) on the project), there should be a generated-resources directory in subdirectory target. The compiled classes reside in classes.

  • Add target/generated-sources/xjc to the project’s buildpath.
  • You can now include the generated, compiled classes in other projects with this dependency in the POM.
<dependency>
  <groupId>javabinding</groupId>
  <artifactId>javabinding</artifactId>
  <version>0.0.1-SNAPSHOT</version>
</dependency>

Setup

  • Following the tutorial, create the Maven project first
mvn archetype:create -DarchetypeGroupId=org.springframework.ws -DarchetypeArtifactId=spring-ws-archetype -DarchetypeVersion=1.5.2 -DgroupId=de.wssample -DartifactId=wssample
  • Afterwards, create a eclipse project from the maven resources.
cd wssample
mvn eclipse:eclipse
  • The generated eclipse project can now be imported as a Eclipse project into eclipse.
  • Remove the M2_REPO entries from the project’s build path.
  • Use the follwing POM which includes the javabinding we generated above and the jetty-plugin for fast deployments.
<?xml version="1.0" encoding="UTF-8"?>
<project xmlns="http://maven.apache.org/POM/4.0.0" xmlns:xsi="http://www.w3.org/2001/XMLSchema-instance"
         xsi:schemaLocation="http://maven.apache.org/POM/4.0.0 http://maven.apache.org/maven-v4_0_0.xsd">
    <modelVersion>4.0.0</modelVersion>
    <groupId>de.wssample</groupId>
    <artifactId>wssample</artifactId>
    <packaging>war</packaging>
    <version>1.0-SNAPSHOT</version>
    <name>wssample Spring-WS Application</name>
    <url>http://www.springframework.org/spring-ws</url>
    <build>
        <finalName>wssample</finalName>
		<plugins>
			<plugin>
				<artifactId>maven-compiler-plugin</artifactId>
				<inherited>true</inherited>
				<configuration>
					<source>1.5</source>
					<target>1.5</target>
				</configuration>
			</plugin>
			<plugin>
				<groupId>org.mortbay.jetty</groupId>
				<artifactId>maven-jetty-plugin</artifactId>
				<version>6.1.4</version>
				<configuration>
					<contextPath>/</contextPath>
					<scanIntervalSeconds>10</scanIntervalSeconds>
				</configuration>
			</plugin>
		</plugins>
	</build>
	<dependencies>
		<dependency>
			<groupId>org.springframework.ws</groupId>
			<artifactId>spring-oxm</artifactId>
			<version>1.5.2</version>
		</dependency>
		<dependency>
			<groupId>org.springframework.ws</groupId>
			<artifactId>spring-oxm-tiger</artifactId>
			<version>1.5.2</version>
		</dependency>
		<dependency>
			<groupId>org.springframework.ws</groupId>
			<artifactId>spring-ws-core</artifactId>
			<version>1.5.2</version>
		</dependency>
		<dependency>
			<groupId>org.springframework.ws</groupId>
			<artifactId>spring-ws-core-tiger</artifactId>
			<version>1.5.2</version>
		</dependency>
		<dependency>
			<groupId>javabinding</groupId>
			<artifactId>javabinding</artifactId>
			<version>0.0.1-SNAPSHOT</version>
		</dependency>
	</dependencies>
</project>
  • Put your XSD in the WEB-INF directory (in the sample above, the WSSample.xsd). This is necessary for the automatic WSDL generation.

The project structure should look like this:

The spring-ws-servlet.xml

<?xml version="1.0" encoding="UTF-8"?>
<beans xmlns="http://www.springframework.org/schema/beans" xmlns:xsi="http://www.w3.org/2001/XMLSchema-instance"
	xsi:schemaLocation="http://www.springframework.org/schema/beans http://www.springframework.org/schema/beans/spring-beans-2.0.xsd">

	<!-- Register PayloadRootAnnotationMethodEndpointMapping -->
	<bean class="org.springframework.ws.server.endpoint.mapping.PayloadRootAnnotationMethodEndpointMapping" />

	<!-- Register Endpoint -->
	<bean id="sampleEndpoint" class="de.wssample.SampleEndpoint"></bean>

	
	<!-- Configure XML Marshaller -->
	<bean class="org.springframework.ws.server.endpoint.adapter.GenericMarshallingMethodEndpointAdapter">
		<constructor-arg ref="marshaller" />
	</bean>

	<bean id="marshaller" class="org.springframework.oxm.jaxb.Jaxb2Marshaller">
		<property name="classesToBeBound">
			<list>
				<value>org.example.wsschema.SampleRequest</value>
				<value>org.example.wsschema.SampleResponse</value>
			</list>
		</property>
	</bean>

	<!-- Add automatic WSDL generation support -->
	<bean id="sample" class="org.springframework.ws.wsdl.wsdl11.DefaultWsdl11Definition">
		<property name="schema" ref="schema" />
		<property name="portTypeName" value="SampleWS" />
		<property name="locationUri" value="http://localhost:8080/samplews/" />
		<property name="targetNamespace" value="http://samplews" />
	</bean>

	<bean id="schema" class="org.springframework.xml.xsd.SimpleXsdSchema">
		<property name="xsd" value="/WEB-INF/WSSchema.xsd" />
	</bean>

</beans>

The web.xml was generated automatically, the Endpoint is as follows

package de.wssample;

import org.example.wsschema.SampleRequest;
import org.example.wsschema.SampleResponse;
import org.springframework.ws.server.endpoint.annotation.Endpoint;
import org.springframework.ws.server.endpoint.annotation.PayloadRoot;

@Endpoint
public class SampleEndpoint {
    
    @PayloadRoot(localPart = "SampleRequest", namespace = "http://www.example.org/WSSchema")
    public SampleResponse doit(SampleRequest request) {
    	SampleResponse response = new SampleResponse();
    	response.setStringArgument("response");
        return response;
    }

}
  • Run mvn with goals clean,compile,jetty:run.
  • Point the browser to the generated WSDL.
  • It is important to note that with this setup, the root context can be used and the WSDL is generated if the org.springframework.ws.wsdl.wsdl11.DefaultWsdl11Definition bean id + .wsdl is called (“sample” in this case).

You can now test the Web Service with the great tool soapUI, which generates test request data for you, let’s you modify the data and allows for creating and executing test cases.

Sampleproject: A mail web service

In the project a web services around the velocitymailsample is created which results in a mail web service.

Instructions:

  1. Download the velocitymail-sample
  2. Download the mail-databinding-sample
  3. Download the mail-service-sample

server in /velocitymail/src/main/resources/applicationContext.xml has to be set and access to a (secured) SMTP mail server is necessary to run the sample.

If correctly installed into the same eclipse workspace, the dependencies should be resolved automatically. However, to deploy the application as a WAR, you will need to mvn clean install sampledatabinding, velocitymail and mailservice in this order.

To run the web service with the jetty-maven-plugin, you can run the mailservice project with goals mvn clean install jetty:run.
Posted in Maven, Spring Web Services | Tagged: , | 2 Comments »

Groovy Spring

Posted by ice09 on June 6, 2008

Though the not really persuading (Open Source) IDE support, Groovy is my favorite script language for the Java VM. To have at least simplest support for Groovy, the Eclipse Plugin can be used. However, do not expect too much of it – it seems to be quite unstable (there are some suspicious OOME under Linux), but the Syntax Highlighting is ok. It is said that IntelliJ has the best Groovy IDE support by far, but I didn’t test it.
There exists nice Spring support for Groovy – you can transparently use Java- and Groovybeans. Combining this with Maven makes it really easy to make Spring even groovier.

Preparation

Setup

This post will focus on the Groovy usage within Spring, therefore the use case is quite simple.

  • A central Java bean has a list of several beans (ie. resembles a workflow)
  • The injected beans must implement an interface ITestStep which is very generic (Object execute(Object))
  • Implementing an interface seems the only way to inject Groovybeans transparently

Code

The Maven POM:

<?xml version="1.0" encoding="UTF-8"?>
<project>
  <modelVersion>4.0.0</modelVersion>
  <groupId>maven.groovy</groupId>
  <artifactId>maven.groovy</artifactId>
  <name>maven.groovy</name>
  <version>0.0.1-SNAPSHOT</version>
  <description/>
  <dependencies>
    <dependency>
      <groupId>org.springframework</groupId>
      <artifactId>spring</artifactId>
      <version>2.5.1</version>
    </dependency>
    <dependency>
      <groupId>groovy</groupId>
      <artifactId>groovy</artifactId>
      <version>1.1-rc-1</version>
    </dependency>
  </dependencies>
</project>

The Spring config:

<?xml version="1.0" encoding="UTF-8"?>
<beans xmlns="http://www.springframework.org/schema/beans" xmlns:xsi="http://www.w3.org/2001/XMLSchema-instance"
	xmlns:lang="http://www.springframework.org/schema/lang"
	xsi:schemaLocation="
http://www.springframework.org/schema/beans http://www.springframework.org/schema/beans/spring-beans-2.0.xsd
http://www.springframework.org/schema/lang http://www.springframework.org/schema/lang/spring-lang-2.0.xsd">

	<lang:groovy id="groovyTestStep"
		script-source="classpath:SimpleGroovyClass.groovy">
	</lang:groovy>

	<bean id="testFlow" class="de.groovysample.JavaGroovyTest">
<property name="testSteps">
	<list>
				<ref bean="groovyTestStep" />
			</list>
		</property>
	</bean>

</beans>

The Beans (ie. workflowsteps) interface:

package de.groovysample;

public interface ITestStep {

	Object execute(Object arg);

}

The Groovybean (NOTE: this gose to src/main/resources as SimpleGroovyClass.groovy):

import de.groovysample.ITestStep

class SimpleGroovyClass implements ITestStep {

	Object execute(Object arg) {
		println "groovy called with arg: $arg"
	}

}

The Workflow Javaclass the Groovybean is injected to:

package de.groovysample;

import java.util.ArrayList;
import java.util.List;

public class JavaGroovyTest {

	private List<ITestStep> testSteps = new ArrayList<ITestStep>();

	public void setTestSteps(List<ITestStep> testSteps) {
		this.testSteps = testSteps;
	}

	public Object execute(Object arg) {
		for (ITestStep testStep : testSteps) {
			testStep.execute(arg);
		}
		return null;
	}

}

and the Main class:

package de.groovysample;

import org.springframework.context.ApplicationContext;
import org.springframework.context.support.ClassPathXmlApplicationContext;

public class Main {

	public static void main(String[] args) {
		ApplicationContext app = new ClassPathXmlApplicationContext("beans.xml");
		JavaGroovyTest test = (JavaGroovyTest) app.getBean("testFlow");
		System.out.println(test.execute("called from Java"));
	}

}

Resulting in the overall project setup

That’s all, this way you can easily combine Java and Groovy beans (which must implement an interface).

Posted in Groovy, Maven | Tagged: , | 1 Comment »