H Bridge
[Taken from: http://www.mcmanis.com/chuck/robotics/tutorial/h-bridge/index.html]
Basic Theory

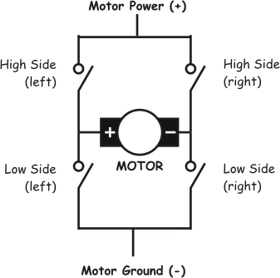
Let's start with the name, H-bridge. Sometimes called a "full bridge" the H-bridge is so named because it has four switching elements at the "corners" of the H and the motor forms the cross bar. The basic bridge is shown in the figure to the right.
The key fact to note is that there are, in theory, four switching elements within the bridge. These four elements are often called, high side left, high side right, low side right, and low side left (when traversing in clockwise order).
The switches are turned on in pairs, either high left and lower right, or lower left and high right, but never both switches on the same "side" of the bridge. If both switches on one side of a bridge are turned on it creates a short circuit between the battery plus and battery minus terminals. If the bridge is sufficiently powerful it will absorb that load and your batteries will simply drain quickly. Usually however the switches in question melt.

To power the motor, you turn on two switches that are diagonally opposed. In the picture to the right, imagine that the high side left and low side right switches are turned on. The current flow is shown in green.
The current flows and the motor begins to turn in a "positive" direction. What happens if you turn on the high side right and low side left switches? Current flows the other direction through the motor and the motor turns in the opposite direction.
Pretty simple stuff right? Actually it is just that simple, the tricky part comes in when you decide what to use for switches. Anything that can carry a current will work, from four SPST switches, one DPDT switch, relays, transistors, to enhancement mode power MOSFETs.
One more topic in the basic theory section, quadrants. If each switch can be controlled independently then you can do some interesting things with the bridge, some folks call such a bridge a "four quadrant device". If you built it out of a single DPDT relay, you can really only control forward or reverse. You can build a small truth table that tells you for each of the switch's states, what the bridge will do. As each switch has one of two states, and there are four switches, there are 16 possible states. However, since any state that turns both switches on one side on is "bad" (smoke issues forth :P), there are in fact only four useful states (the four quadrants) where the transistors are turned on.
| High Side Left | High Side Right | Low Side Left | Low Side Right | Quadrant Description |
|---|---|---|---|---|
| On | Off | Off | On | Forward Running |
| Off | On | On | Off | Backward Running |
| On | On | Off | Off | Braking |
| Off | Off | On | On | Braking |
The last two rows describe a maneuver where you "short circuit" the motor which causes the motors generator effect to work against itself. The turning motor generates a voltage which tries to force the motor to turn the opposite direction. This causes the motor to rapidly stop spinning and is called "braking" on a lot of H-bridge designs.
Of course there is also the state where all the transistors are turned off. In this case the motor coasts freely if it was spinning and does nothing if it was doing nothing.
Implementation
- Using Relays
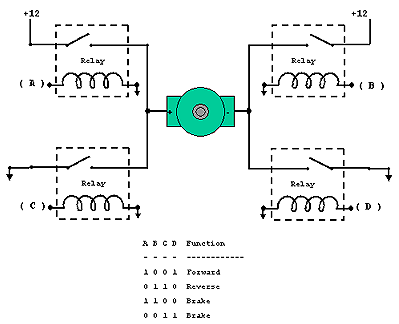
A simple implementation of a H Bridge using four SPST relays is shown. Terminal A is High Side Left, Terminal B is High Side Right, Terminal C is Low Side Left and Terminal D is Low Side Right. The logic followed is according to the table above.
Warning: Never turn on A and C or B and D at the same time. This will lead to a short circuit of the battery and will lead to failure of the relays due to the large current.

- Using Transistors
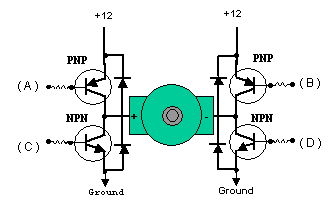
We can better control our motor by using transistors or Field Effect Transistors (FETs). Most of what we have discussed about the relays H-Bridge is true of these circuits. See the diagram showing how they are connected. You should add diodes across the transistors to catch the back voltage that is generated by the motor's coil when the power is switched on and off. This flyback voltage can be many times higher than the supply voltage!
For information on building a H-Bridge using Transistors, have a look here.
Warning: If you don't use diodes, you could burn out your transistors. Also the same warning as in the relay case. Don't turn on A and C or B and D at the same time.
Transistors, being semiconductor devices, will have some resistance, which causes them to get hot when conducting much current. This is called not being able to sink or source very much power, i.e. not able to provide the required current from ground or from plus voltage. Mosfets are much more efficient, they can provide much more current and not get as hot. They usually have the flyback diodes built in so you don't need the diodes anymore. This helps guard against flyback voltage frying your ICs. To use Mosfets in an H-Bridge, you need P-Channel Mosfets on top because they can "source" power, and N-Channel Mosfets on the bottom because then can "sink" power. It is important that the four quadrants of the H-Bridge circuits be turned on and off properly. When there is a path between the positive and ground side of the H-Bridge, other than through the motor, a condition exists called "shoot through". This is basically a direct short of the power supply and can cause semiconductors to become ballistic, in circuits with large currents flowing. There are H-bridge chips available that are much easier, and safer, to use than designing your own H-Bridge circuit.

- Using H-Bridge Devices
The L293 has 2 H-Bridges (actually 4 Half H-Bridges), can provide about 1 amp to each and occasional peak loads to 2 amps.
The L298 has 2 h-bridges on board, can handle 1amp and peak current draws to about 3amps. The LMD18200 has one h-bridge on board, can handle about 2 or 3 amps and can handle a peak of about 6 amps. There are several more commercially designed H-Bridge chips as well.
I'll explain how to use these ICs taking the example of L293.
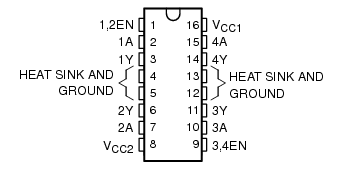
The L293 contains 4 half H-bridges labelled 1, 2, 3 and 4 in the pin diagram, which can be used in pairs as two full H-Bridges. In this IC there are two different power supplies (Vcc1 and Vcc2). Vcc1 is for logic input circuit while Vcc2 is supply for the output circuit. This means that you should apply about 5V to Vcc1 and whatever voltage required by the motor (upto 36V max for this IC) to Vcc2. Each Half H-Bridge has an individual Ground. So you must ground the terminal corresponding to the Half H-Bridge you want to use or else you can also just ground all the 4 terminals. Each Half H-Bridge has an Input (A) and output (Y). Also there are enable pins to turn on the Half H-Bridges. (if 1,2EN (Pin1) is given +5V, then the 1 and 2 Half H-Bridges are turned on. If Pin1 is Ground, then the 1 and 2 Half H-Bridges are disabled. Similar for 3,4EN).

Once a Half H-bridge is enabled, it truth table is as follows:
So you just give a High level when you want to turn the Half H-Bridge on and Low level when you want to turn it off. When the Half H-Bridge is on, the voltage at the output is equal to Vcc2. If you want to make a Full H-Bridge, you connect the motor (or the load) between the outputs of two Half H-Bridges and the inputs will be the two inputs of the Half H-Bridges. Suppose we have connected Half H-Bridges 1 and 2 to form a Full H-Bridge. Now the truth table is as follows:INPUT
AOUTPUT
YL L H H INPUT
1AINPUT
2AOUTPUT
1YOUTPUT
2YDescription L L L L Braking (both terminals of motor are Gnd) L H L H Forward Running H L H L Backward Running H H H H Braking (both terminals of motor at Vcc2)
Those are the basics about motors and H-Bridges! Hope this helps.