Dont know what the Kmod v0.1 is all about?, check the Kmod v0.1 Presentation post.


I’m not responsible for any damage you or anyone else inflicts on your kaossilator.
Skills you will need to perform the Kmod v0.1 :
- Basic Electronics knowledge or the will to learn them.
- Know how to read Schematics.
- Basic Drilling/Sanding skills/experience.
- Basic Soldering skills.
- Basic Patience and Care skills.
Do you meet these requeriments?, if you do lets get the modding going, if you dont you could either learn these basic skills by building/soldering a beginers electronics proyect like a led toy or something like that.
Equipment you will need :
- A Soldering iron : One with temperature control and a stand is best. A conical or small ‘screwdriver’ tip is good, almost all irons come with one of these. A low quality (ahem, $10 model from radioshack) iron may cause more problems than its worth!. Do not use a “ColdHeat” soldering iron, they are not suitable for delicate electronics work and can damage the electronics.
- ‘Handy Hands’ with Magnifying Glass : Not absolutely necessary but will make things go much much faster.
- Multimeter/Oscilloscope : A meter is helpful to check voltages and continuity.
- Solder : rosin core 60/40 is fine.
Don’t have a basic electronics kit?, check Ladyada’s awesome Electronic tools kit list.
- A Drill (hand or bench).
- A dremel is really nice but not obligatory.
- Correct size METAL WORK Drill bits.
- Sanding Bands for the drill/dremel.
- A black marker, always useful.
Materials you’ll need:
- (Two) 6pin mini-din “ps2” Female connectors, Panel mount (and screws for this probably).
- (Two) 6pin mini-din “ps2” Male connectors, floating/cable mount.
- (about 12 foot) Thin hook up wire, 26 AWG is fine. The more colors, the better.
- (one) 50 kohm 1/4watt resistor, 5% tolerance is fine.
- (one per button) SPST push/toggle buttons, Panel mount.
- (one per button combo) DPST or DPDT buttons, Panel mount.
- (one) SPST toggle button/switch for the Sustain button, Panel mount.
- Cleaning Isopropilic alcohol and heatswrink tube is not really nedeed but its always nice.
Modding the Kaossilator case:
First thing you have to do is get the female minidin connector into the kaossilator, so you’ll have to drill a hole in the case and get it to fit correctly.
The best way to do this is to use a marker to trace a line where the connector will go, mark where the screw and main holes will be and then use a hammer and a nail to make a little notch in these marks, so the drill bit will start in this notch and you won’t get holes and scratches everywhere.
Then you just have to make room and cleareance for the mini-din connector to fit inside the plastic case.
You can see how I did mine in this video.
Electronics stuff: 
Next in line is the Electronics connetions/soldering work.
Before you do any soldering in the kaossilator disconnect the X/Y pad from the main PCB (just pull the flat ribbon cable gently, notice the direction of the connection face to properly connect it again) to avoid ribbon cable/pad disasters
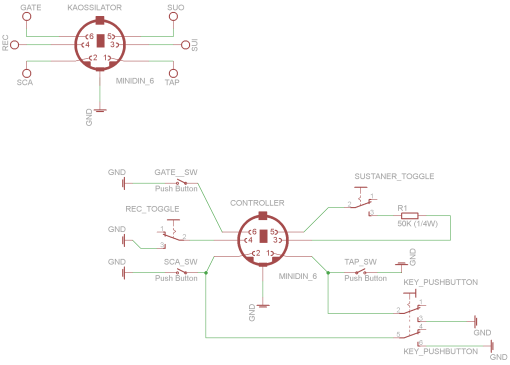
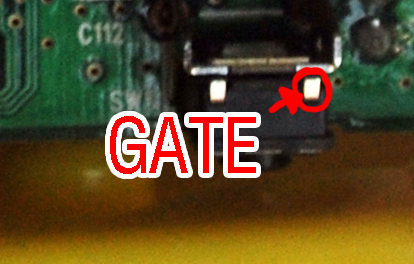
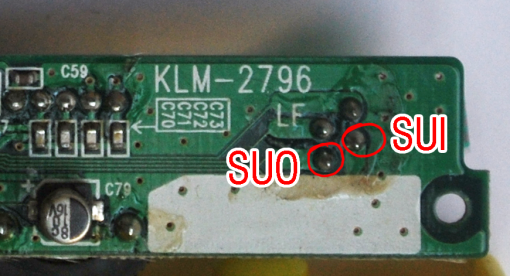
This is easy, just connect the Mini Din to the correct places in the kaossilator using the hook up wire, you just have to be careful not to make solder bridges or to overheat the PCB/Parts while soldering (10 seconds of direct tip contact is too much). Also make sure there’s enough loose wire to move the aluminum plate around and enough space inside the Kaossilator to tuck the wires in nicely, I had to cut the unused RCA-in PCB part to make room for this (don’t worry, those are useless, so no harm done)
Then you have to make the control box where the buttons will be placed, wire the switches/buttons/toggles together and connect them to the other female Mini din connector.
And at last, you have to make a Male / Male 6pin Minidin connector to connect the control box and the kaosilator.
Watch how i did it in this video.
Here are the schematic and the soldering diagrams. (click to enlarge)
The Finale :
Ok, so just wrap everything up, connect the Kaosilator with the Control Box and enjoy!.
If you completed this mod, please take some photos and share them with me and the community, i’ll be putting a Gallery up soon!


February 21, 2009 at 6:44 pm
Great job on the mod it looks great. Its similar to my mod in the way you take the buttons to a separate unit. I really like the sustainer mod. For mine I took both contacts of each switch to separate switches. I’m only in high school and don’t know that much about circuit design. Its easy to undo and redo it your way though. I can’t wait to see what you do next. I’ll have some pics and maybe a video up later tonight.
March 2, 2009 at 12:35 pm
Thanks so much for all your posts, I’m getting my Korg tonight! 😀
Keep up the amazing work!
July 19, 2009 at 5:26 pm
I dig the mod, so I implemented it. 🙂
Posted a video response with a quick demo, but here are some pics for your gallery:
July 19, 2009 at 10:43 pm
Congrats!!!. I really liked how you made your db9 switch!, pretty ingenious
October 15, 2009 at 7:46 am
Hey! Did you find a possibility to mod the kaossilator for syncing?
Greets
December 11, 2009 at 12:47 am
Hello,
Is the kaossilator’s touchpad a 4 wire resistive touch panel? Do you know the range of resistance across the panel? If it’s 200-900 ohms like most other touch panels it would be possible to swap the kaossilator’s touch panel for any size 4 wire resistive touch panel. This would make it easier to hit individual notes.
Can you tell me any other information about the touch panel such as markings or part numbers?
Mike
January 15, 2010 at 10:48 pm
[…] […]
January 31, 2010 at 7:28 pm
Hi HOw did you make the little box with the buttons on it. Can I buy that somewhere?
March 29, 2010 at 8:38 am
You are GOD…………………….
…………………………….
……….I just love it when everything I wish for happens,
and are you going to hack the Kaossilator pro??????????????????
……..Thnx
April 26, 2010 at 1:03 pm
Nice work ,did my mod this weekend
with DB9, looks pro!
Thanx
November 1, 2010 at 3:49 pm
hello
i will buy my kaossilator next week. i will do some Mods too.
i try to change the LEDs and will have a look at the touchpanel and will have a look for an alternative one. i will post it on facebook or on a special website. if someone is interessted in this. just have a look on this site … i will post the adress. thx
December 26, 2010 at 8:43 am
Got my Kaosilator Pro for Xmas but not going to mod it just yet – knowing my electronic skills it would be dead in a flash!
February 21, 2011 at 2:04 pm
You and James Haskin inspired me to mod my Kaossilator and build my own Radio-Shack-based external control box. The pictures are here.
Thanks!
August 24, 2011 at 9:25 am
electronic door lock lock security lock…
[DIY] Kmod V0.1 Instructions « Kaossilator!…
April 2, 2012 at 5:22 am
Hi
I am trying to mod my kaossilator these days but I am having difficulties with the sustain switch feature (mounted directly without the control box):
I have added the wires to the SUI and SUO hookup points and when they are connected the kaossilator doesn’t sustain but produces the lower left corner note of the touchpad, when a 47k resistor in put between them nothing happens. What am I missing?
Chris
June 21, 2013 at 10:46 am
Effective keywords research is crucial for online
marketing success. I Advise you checck this out article marketing traffic.
Internet marketing has indeed become one of the major ways of making oneself known to the whole world.
January 14, 2015 at 11:22 pm
Hello webmaster do you need unlimited articles for your blog ?
What if you could copy content from other sites, make it unique and publish on your site – i know the right tool for you, just search in google:
loimqua’s article tool
September 23, 2018 at 8:38 pm
Thank you very much for this excellent site – a great resource for the korg modding community. I found when adding a sustain switch to my kaossilator that 50k did not work and I had to use a slightly smaller value. 47k seemed to work, but I ended up using 44k to be sure.
August 10, 2019 at 1:15 pm
Still usefull. Thanks for the inspiration. Only used the rec switch, but left the remain wires for future mods. Thank you so much. My rec button was broken so i had to do something lol. 😉
Cheers. I Wish there was new things about ko-1