
Folks, this is probably my last post before I leave for India. It's a 3 month vacation and I am really not sure how much I can post before I come back. I do have a collection of recipes, that I experimented with past few months and hadn't gotten around to posting. As and when time permits, I will try to post them. However, no promises!!! In the meantime, I leave you with another treat for the sweet tooth. Bangla Special..shondesh!!!
The whole trick to this mithai, or for that matter any bangla mithai, is the chenna/paneer. Whats the difference between chenna and paneer?..From what I understand, the curds from the milk is the chenna and when its drained completely dry, its paneer. But, I might be wrong. Anyone who knows better, may please feel free to correct me. I would really like to know. I really should be packing for my trip and not writing a post. Which is why, I am going to explain the whole process in pictures.
For the chenna, curdle the milk first.
6 cups whole milk
2 cups dahi, beaten till smooth
You know the process. Bring milk to a boil. Remove from flame and stir in the dahi ,a little at a time, till the curds separate. If you need more dahi, add more. It should look like below.

Using dahi instead of citric acid/vinegar results in softer curds. Also, the curds won't have the sour taste of the acid/vinegar, which is really important for a mithai. Be careful that you don't burn the milk and please don't scrape the bottom while you stir the milk. The brown bits you see in the photo above result from the same mistake. I had a tough time removing that, once the chenna was formed. Lesson Number 1 learnt….
Next,strain it in a muslin cloth. Once all the whey has drained, pull together all four corners of the cloth and twist it. Keep twisting till the chenna forms a ball of sorts. The twisting will also remove any additional whey left in the curd. Tie the cloth with the chenna ball to the tap in your sink, or generally, any place where the chenna can be suspended at a height. Tying it to the tap just means that I don't have to clean up any remaining whey, that is draining away. Like so.

Yep, the brown spots still there. You don't have to hang it for long, just till the whey stops being a steady drip. Remove the chenna from the bag. This is what you will end up with.

Yeah, yeah, I know. the brown spots. Chenna is ready. Now, we can move on to making the sandesh.
Recipe
1 1/4 cups chenna
1/4 cup powdered sugar
Now, take the chenna in a wide bowl. Add the sugar to it and start kneading it. Knead till very, very, very smooth. It took me 5 minutes for this amount of chenna (That is, after I painstakingly removed all the brown spots). But the time is so dependent on kneading style. All I can say is that, the chenna loses its grainy texture and becomes a soft, smooth dough. When you form a ball with it, it will not have any cracks.

Before Kneading

After Kneading
Add flavorings. I added cardamom and saffron(nuke 1 tbsp of milk , add saffron and then add it to the chenna) You can add rose essence and a drop of pink color, which is the classic way of making sandesh.You can call that rose sandesh. 🙂
Cook on a very low flame in a kadhai stirring continuously with a flat wooden spoon. Remove the kadhai from the flame at regular intervals so as not to overheat the sandesh. If it does over heat, it will become grainy and recurdle. Not good. And, no, that was not lesson number 2. The sandesh is ready when it leaves the sides of the kadhai and is neither too dry nor too moist. This doesn't take long, as you have already kneaded it. Just about 2-3 minutes. Some recipes that I researched on the internet, did not cook the chenna after kneading it. So you can completely skip this step. But, I like the flavor, after it is sauteed, better. So, I did.
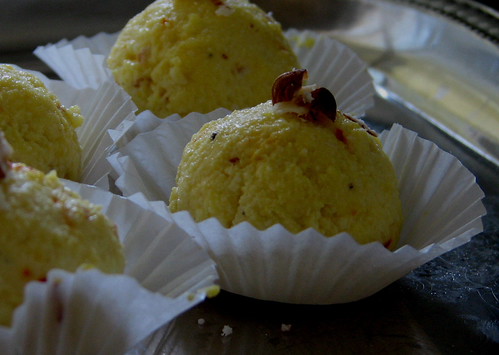
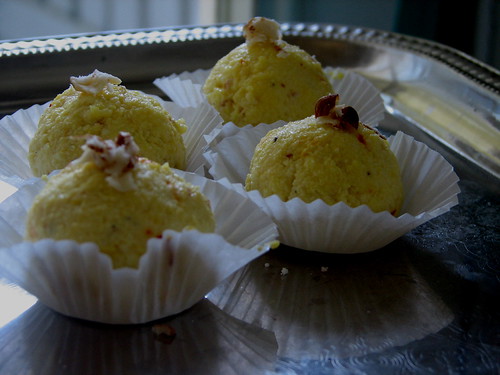
It should have the consistency of very soft dough. The sandesh should be used immediately for making various shapes and garnishes. This, my friends, is lesson number 2. I didn't shape it immediately and hence, did not get smooth, uncracked balls. Here's where the 'asbestos hands' thingy comes handy. But, it tasted just as good. So, other then being a visual atrocity, no harm done. Well, lesson learnt. There is always a next time….
Anyway, top with chopped almonds or pistachios and chill. Ready to eat in a hour.
Thats it, Friends. Have fun while I am gone and don't do anything I wouldn't do ;)…

Lessons noted….Nice Work!! Enjoy your vacation!!!:-) 🙂
Tanuja
WOW…the pics look great and my mouth is watering..I think you got the chenna/paneer definition right, in my opinion.
Enjoy your vacation!
Hey the sandesh looks delicious. I have been trying various kinds of sweets for the past couple of weeks. And this goes to my to do list 😉 But before this i gotta try malai modak, i have some ricotta cheese left from the rasmalai i made. But i dont have Saffron 😦 but iam sure to make them this weekend. I was not able to make mangalore buns last time, the bananas turned pitch black by the time i could make the buns.
ANd VEE use the whey for making rasgullas, they are better than yogurt or lemon juice. They make the rasgullas really soft and moist.
Enjoy your vacation 🙂
Hi,
Kesar sandesh yummy.i added this into my booklist.
Vineela
wow, yummy.nice recipe, i am going to try this out……saved under my fav.
We will behave ourselves while you are away, M’am Vee. 🙂
Please do post during your vacation. I know you will. Three months is too long. I have got so addicted to it now that I’ll surely have withdrawal symptoms if I went on such a long blogging break. Enjoy your vacation all the same! But again, three months???? Some people can be soooo shameless. That’s a quarter of a year, my dear. Ok, go on, make us jealous.
Coming back to the Shondesh, great pics, good write-up and fabulous presentation. But hey, do NOT waste the paneer/chenna water. It’s bursting with nutrition. If nothing else, just use it to make dough or to thicken dals, soups and what not. If stored covered in the refrigerator, it keeps fresh for about a month.
Happy Holidays!
A three months trip to India!!! I am feeling J ;). Have a great time at home.
I loved your sandesh and step by step explanation.
Sondesh! Oh dearie…this was my lunch tiffin as a child when I was in Calcutta. Noone gets the bangla mithai right in Bombay. Its in a class of it’s own. And…
THREE MONTHS??????
It is so so unfair 😦
Anyway have fun, do write about your trip when you can (where are you going?) and come back. We will miss ya
Looong vacation for u vee.
I am so very green with envy..
Have great fun..
And what lovely pictures of sondesh.
Will try for sure..
Vee: Lovely recipe and pics..Love the way of your presentation, looks good 🙂
.. 3 months.. I envy you..have fun..enjoy your vacation ..and most importantly “don’t do anything we wouldn’t do ;)” just kidding 😛
Hi Vee
Thank you for adding me to your blog. Very nice of you. I love the fotos in ur blog. Keep going 🙂
Never heard of this but I bet itz yummy 🙂
This is an amazing blog. Great pics, great write up. Too bad you are going away on vacation, but hey have a great time. Hope you find tons of things to write about when you get back.
Have a great time in India and come back soon, Vee.
Have fun in India….I wish I was going too…and do bring back lots of traditional recipes with you!!
Hi,
Very nice post. Have a nice time in India. See u back soon.
Hi Like your blog! See you soon!
Hw come Gujaratis too claim sondesh as theirs?..I found it being referred as a traditional gujju sweet…hmmm in this country tradition and culture do overlap…bengali babu and gujju bhabhi might have jointly invented it!!
The sandesh makes me drool,I too thought sandesh was a bengali sweet especially after watching the movie Devdas!:):)
hi Vee I’m writing for the first time ’cause I tried your recipe of sandesh n it turned out perfect.
Both my son n husband were bowled over that sweet .I’m sure going to try this in front of my friends.thank you
Puja
explained really well, good that u posted pics too. i searched thr lots of recipes, but this was the best. u have given it both ways without heating and with heating. Thank u soo much.
You are welcome, Mukta. Enjoy the sandhesh. It is good either way. The one without heating is more subtle than the one which is heated. Personally, I like the heated one and I guess, that means that there is nothing subtle about my taste 😀
Hi dear,
I loved ur receipe….its soooo easy & yummy..
will try soon
🙂
I love sandesh, I’ll definelty try this when time permits.
Finally I found a picture explanation of the recipe. Thank you so much. Need some help on this:
What is muslin cloth? and where can you get that? Also, by ‘curds’ do you mean ‘plain yogurt’?
Hmmm,Youcould try cheese cloth or a even coffee filter for straining. Though,I would recommend the cloth(muslin/cheese)instead of coffee filter as youcould hang it covered, thus keeping it moist. Curds would be plain yogurt, the one with ‘active cultures’ kind.
nice pic, kesar sandesh looks delicious
Hey can i know where do u get kesar here in USA?… i cudnt find in the nearby indian store…:( any other place? any idea?
hey u do visit my blog and give me ur comments..:)
I learnt the lesson today. I think I over cooked. It became grainy and chewy. I should have seen this post before I started doing sandhesh. Thanks for all the tips. I will remember every line of this post when I try it next time. Thanks for sharing your experience.
Kesar sandesh is really yummy and mouthwatering. Beautiful yellow colour and excellent garnishing. Thanks for this easy and yummy bengali sweet recipe.
Sandesh is new to me. But looks great and really mouthwatering. Thank you very much for this nice recipe.
yummy yummy!!!
Could you parcel some of it to me please :-).
Everyone is a fan of bengali mithai and rightly so.
Good work. I saw this very late, have just come across ur blog.
Thanks Vee – my nephew married a lovely Bengali girl just recently and I will make sandesh for her when they visit next!