Using IIS 7 Output Caching Capabilities
One of the great features of IIS 7 server is output caching. If you are performance enthusiast you have for sure taken advantage of caching in one way or another. If not this will be a chance for you to find out how easy it is to enable output caching for the entire server, single web site or on a more granular level. Just a few settings in the applicationHost.config or your application’s web.config files are what you need. If you do not feel at ease editing some configuration files you could use the IIS Manager as well.
Configuration files
You could configure your server by editing the applicationHost.config file located at the following path – %windir%\system32\inetsrv\config. It is the main file for the IIS 7 server that defines all settings for all sites, applications, application pools, etc. If you choose to edit this file you should be aware that the settings you enter will be applied globally. If you only want a single site or application to be affected you could edit its web.config file. Regardless of which file you edit the syntax is the same.
There are two ways for invalidating the cache – using a timeout period (CacheForTimePeriod) or detecting a change in the resource file (CacheUntilChange). Below is a sample configuration that uses both ways for caching:
<configuration>
...
  <system.webServer>
    <caching enabled="true" enableKernelCache="true">
      <profiles>
        <add extension=".png" policy="CacheUntilChange" />
        <add extension=".gif" policy="CacheForTimePeriod" duration="12:00:00" />
      </profiles>
    </caching>
  </system.webServer>
</configuration>
You could tell the IIS 7 server to cache a resource based on different criteria. In order to do this use the following attributes:
– varyByQueryString – caches different versions based on the query string
– varyByHeaders – caches different versions based on the request headers
You should be aware that when you are using CacheForTimePeriod the browser won’t make a request to the server. This does not apply to CacheUntilChange – a request is made but the response might not be full, e.g. the file hasn’t changed since the last request and the server returns a 304 status code indicating that the file must be loaded from the browser’s cache.
If you want to take advantage of kernel mode caching you could just replace the policy attribute with the kernelCachePolicy one. There are some limitations of the kernel mode output caching though – varyByHeaders is not supported.
If you have a scenario where you need greater control over what gets cached and customize it to your needs you might consider applying policies on a per folder basis. Here is a sample configuration that sets up the output caching for a single folder:
<configuration>
...
  <location path="Images">
    <system.webServer>
      <staticContent>
        <clientCache cacheControlMode="UseMaxAge" cacheControlMaxAge="12:00:00"/>
      </staticContent>
    </system.webServer>
  </location>
</configuration>
Every file located under the Images folder would be cached on the client’s browser for 12 hours. If you are sure that some of your resources will not change on a regular basis you could set up a greater time period, i.e. 1 year.
GUI Configuration
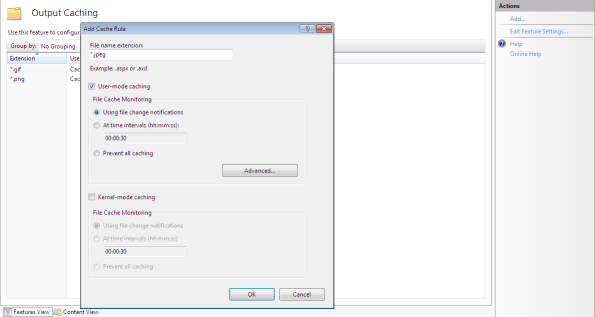
You could set up these policies from inside IIS Manager as well with almost no effort on your side. To configure the output caching globally for a given file extension select the Output Caching feature and click Add… You will be presented with the following dialog:
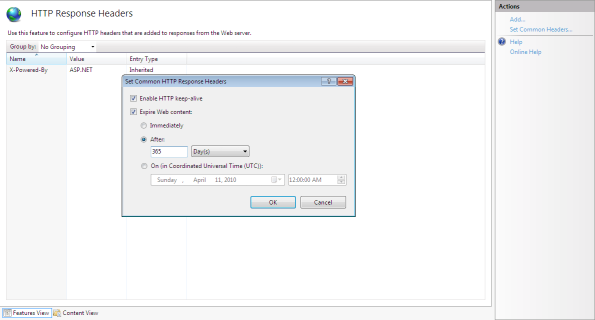
There is another feature that you could use to configure the response headers and control the output caching. Choose HTTP Response Headers and click on the Set Common Headers… action link and you will see the following dialog:
These headers could be applied on a per folder basis. If you need to add additional response headers you could use the Add… action link button as well.
As you can see all the settings that you could configure from IIS Manager could be edited by hand in your configuration file.
Summary
In this blog post I showed you how you can set up a cache policy for your web application both through web.config and IIS Manager. Different kinds of applications could improve their performance significantly from the built-in output caching capabilities in IIS7. It is really easy to set them up and there is no excuse for anyone not taking advantage of them. Of course you could implement your own custom caching policies that do not rely on IIS7 – just implement the IHttpHandler interface which gives you an opportunity to intercept the request and perform whatever suits your scenario and return the necessary response.


nraykov.wordpress.com’s done it once more. Amazing writing!
It’s hard to find educated people for this topic, but you seem like you know what you’re talking about!
Thanks
I blog quite often and I really appreciate your content.
Your article has really peaked my interest. I’m going to
bookmark your blog and keep checking for new information about once per
week. I subscribed to your RSS feed as well.