 I have admired Ruth Lee’s work for some time. I bought her first book, this one…
 ..back in 1990 while taking a City & Guilds in Machine Knitting. A fabulous book that I have referred to time and time again.
The new book has, amongst other things, some interesting pieces of work using a combination of Tyvek and machine knitted wire.
I then read an interview with Ruth in the current issue of Workshop on the Web where she goes through some of the secrets of how she constructed the distressed down-at-heel shoes which feature in her ‘Hand Me Downs’ installation using Tyvek, machine knitted wire and machine stitching.
All really good stuff and well worth reading.
Although I had the Tyvek film, which melts very easily, as opposed to the sheets, I still decided to have a go at combining it with machine knitted wire.
I used Distress Inks to cover some Tyvek I had painted previously with acrylic paint.

 And I used the same inks to cover a white piece of Tyvek and a piece of Lutrador.
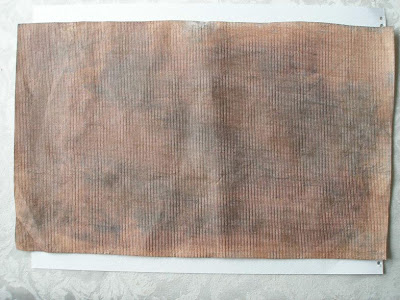
With the Tyvek I splattered a few drops of the ink over the surface before dipping the brush in water and spreading it. I then took a piece of kitchen towel and rubbed at the ink so that I was left with light and dark patches.
Tyvek
 Lutradur
 This is how the kitchen towel looked when I had finished, destined for the bin at first, but then I decided to save it and use elsewhere.
  I used 0.20mm gauge wire with a metallic thread. The first one, copper coloured is knitted with a Maderia metallic thread.
 This one, light gold, has one of those really cheap metallic threads knitted with it. In the photo you can see where the thread has broken and I have knitted with just the wire. Dark area is with thread, light area is without.
  In this sample the layers, from bottom to top, are Lutradur, book page, machine knitted wire, Tyvek. The Tyvek was cut into wide strips and laid on top of each other.
Using a polyester thread I machine stitched on top.
 I then used the iron to melt the Tyvek. Notice how the horizontal strip appears darker than the vertical strips. Does anyone know why?
 I used the heat gun on the reverse to melt the Lutradur.
 This next sample is machine knitted wire sandwiched between Lutrador and Tyvek, machine stitched over the top and melted with the heat gun.
 Here I have used one of the kitchen towels, once again sandwiched between Lutradur and Tyvek with machine stitching to hold the layers in place.

 In this sample I have used Tyvek previously painted with acrylic paints as the base layer with machine knitted wire in the centre and an ink painted piece on top. Machine stitching with a polyester thread holds the layers in place.
 Once again, the mix as above, but this time the base layer is a thicker Tyvek, easier to work with I think.

 I wondered if Fibre in-Form foil would fuse to any of these surfaces without either an adhesive or melting the surface even further. I used a warm iron and found that the film did melt a little more but I think the sheets would withstand a bit extra heat. I also believe that I would have got a better result if I had used either the edge of the iron or the Clover mini iron.
These are the samples I foiled. The foil doesn't show up very well in these photos but there is a reasonable amount on there.

 And then I wondered if maybe I could fuse the foil onto the surface while melting the Tyvek at the same time. And yes, it works. I seem to have been a bit heavy handed but once again this is the film – I think it would be better with the thicker sheets. This sample has a layer of Tyvek on each side with machine knitted wire in the middle. Machine stitching with polyester thread holds the layers in place.
 I also decided to try Xpandaprint on top of Tyvek, melting one and expanding the other at the same time.
I placed a piece of previously painted Tyvek on to cotton velvet that had been coloured with Walnut Ink. A rayon thread was used for some freehand machine embroidery and Xpandaprint was dabbed on the surface.  Once dry the surface was subjected to the heat gun.

 The whole piece was then painted with household emulsion paint.
 Painted with blue Quink writing ink.

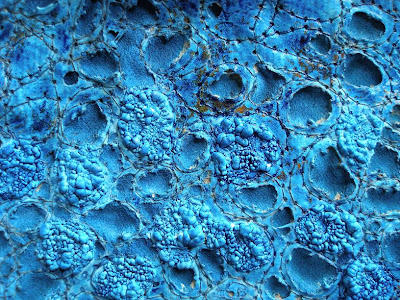 Bleach was then lightly brushed on. This photo was taken just a few seconds after the bleach had been added.
 And this one and the close up below were taken a couple of minutes later.

 And finally, these photos were all taken some time later once the bleach had dried.


 Definitely worth pursuing, but now I’m all out of Tyvek - so watch this space :)
 Once dry the surface was subjected to the heat gun.
 The whole piece was then painted with household emulsion paint.
 Painted with blue Quink writing ink.
 Bleach was then lightly brushed on. This photo was taken just a few seconds after the bleach had been added.
 And this one and the close up below were taken a couple of minutes later.
 And finally, these photos were all taken some time later once the bleach had dried.


 Definitely worth pursuing, but now I’m all out of Tyvek - so watch this space :)
I ought to add at this point that if you are melting Tyvek and/or Lutradur please make sure you take all sensible precautions with regards to health and safety.


