How to use Flash Builder 4 DB introspector with PHP
Content
The second beta of Flash builder 4 is now available on Adobe labs. This new beta comes with the original goodness of the earlier versions and addition of many requested features. To see what’s new with this beta click here. Release notes can be viewed at http://labs.adobe.com/wiki/index.php/Flash_Builder_4:Release_Notes One of the many features introduced in this beta is the Database introspector. It can be a drag sometimes to write basic read and update methods and classes for each and every table in a database. This is where the Database introspector of Flash builder 4 will become very handy. A developer can use this feature to generate a sample code in PHP or ColdFusion for basic CRUD operations simply by pointing to the database from Flash builder project. This post contains details for generating PHP code. Here is a step by step for how to invoke the database introspector
Create the database and tables
I am using the following commands in mysql to create two tables, User, User_profile in the database “testdb”.
DROP TABLE IF EXISTS `testdb`.`user`;

CREATE TABLE  `testdb`.`user` (

`ID` int(10) unsigned NOT NULL auto_increment,

`FIRST_NAME` varchar(100) default NULL,

`LAST_NAME` varchar(100) default NULL,

`DISPLAY_NAME` varchar(250) default NULL,

`COMPANY_ID` varchar(100) default NULL,

`LOGIN_ID` varchar(250) NOT NULL default '',

`LOGIN_PASSWORD` varchar(45) NOT NULL default '',

`DEPARTMENT` varchar(100) default NULL,

PRIMARY KEY  (`ID`)

) ENGINE=InnoDB AUTO_INCREMENT=6 DEFAULT CHARSET=utf8;
DROP TABLE IF EXISTS `testdb`.`user_profile`;

CREATE TABLE  `testdb`.`user_profile` (

`ID` int(10) unsigned NOT NULL auto_increment,

`USER_ID` int(10) unsigned NOT NULL default '0',

`BLOG_URL` varchar(300) default NULL,

`DESCRIPTION` varchar(300) default NULL,

`TWITTER_URL` varchar(300) default NULL,

PRIMARY KEY  (`ID`),

CONSTRAINT `FK_COURSE_USAGE_USER` FOREIGN KEY (`USER_ID`) REFERENCES `user` (`ID`)

) ENGINE=InnoDB AUTO_INCREMENT=32 DEFAULT CHARSET=utf8;
Execute these commands in Mysql and you will have your tables. The next step obviously is to create client code. You start by creating a flex project.
Create the flex project
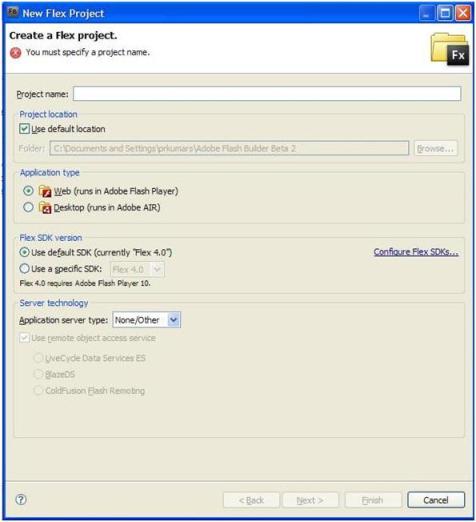
Start Flash builder 4. Go to File menu select New and then select Flex Project. A window appears with options to fill up the project details. 
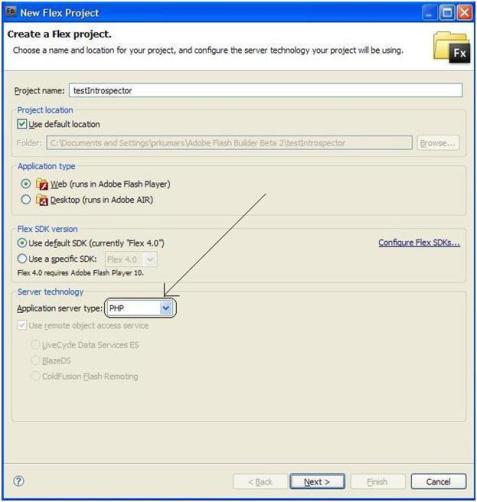
- Give an appropriate name to the project (here I gave it the name testIntrospector)
- Change the application server type to PHP.
- Let other options keep their default value
Click on next and you see options to fill in the server details.
- Web root: Specify the root folder of your web server (in my case it was C:\Program Files\Apache Software Foundation\Apache2.2\htdocs)
- Next specify the root URL as appropriate (I entered -> http://localhost:8080)
- Now click on validate configuration. In case there is an error in accessing the data server, it will be shown. Otherwise Flash builder tells you that the root folder and URL are valid.
The output folder can be changed according to your need. I am kept the default value  Click on next -> finish to be done with the project completion. What next? Now you need a PHP service that can read and edit the database
Generate the Service
Click on the Data/Services tab in the bottom frame.  This tab shows a link which says “Connect to Data/Service”. Click on this link to see this window
  Here select PHP as your service type and click on next. The same can be done by going to Data in the tool bar and selecting Connect to PHP. You will be taken to a window where you need to fill in details about the service. The next step is to generate the PHP Code based on our Database Table.
Generating PHP Code based on a Database Table
Here is how you do that. Click on the link which says “click here to generate a sample”.  It opens a window where you can enter details about the database you want to connect to. You would be required to enter the following details about the database:
- Username – Enter the username having all privileges over the table you want to generate the service for (I entered root)
- Password – Enter the password for that user.
- Host name and port– Give the name of the host where the database is and the port on which it can be accessed(localhost,3306 in my case)
- Finally enter the name of the database
Click on the “Connect to Database” button. If all details have been correctly entered all tables from the entered database will be now visible in Table comboBox like this.. 
Select the table (I select the User table from our database testdb ) for which you require the CRUD methods and click on OK. You can also select the location where this sample PHP service is created. I have used the default location. Once you click OK Flash builder might show you a warning that the service generated is intended for a trusted environment. The code generated will allow anyone with network access to your server to be able to select, insert, update or delete information from this table. The code should be reviewed before it’s used for production purposes. If you go ahead and press Ok and finish with the default values of the Service name and Service package, the introspector generates a Sample PHP and opens it for you to view and edit. Here is a code snippet of what was generated for me for the table testdb.User
public function getAllUser()

{

$stmt = mysqli_prepare($this->connection, "SELECT * FROM $this->tablename");

$this->throwExceptionOnError();

mysqli_stmt_execute($stmt);

$this->throwExceptionOnError();

$rows = array();

mysqli_stmt_bind_result($stmt, $row->ID, $row->FIRST_NAME, $row->LAST_NAME, $row->DISPLAY_NAME, $row->COMPANY_ID, $row->LOGIN_ID, $row->LOGIN_PASSWORD, $row->DEPARTMENT);

while (mysqli_stmt_fetch($stmt))

{

$rows[] = $row;

$row = new stdClass();

mysqli_stmt_bind_result($stmt, $row->ID, $row->FIRST_NAME, $row->LAST_NAME, $row->DISPLAY_NAME, $row->COMPANY_ID, $row->LOGIN_ID, $row->LOGIN_PASSWORD, $row->DEPARTMENT);

}

mysqli_stmt_free_result($stmt);

mysqli_close($this->connection);

return $rows;

}
This method gets all users present in the user table. Now that you have your service to get you data from the database, you just need to display it. Go to Flash builder design view and drag and drop a DataGrid on the application. This done you have to decide what to display in this grid. In this case let us say you want this grid to display all users. To get the DataGrid to show all users drag and drop the above method getAllUser from the Data/Services tab on the DataGrid  When you drop the method on the grid it the grid adapts to the return value of the function and looks something like this now.
 If you now run the project with data in the database, this is what you see.
 You have created an application which reads from a Mysql database through a PHP service and displays the data on a Flex DataGrid and you have not written one line of code. Feels like magic? It is 🙂 More on Flash Builder 4 can be seen at http://sujitreddyg.wordpress.com/flash-builder-4/


Chand said,
October 7, 2009 at 5:04 pm
Clean stuff!
Ando said,
October 27, 2009 at 11:52 pm
Hello,
Your tutorial was simple and easy but I got an error. I am on OSX and get the following error when I I connect to the database…
Server error The mysql driver is not currently installed
Any help would me much appreciated,
Ando
Prashant Singh said,
October 28, 2009 at 8:54 am
@chand thnx 🙂
@ando
Glad you found the post easy to understand. Now to your problem.
Open the php.ini file from your php installation for editing. In this file locate the following lines:
extension=php_mysql.dll
extension=php_mysqli.dll
extension=php_pdo_mysql.dll
Some of these lines or all may be commented. You need to uncomment all of them. This done, save the file and try connecting to the database again.
This should solve your problem.
Feel free to contact me again for further problems.
kasi said,
May 3, 2010 at 9:04 am
how to use the http and , how to use the same php when i am connecting the real server and database, or how to connect to the diffrent servers other then localhost
Narjiss said,
June 17, 2010 at 12:26 am
thanks for your great tuto it’s was very helpful for me.
now i want to do the same thing whit three table ( client, product, facture) how can i ask flex to build the Service classe for me.
thanks
shrikumar said,
August 4, 2010 at 10:41 am
Hi,
Need one help in flex 4.
Searched all over internet around 3 days, Couldn’t find it..
here is my question,
Consider, I need to fetch data from java by using remote object.
for that, i need to create 2 funcrion a) Invoke the remote object b) Uising addEventListner & resultEvent to fetch the data as arrayCollection.
i.e
public function remoteHandler():void
{
var ro:RemoteObject= new mx.rpc.remoting.mxml.RemoteObject;
ro.destination=”javaDestination”;
ro.getJavaValue();
ro.addEventListener(ResultEvent.RESULT,resultHandler);
}
private function resultHandler(event:ResultEvent):void
{
var objectiveList:ArrayCollection= new ArrayCollection;
objectiveList=event.result as ArrayCollection;
}
I am pretty sure above code is work,
But i need to combine these 2 functions together and make a single function which return the arryCollection, So that i can call this function is some loop and fetch the java values whenever i need.
But i am not able to combine there 2 functions since addEventListner returning null value(void), and not not getting any values.
Please let me know how i can do this,,
Thanks in advance