City and Guilds Fashion Level 1 – Weeks 14, 15 & 16
It’s been a while since I wrote about my progress on the City and Guilds course for a number of reasons. The things I’ve been working on have been time consuming and I don’t like to post blogs just for the sake of it. I also had to miss a class due to illness, and then it was half term, and with all the other things that have been going on in the Tweedie family, it’s been a pretty busy month or so.
Anyway, I am back to share my progress on the skirt so far. I decided to use ten different nautical stars for my skirt, to give a nice variety. However, I did cheat a little, and opted for a couple of stars of the same design, but different colours (i.e. one with the red striped fabric and the other with the navy striped fabric). I figured with different stitching as well the results would be quite different.
I used my template (angles calculated by Mr Tweedie) to draw onto the striped fabric the triangles and rhombuses I would need for my nautical stars.


I then cut all of these out ready to fuse to the interfacing, which I pre-shrunk by holding the iron just above and steaming for around 10 seconds. I arranged the triangles and rhombuses and carefully fused them to the interfacing. At last I was ready to start stitching!
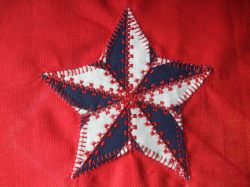
I spent a lot of time practising different stitches for the appliqué nautical stars. Here’s one example of some different kinds of stitching on the same star:

I decided I preferred the star, fagoting (which reminds me of feather stitch), zig zag and the zig zag block stitch and planned to use a combination.
I began my first star with what I thought would be a safe option – zig zag stitch around the outside. But I confess, it looked terrible. Appliqué zig zag stitch is one that I always struggle with and it didn’t look perfect. My first thought was ‘nevermind, it doesn’t really matter’ but after a bit more thought I knew I would never be happy with it, so I unpicked it and used blanket stitch instead. The blanket stitch looked so nice that I decided that I would use it around the edge of every star, but still change the stitching in the middle of the stars. On my second star I decided that zig zag stitch would probably be fine on the inside of the star, but, I didn’t like it at all. I had to unpick it all and then cut new pieces, after which I decided zig zag stitch was officially banned!

Before - as you can see I already started unpicking this.

After - with freshly cut pieces and star stitch.
Once all of my stars were complete, I sewed the ‘squares’ together for the front and back of the skirt and overlocked the edges.

The squares joined together, seam allowances overlocked together and pressed to one side. The stitching looks pretty from the wrong side too!
Then I made my piping cord. I used 20mm red bias binding and the thinnest piping cord I could find. Once made, I applied it to both the long edges of my patchwork square strips.
Next, I attached the bottom bands of my skirt to the patchwork square strips. This was tricky as I was sewing together a concave and a convex curve. I pinned and stitched but found that the material had tiny gathers, so I unpicked and notched the curved edges to help the fabric to lie flat before re-stitching. It didn’t completely solve the problem, but it was better after notching and hardly noticeable at all.

After having sewn the bottom band to the patchwork square strips, I understitched the seam allowances together and pressed them towards the patchwork strip.
My next task was to insert the concealed zip to the centre back seam. I used Alison Smith’s method on page 255 of her book ‘The Sewing Book’ (a book which both Julia and I own, and which we highly recommend). There was a small gap between where the stitching ended at the zipper tape and where the seam stitching began, so I hand sewed this to close it up.

That’s as far as I have got with my skirt at the moment. My next tasks are to sew the upper front and upper back to the patchwork strips, and then I can attach the front to the back at the side seams. I also need to sew together my lining and insert hanging loops. The final step will be to hem the skirt (which we have to do by hand) and then it will be finished!
I also need to complete three different finished design sheets, which I’m looking forward to doing, so watch this space!


Comments are closed.