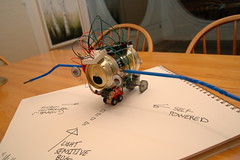
 This blog post will show you how to build an autonomous robot that seeks out light based on a toy with a low power DC motor, an Arduino board, and a host of electronic components. Look at the pictures or go and check out a movie of the end product— the robot on a flashlight "leash." I built it with my 6 and 3 year olds over Thanksgiving weekend in stages, and we had a blast doing it. I'm putting the assembly process down as a blog post to get all of the information in one place for people who might be interested in these types of projects. It is written from the perspective of an electronics noob so hardcore hardware hackers or Arduino experts will be bored.
 To begin I should say that this is the most fun I've had on a hobby project since I set up my first server on the Internet back in 1996. As in back then, the best part was how little I knew going into it and how quickly I was able to make progress due to the many smart brains that contribute to the collective fabric of our group brain— so thank you web!
A few weeks ago, the kids had seen a cheesy robot in a toy store and thrown a tantrum about getting it. Promising them that we would built our own, I've spent weeks scouring the Internet for the hardest part of a low end hobby robot to find— a cheap and easy drive system. Servos, stepper motors, gearboxes all turn out to be relatively expensive, and the electronics required seem to be overly complex for anyone who isn't either a dedicated amateur or Macgyver on a deadline.
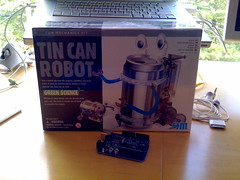 Last week I happened to come upon a fun kit called the "Tin Can Robot Science kit" which is nothing but a low power 1.5v DC motor hooked to a gearbox and a set of oblong wheels that cause an anthropomorphized beer can to wobble along like a drunk guy along a quasi-straight line. It's a cute 45 minute project and I would recommend it for anyone who wants to "build something" though I suspect that most of the fun in this toy comes from the assembly.
In our case, the fun was just beginning. Having built a light-sensitive Mindstorms robot that would chase a flashlight, I was pretty sure that the beer can equivalent would be fun to play with for a while. So our blueprint effectively consisted of 3 parts which I will describe in turn, along with some instructions:
The drive system: This proved the hardest to build for two reasons: 1. most lightweight toys tend to be very carefully balanced to move with low-power motors and are thus are not often capable of taking extra weight (in the form of the Arduino board and more batteries), and 2. it turns out that you can't just hook a motor into one of the digital pins on a microcontroller like the Arduino, turn the pin on HIGH and expect the motor to go (at least not without burning something out in a hurry).
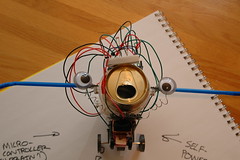
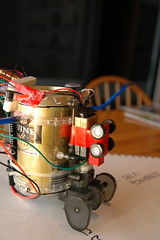 I can not overemphasize point number one enough: in fact, I would advise anyone building am ambulatory robot to get the mechanical bits working first by simply building the robot and setting it to move with nothing but power to the drive. The Tin Can robot was designed as a standing beer can but as it turned out, there was no place to attach the Arduino board that wouldn't tip the robot over or render it totally motionless, to say nothing of the additional power required to run the motor. The design compromise in this case turned out to be putting the can on its long side and building something that looks much more bug-like, as well as getting rid of the 1AA power supply of the original kit in preference of the +3V that the Arduino board provides.
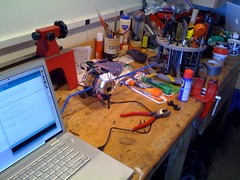
Coming from the world of software engineering, the best analogy I can think of to describe the process for getting the can moving was that of iterative development. Do something. Hook the motor up to power and see if it moves. If it does, take the next step; if not, iterate on the design. This will take a while, but the less you think of any part of your design as being fixed, the better. What can I say? The physical world is a bitch with all of its gravity and stuff.
 The second bit of the drive system that baffled me was that there is not way to drive a motor from one of the digital pins on the Arduino. The short answer is that most things draw way too much power (current) relative to the 40-50 milliamps that each of the pins on an Arduino puts out, something which you quickly discover by the way in which an IC near the pins gets hot enough to boil your skin (amazingly, this as well as other noob mistakes don't tend to damage your Arduino if you catch them quickly enough— have I mentioned how awesome Arduino is?)
Once you realize this, you can find many options online for driving motors, servos, and all sorts of things that move— from full on "shields," or boards that you snap on top of your Arduino with as many chips as the Arduino itself (and often about as expensive) to all sorts of motor control circuits. It turns out that most robotics folks know that what you would want is something called an "H bridge" which uses a bunch of transistors and diodes to give you fine grained control over the direction and speed of multiple motors and servos. But even this was too much work for us— we just wanted the motor to move when the robot sensed light irrespective of speed and only in its ambling forward direction. Fortunately thanks to the web (or more specifically, the wonderful LetsMakeRobots.com), I discovered that you can actually use one transistor, an NPN silicon one from Radio Shack (part #276-2016) to build a simple circuit that lets you control current from the 3V power supply on the Arduino from one of the digital pins. Think of a transistor as a big electronically controlled switch and you'll get the gist of it (but have a look at my monkey circuit diagram to figure out how to wire it up).
The light-detecting circuit: I had the leg up on this one as I did one of these circuits for a science fair about 20 years ago (my dad's idea for how to make me popular as a recent non-English speaking immigrant in the public school system in the US— and no, it did not work). Surprisingly, it even worked the first time. The basic circuit requires placing another resistor (I used a 1k ohm one but the value will depend on what kind of photo resistor you have on hand). A photo resistor (you can Google "CDS" to find one) seems to be hard to find these days, but you can get them from Radio Shack online for about $2. The other step is taking measurements on the analog pin from the circuit you build; you will basically get values from 0 to 1023 depending on the ambient light of the room you are in and will have to tweak your program to determine what the "move robot" threshold should be (in our case, with the circuit detailed above, values above 200 trigger the robot to move).
The "mouth" circuit: this is a standard yellow LED plugged into one of the digital pins and buried deep inside the can. When the robot moves, the LED comes on. Note that all of the tutorials for Arduino say to use a resistor with the LEDs but as a master of burning out LEDs I can tell you that you won't need it on the digital pins of the board.
The final step was getting the software written which proved to be the easiest part of the project (and I suspect it was not just that that is my background but that the Arduino folks have done a great job on their IDE). You can see the "sketch" (Arduino/Processing for program) here. After some initialization, it simply goes into a loop reading the photo resistor circuit and when appropriate turns the pin connected to the NPN transistor to HIGH and the mouth LED pin to high as well.
 We live in wonderful times— and nothing like the ability to take on a weekend project like this with little prior training in electronics proves it as well. So now it's my turn to give back to the collective brain— please feel free to either leave me comments with questions/clarifications or send me email at antrod at gmail dot com.
And happy hacking!