How can I contribute to help in the time of COVID-19
Who could have predicted the current weird?
Certainly not politicians, right?
Some of us are grateful that we were already used to working from home, and therefore the current situation, although not ideal, is still manageable. I just had to wait a couple of weeks to receive a desk and swap my ironing board and improvised desk to a more long term environment than my living room table.
After sorting out our home schedule, such as distributing home-schooling and client’s work, I was frustrated not being able to help with the “current weird” situation like the amazing frontline medical staff that are saving lives.
- I made myself available for a few hours each week, to answer any of your working-from-home challenges, solve your technical challenges with Office 365 and SharePoint.
When I posted this on LinkedIn a few weeks ago, a couple of people joined me and I hope that I was useful since they managed to progress with the questions they had. I just didn’t post it on my own blog yet.
There was never a better time to learn something new, so come on and hit me. Anything from being Excel pivot tables, chart, preparing an amazing presentation and mastering Zoom ro Microsoft Teams, becoming a master in productivity with Outlook, kicking arse at ticking tasks and finding your documents in seconds, to backing up your pc the right way.
Click here to book time absolutely free, and booking can be repeated if you wish.
(the times I reserved for us will not impact my current commitment so don’t be embarrassed, just come to say hello)
The post How can I contribute to help in the time of COVID-19 appeared first on François on SharePoint, Office 365 and more technologies.
via François on SharePoint, Office 365 and more technologies https://bit.ly/2yJ5IBC
|
French native Sharepoint Consultant living in London. A crossway between a designer, developer and system architect. Prefers stretching the limit of out-of-the-box features rather than breaking them into code. When not working with Microsoft Sharepoint François is often found on Web2.0 News sites and related social networking tools.
This article has been cross posted from sharepointfrancois.com (original article) |
A different viewpoint from Microsoft Ignite conference 2020 (The Tour #London)
Last week I attended #MSIgniteTheTour in London #ExcEl, it is always a great opportunity to learn and catch up with some community friends. Although a lot of sessions were techy, including some I admit that went well above my head… that is until I realised that I was in the wrong room 30 minutes later ;-).
As always the amount of partners stands and various products was overwhelming, but they must exist in the Microsoft eco-system so that they accelerate and improve the products. I was thrilled to discover the latest UX of Project on the Web thanks to a fast-paced live presentation by my ex-colleague MVP Paul Mather and enjoying watching his mastering in both the topic and the public speaking.
Yet, amongst the heavy loaded bag of knowledge and futuristic (yet nowadays) approach to tech, that I was listening to, the topics that struck a chord to me was actually the non-tech sessions, part of the #humanofIT stream. Is it because I am getting old, and the tech is interesting but I am not more interested in understanding people and myself(? open question).
I am listing below the sessions related to #HumanofIT that I went to, so that anyone in quest of how to create a more diverse and inclusive tech environment can dig up the slides and videos when they are made available (the videos next to each session are not of the session but were shown, referenced or serve as an introduction, just to make you willing to research some more! You won’t be disappointed!):
“Practising kindness in Tech” (link), by Dux Raymond Sy, explaining to the giving the science and numbers that we now have to prove the benefits of practising random acts of kindness daily.
“How Heathrow’s security officer launched 12 PowerApps” (link), with no code, with Dona Sarkar & Dux Raymond Sy, who “grilled” Samit Saini with some great questions, leaving the room inspired to go away and create a PowerApps app in minutes.

“From Geek to Chic: Build Your Brand & Elevate Your Career in 5 Steps (link)”. Where the pair share their own personal experience on what it means to them to develop a personal brand, which is very much what I always believed: “share a skill for others to use”, whatever that SuperPower is.
I also learnt about the new coined term of “OnlyNess”, used by Nilofer Merchant in her book “The Power of Onlyness“, which is the thesis that ideas born of an ‘only’ can scale and make a dent in the world. The audiobook is already in my listening list.
So thanks again to Dux & Dona, both are fantastic speakers, yet with different styles, they are both authentic enough to show their vulnerability and driven by a common thirst to share their life experience to us and the world, all to make it a better place!
Within my career which has very much been in IT since I left Uni in 97, I always had issues to feel that I belonged in a work or social group and I ended to “blend in” if not “fit in” but not always as being myself, especially when younger and fresh out of Uni. This kind of #HumanOfIT sessions was what I needed 15 years ago. I feel hopeful and trusting that the world of corporations and businesses can change for better and that we can all contribute to this change because they need us to do that.
Truthfulness, be yourself, lead with empathy, whole-heartedness, onlyness …
in 2020 I want to see more of those.
The communities I frequent like the Happy Startup School and conversABLE are all about fulfilment in business and life are leading the movement, now joined by corporations like Microsoft with this #HumanOfIT and many more are showing that we all need more humanity and what I called “H2H and not just B2B”.
In 2020 I will continue to deliver more Tech sessions as part of my current enjoyment this year as being a trainer for various organisations. I will also continue to deliver non-tech presentations to help Humans to be themselves in the workplace and beyond, just like the #IamRemarkable workshop and more workshops.
The post A different viewpoint from Microsoft Ignite conference 2020 (The Tour #London) appeared first on François on SharePoint, Office 365 and more technologies.
via François on SharePoint, Office 365 and more technologies http://bit.ly/38m70yH
|
French native Sharepoint Consultant living in London. A crossway between a designer, developer and system architect. Prefers stretching the limit of out-of-the-box features rather than breaking them into code. When not working with Microsoft Sharepoint François is often found on Web2.0 News sites and related social networking tools.
This article has been cross posted from sharepointfrancois.com (original article) |
Welcome to the new Project – getting started Part 2 #MSProject #PPM #Office365 #PowerPlatform #ProjectMangement #ModernWorkManagement #CDS #PMOT #PMO
|
I am a Project Server and SharePoint consultant but my main focus currently is around Project Server.
I have been working with Project Server for nearly five years since 2007 for a Microsoft Gold Certified Partner in the UK, I have also been awared with the Microsoft Community Contributor Award 2011. I am also a certified Prince2 Practitioner. This article has been cross posted from pwmather.wordpress.com (original article) |
Following on from yesterday’s blog post: https://pwmather.wordpress.com/2019/10/29/welcome-to-the-new-project-getting-started-part-1-msproject-ppm-office365-powerplatform-projectmangement-modernworkmanagement-cds-pmot-pmo/ walking through the new Project, here is part 2. In the post we will look at the backend to the new Project and look at two Power BI report packs I released yesterday. Links were in the part 1 but for completeness here they are again:
Power BI report for Project: https://gallery.technet.microsoft.com/Power-BI-Report-Pack-4506f183
Power BI report to combine Project and Project Online data (1 PWA instance): https://gallery.technet.microsoft.com/and-Online-Power-BI-Report-d1fbca1b
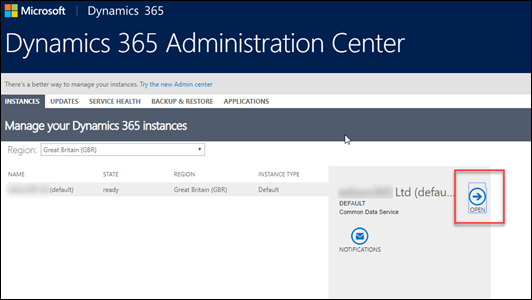
Project is built on the Power Platform’s Common Data Service for Apps (CDS), the data is stored in Entities in the CDS – the same as Roadmap – lots of links about Roadmap here: https://pwmather.wordpress.com/2019/03/01/project-roadmap-cds-app-overview-ppm-projectmanagement-msproject-projectonline-office365-powerplatfom-dynamics365/ Let’s take a look at the solutions deployed for Project, to do this I’ve accessed the Dynamics 365 Admin Center from the Office 365 Admin centers which loads this:
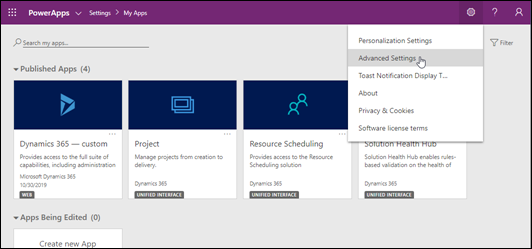
Project is deployed to the default organisation, on this tenant I only have 1 organisation – click the Open arrow on the Default org. This loads the PowerApps interface, from here click the Settings cog > Advanced Settings:
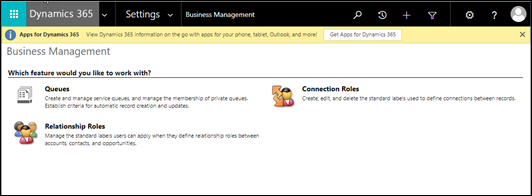
This takes you to the Dynamics 365 Settings:
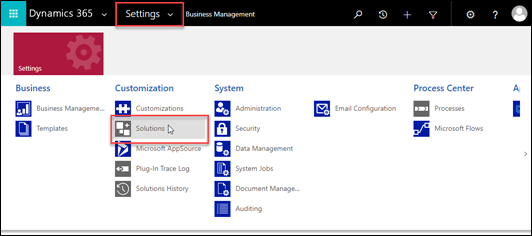
Click the Settings > Solutions:
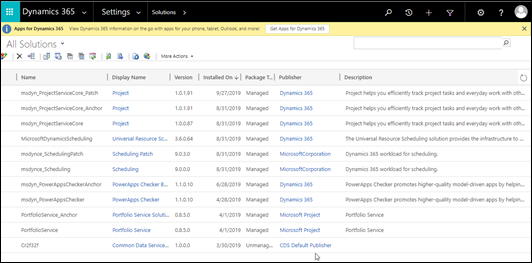
This then loads the solutions deployed to this instance:
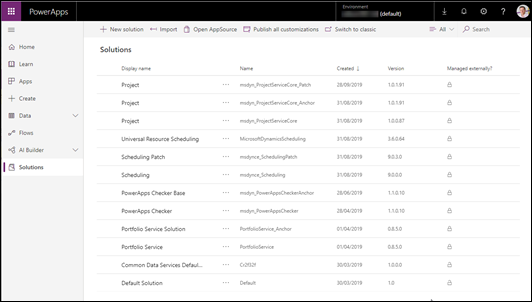
You can also see the solutions from the familiar PowerApps interface:
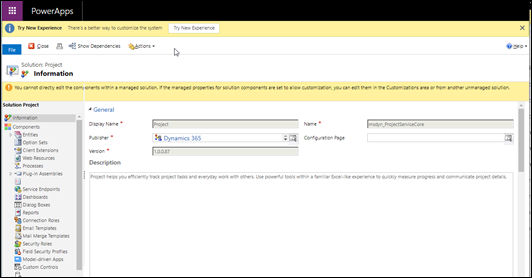
Sticking with the Dynamics 365 Admin interface for the moment, let’s have a quick look at the msdyn_ProjectServiceCore solution:
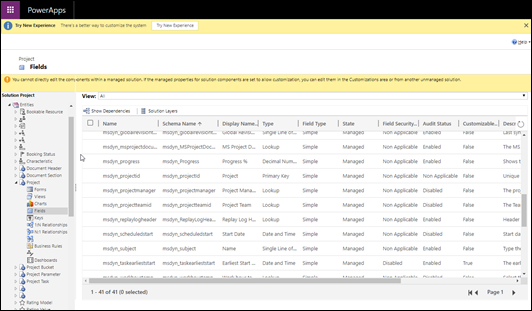
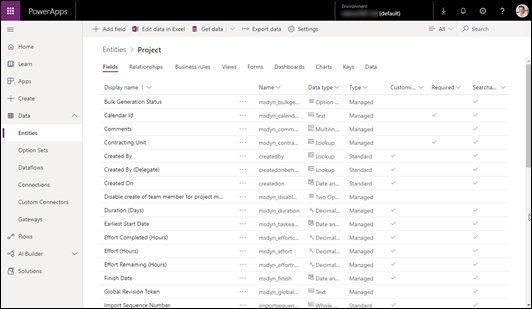
We can then view the components that form this solution, I wont go into them all but here are a few. Looking at the Entities we can see the Entities used in this solution, here I’ve drilled down to the fields in the Project entity:
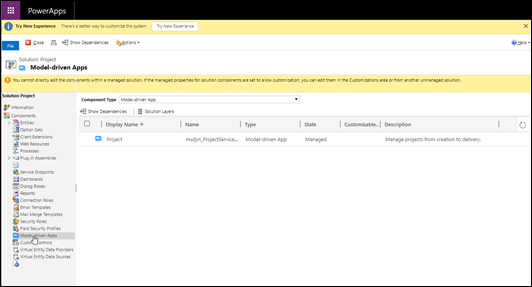
I will go into more details on the fields via the PowerApps interface. Looking at the Model-driven Apps we can see Project:
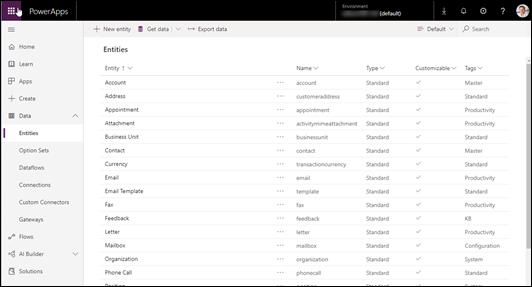
Now lets switch to the PowerApps interface (make.powerapps.com) and view some of the entity fields. Click Data > Entities from the left navigation menu:
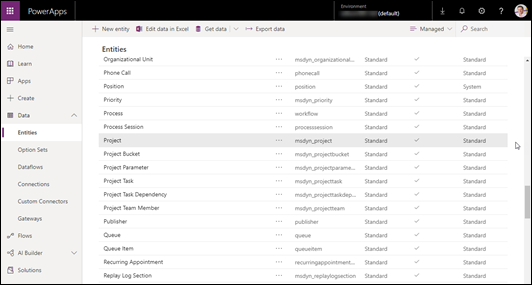
Change the view from Default to Managed in the top right corner and scroll down to Project:
Click Project to view the Project entity details:
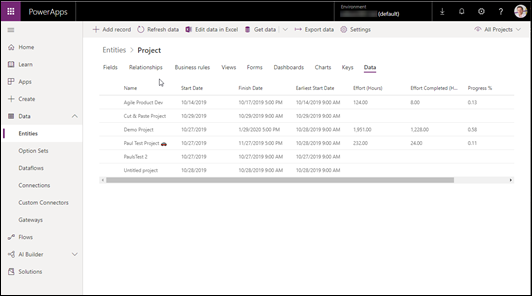
Here we can see the fields, relationships, rules, views etc. We can also view the current data stored in that entity:
The current main entities used by Project are:
- Bookable Resource
- Project
- Project Bucket
- Project Task
- Project Task Dependency
- Project Team Member
- Resource Assignment
- User
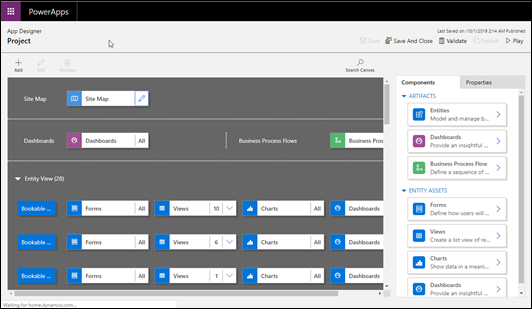
There are others such as Replay Log Section, Work template etc. but those above are where the core data is stored that you see in the UI. Some of these entities are new for Project but some have just been extended or updated to add new components, for example, adding new views or fields to existing entities to support Project. More on the entities later on when we explore the Power BI report pack I created as that is a good way to visualise the data model and the relationships between the entities. Let’s click Apps from the left navigation menu, select Project and click edit:
This then loads the app designer displaying the new Project app – this is what you see when you are in the Dynamics interface that we looked at yesterday. This shows the components that make up the model-driven Project app – more on this in future blogs posts.
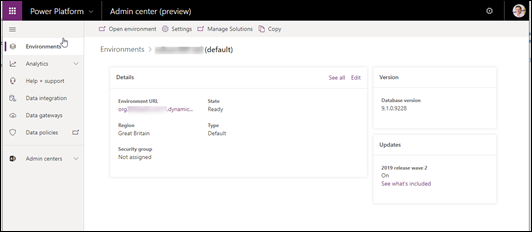
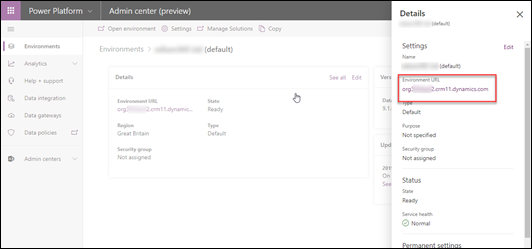
Now lets go back to looking at the entities / data model for Project, for this I will use the Power BI template I published yesterday https://gallery.technet.microsoft.com/Power-BI-Report-Pack-4506f183 Once downloaded and opened in Power BI desktop you will need to provide the CDSUrl for the parameter. There are several ways to get the correct URL for your default CDS instance. Your Office 365 Administrator can access the PowerApps Admin Center, click Environments, click the default environment which loads this:
Then click See all:
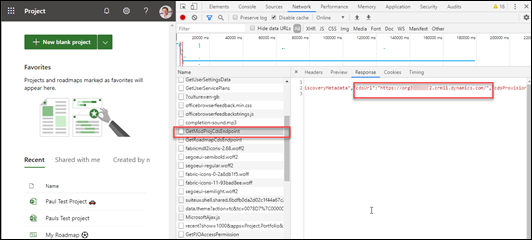
Copy the Environment URL. Or you can get it from the browser when accessing project.microsoft.com. When accessing that page, open the browser dev tools and access the Network tab then reload the page, look for GetModProdCdsEndpoint then click the Response tab and find the cdsUrl property value:
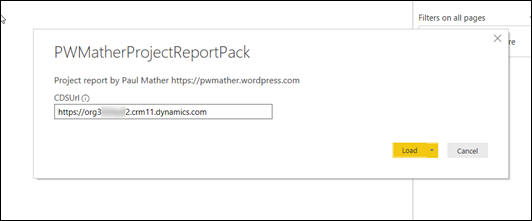
Once you have the correct CDS URL, enter that into the CDSUrl parameter input – minus the trailing slash:
Click Load and sign in when prompted. To access all data, the account used here will need Read access at the business unit level to the Project CDS entities used plus the other default roles a normal user is assigned to. If the user account doesn’t have the correct access the connections will fail. You could create a new “project report access” role in the Dynamics 365 instance where Project is deployed if needed. To do that, access the Dynamics 365 admin center from the Office 365 Admin center using the Global Admin account. Open the default Dynamics 365 instance (this is where Project is deployed to) then click the Settings Cog > Advanced Settings. Then click Settings > Security > Security Roles > New. Give the new role Read access at the business unit level to the 8 entities used in the report:
- Bookable Resource
- Project
- Project Bucket
- Project Task
- Project Task Dependency
- Project Team Member
- Resource Assignment
- User
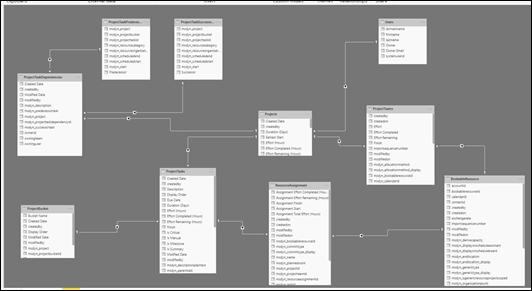
Then access the user account that will be used for the report from the Dynamics Security admin in the Users page then assigned the new role to this account using the Manage Roles option. Other roles and role assignments are as per the default settings. I covered this for the Roadmap report pack I released at the start of the year: https://pwmather.wordpress.com/2019/01/30/project-roadmap-powerbi-report-pack-ppm-projectmanagement-msproject-projectonline-office365-powerplatform-dynamics365/ – for Project the role needs access to different entities. Once the data has loaded in the Power BI report, click on the Model button on the left navigation menu to view the data model:
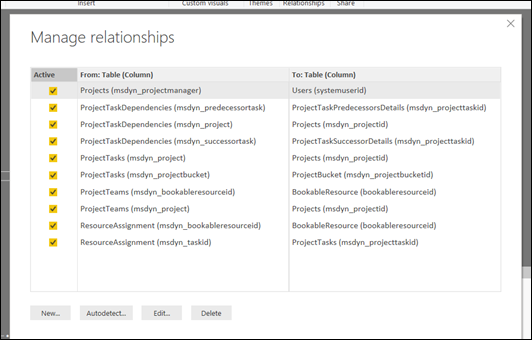
Click the Manage Relationships button to view the relationship table:
Here you can see how the different entities / tables are related.
I also published a report yesterday that combines the Project (CDS) data with the Project Online data (1 PWA instance) https://gallery.technet.microsoft.com/and-Online-Power-BI-Report-d1fbca1b This report uses the slightly less CDS entities:
- Bookable Resource
- Project
- Project Task
- Resource Assignment
- User
It also uses the following tables in the Project Reporting API:
- Assignments
- Projects
- Resources
- Tasks
This reporting combines the following tables:
- Assignments and Resource Assignments
- Projects and Project
- Project Task and Tasks
- Resources and Bookable Resource
- Resources (Filtered to users) and Users
I will create separate blogs post dedicated to these Power BI Reports in the next week or two but download them and see what you think, hopefully they either give you want you need for reporting or help you build the reports you do need.
Look out for more blog posts and videos on Project in the future!
Welcome to the new Project – getting started Part 1 #MSProject #PPM #Office365 #PowerPlatform #ProjectMangement #ModernWorkManagement #CDS #PMOT #PMO
|
I am a Project Server and SharePoint consultant but my main focus currently is around Project Server.
I have been working with Project Server for nearly five years since 2007 for a Microsoft Gold Certified Partner in the UK, I have also been awared with the Microsoft Community Contributor Award 2011. I am also a certified Prince2 Practitioner. This article has been cross posted from pwmather.wordpress.com (original article) |
As you might have seen, the new Project started rolling out a week just over a week ago but the official release is today, here is the blog post from Microsoft: https://www.microsoft.com/en-us/microsoft-365/blog/2019/10/29/new-microsoft-project-rolls-out-worldwide/ If you didn’t see the earlier Microsoft blog post announcement about the start of the rollout it can be found here: https://techcommunity.microsoft.com/t5/Project-Blog/The-new-Project-is-rolling-out/ba-p/909721 In the blog post there are a few links that are worth spending time reading both as Project partner and a Microsoft Project user.
In this blog post we will take a look at the new Project.
How do I access the new Project?
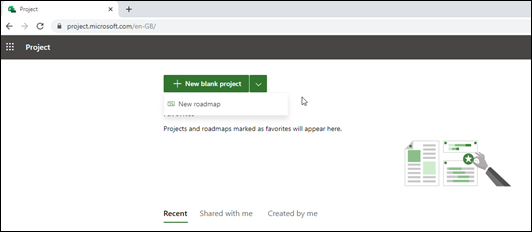
Once the new Project has reached your tenant, creating new projects is via the Project Home, the same place new Roadmaps are created: https://project.microsoft.com/
You can also access this via the Dynamics interface as seen later on in this post.
Clicking the + New blank project button will launch the page:
Building the project schedule
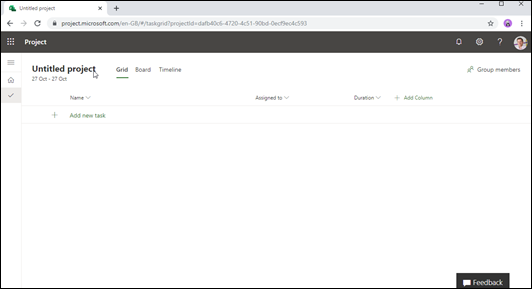
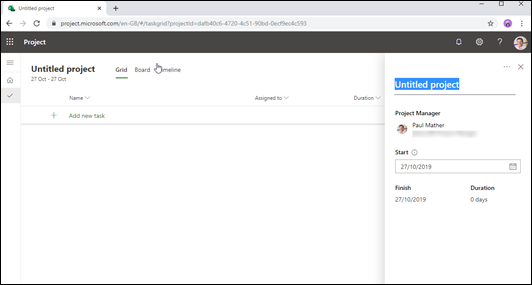
Straightaway you you can start creating tasks on the grid. The first thing to do is give the project a name – click the “Untitled project” and the project name panel will launch:
Here you can give your project a name, change the project owner and project start date if required. Click the “Add new task” row and you can enter the the first task:
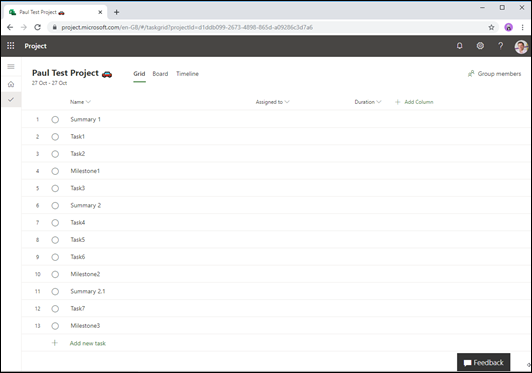
Enter the tasks as required:
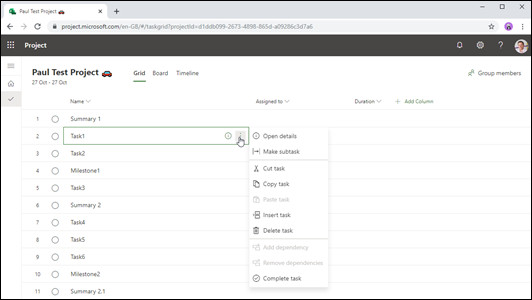
Hover over the task and you you will see an i icon and an ellipsis, clicking the ellipsis launches the task callout with actions for the task – you can also right click on the task to see the task callout:
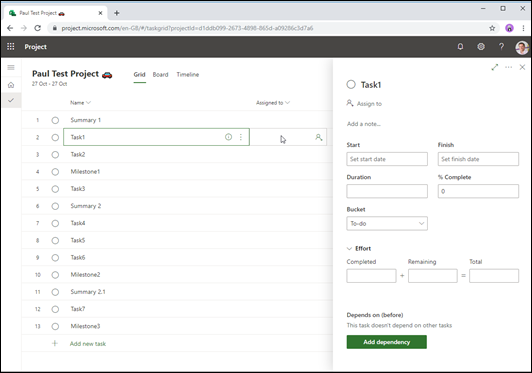
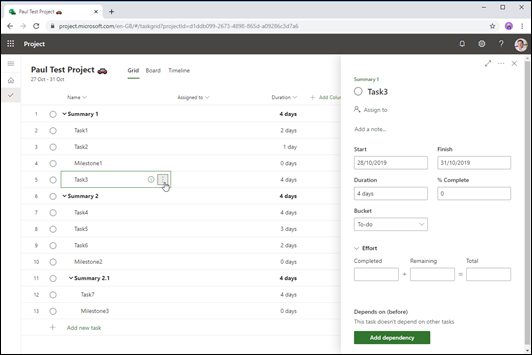
Clicking the i icon or the Open details on the task callout launches the task details panel:
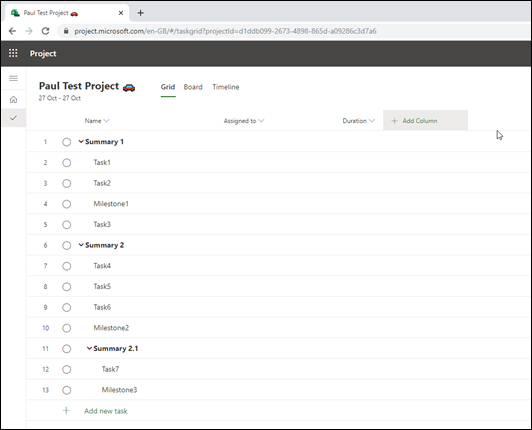
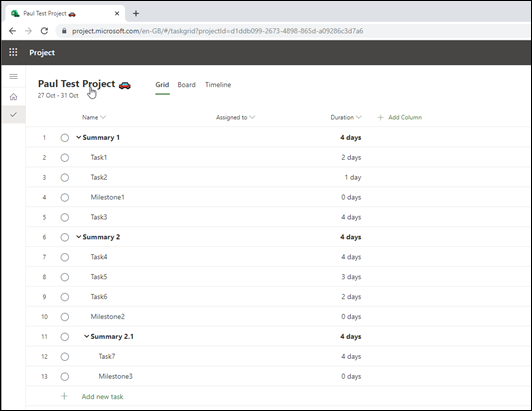
Build the schedule as needed, here is my simple example:
At this point there are no dates associated with the tasks. I will now add some durations as this will add start and finish dates to the tasks:
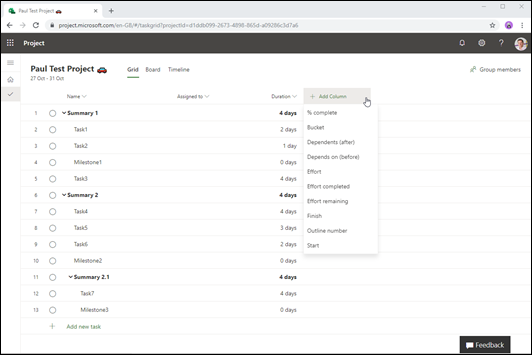
So we now have some tasks, durations and dates, what about the other information like task links, % complete etc.? These columns can be added by clicking the + Add column button:
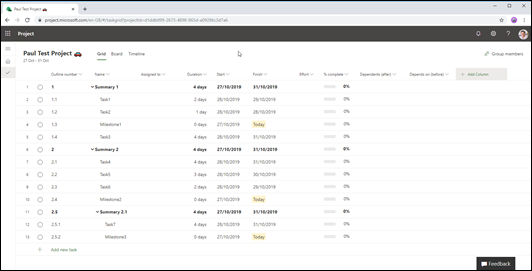
Add in the columns required – notice that Successor and Predecessor have been renamed. Here I have added in the columns I want:
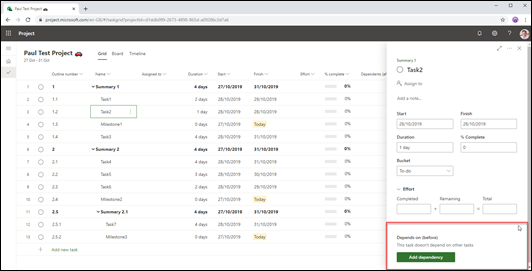
Columns can be reordered by dragging the column to the required position, column widths can also be adjusted as needed too. The columns added here and the ordering is persistent for this project for all users who have access to it. Let’s add some task links. There are several way to do this, from the Task Details panel using the Add dependency button:
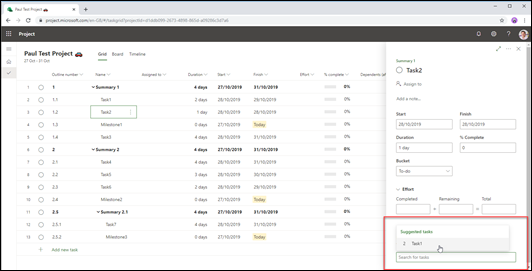
Click it and you can select a task:
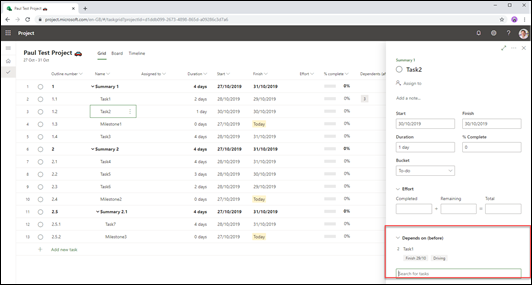
Now the Task Details panel updates to the show the linked task with the finish date of the linked and a label to show the task is “Driving”, Task1 in this case is driving Task2:
The Grid has also updated to show the task IDs for the task links in the Dependents (after) and Depends on (before) columns:
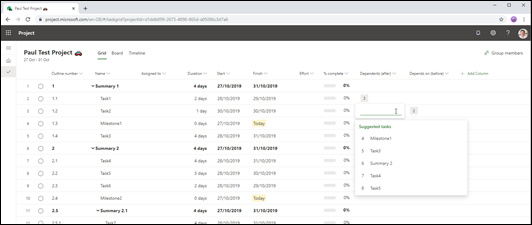
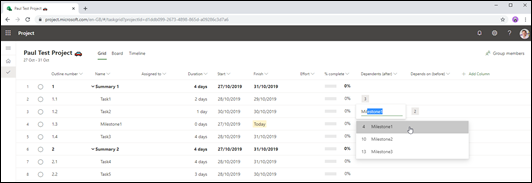
You can also create task links by directly clicking in the Dependents or Depends on cells and select the task/s from the list:
Or type the task ID or task name in the cell:
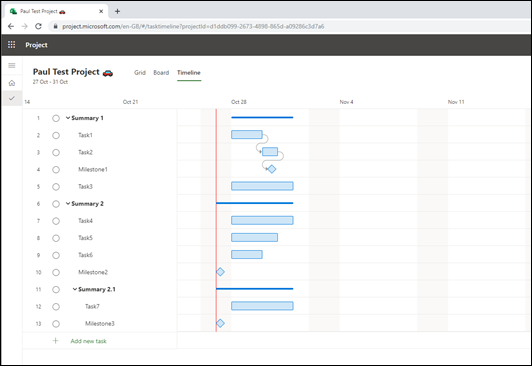
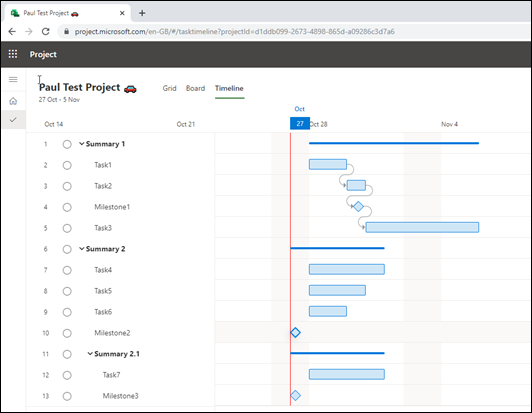
The other way I want to show you is the slickest way by far, click the Timeline button next to the project name. This loads the interactive Gantt chart:
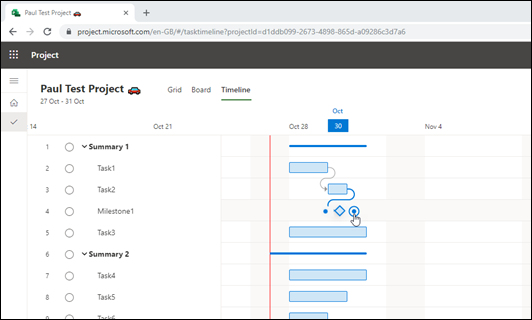
As you hover over a task bar on the Gantt you see controls appear:
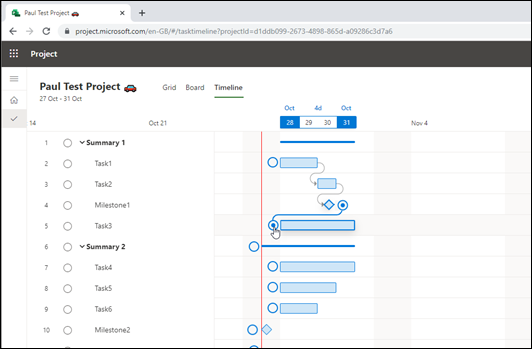
Here I can drag the end of one task to the start of another to create the task link:
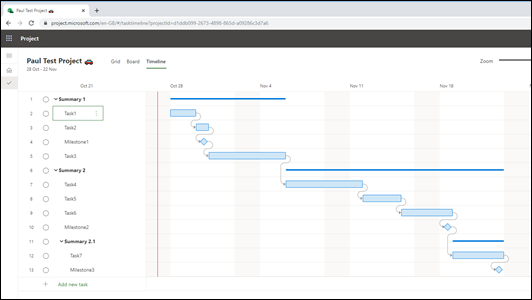
The Gantt will then update to move the tasks as required:
I have now created my simple project task schedule:
Assigning Resources
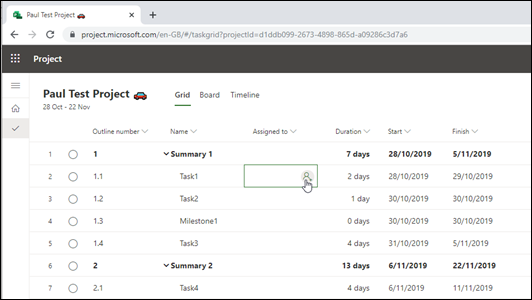
Who used to get fed up having to build the team to be able to assign an enterprise resource? Well not anymore! Hover over the Assign to cell next to the task and click the + person icon:
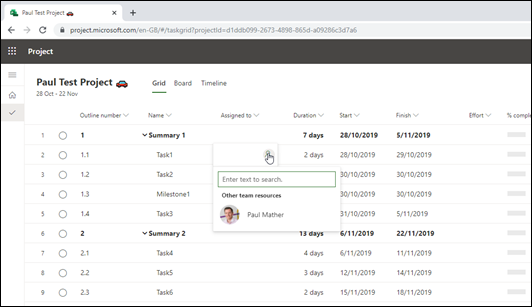
This launches the control to add a resource:
Now simply start typing the name of the resource to search the tenant directory and click the resource to add them:
Clicking the user will launch a modal pop up:
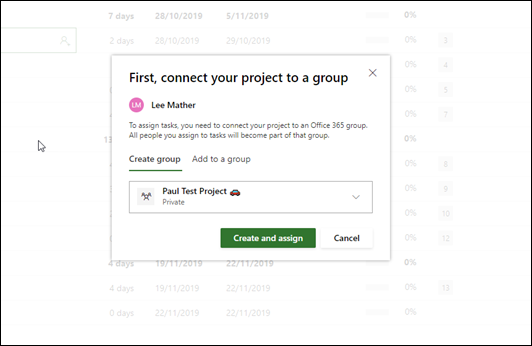
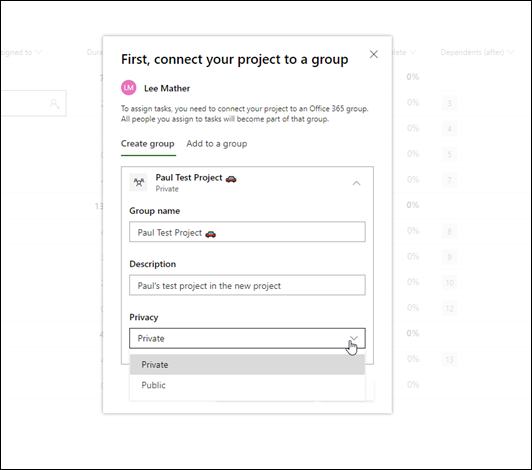
As you can see from the pop up, I firstly need to connect my new project to an Office 365 Group. I can either create a new Office 365 Group or link to an existing one. For this project I will create a new Office 365 Group. Clicking the proposed group name loads the Office 365 Group menu – update as required:
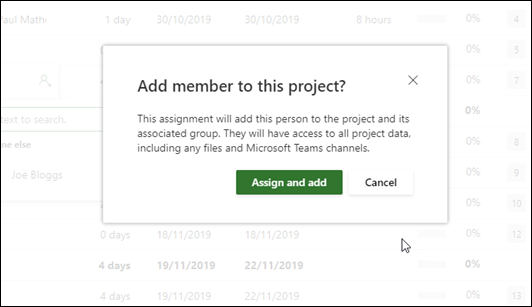
Then click Create and assign to assign the resource. When adding other resources to the project, you will see another modal pop up:
This is just to warn you that the user will be added to the group and have access to the project data, groups files and Microsoft Teams etc. – more on this in the Project Access Model. One point to note, you can no longer assign anyone to a summary task:
This was bad practice anyway but it’s great Project now prevents this!
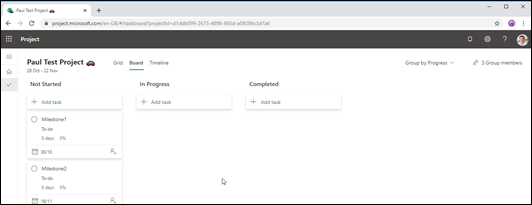
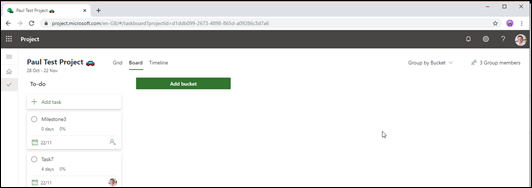
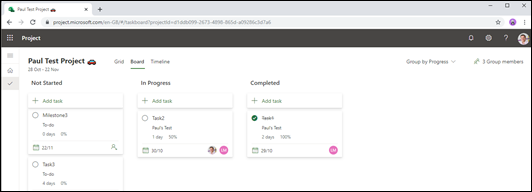
You might also want to plan and manage your plan in an Kanban type task board, this is covered using the Board view, this is accessed by clicking the Board button next to the Project Name:
There are different view options available on the menu here:
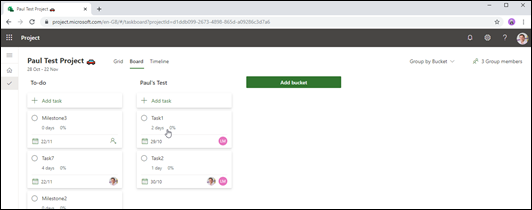
The default view is the “Group by Progress” view which has 3 fixed columns for Not Started, In Progress and Completed – more on this view when we cover task progress. Switching to the Bucket view, new buckets can be added:
Click the “Add Bucket” button to create a new bucket. Task cards can then be dragged into the new bucket/s:
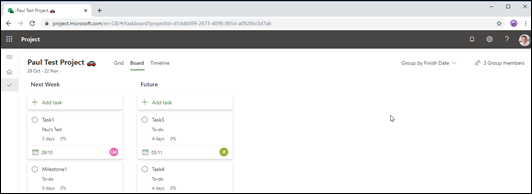
Switching to Group by Finish Date and you see the Task group in Next Week and Future:
Just note, if you drag a task from the Next Week column into the Future column, this will update the task’s and any linked dependent task’s Finish dates to the future. Notice on all of the Board views, Summary Tasks are filtered out.
Project / Task Progress
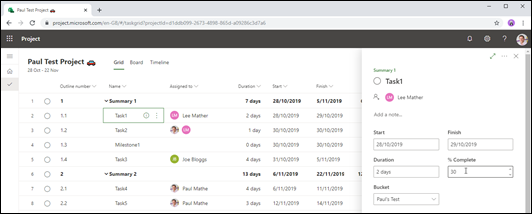
There are several ways to progress a task in Project. Starting with the Grid view, you can click in the % complete cell and type:
Click out of the cell and you will see the progress:
You can open the Task Details panel and type the progress in the % Complete input:
In the Board view using the “Group by Progress” view, you can drag a task card to “In Progress” and this will update the task % complete to 50% or drag a task card to the Completed and this will update the task % complete to 100%:
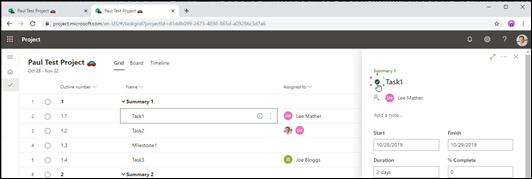
You can also click the empty circles you see next to the Task names on all views, when you hover over these you see a tick appear inside:
Clicking the empty circle marks the task as complete, the same feature that exists in Microsoft To-Do:
Project Saving and Editing
The project auto saves so no need to worry about saving and the concept of publishing no longer exists – how cool is that! Need to undo / redo something, just use Ctrl + z to undo and Ctrl + y to redo.
The new Project also supports co-authoring so multiple users can edit the project at the same time!
Project Access Model
The security for the new Project is built on the Office 365 Groups model – just like Project Roadmap. When you assign a user to a task, they are added to the Office 365 Group. All users in that Office 365 Group have edit access to the project. You can check group access very easily via the Group Members button in the top right corner:
It is a very simple access model, you either can access and edit the project by being in the Office 365 Group or not access to the project at all.
Access via Dynamics 365
As mentioned at the start of this post, you can create new projects via the Project Home but also via the Dynamics interface. Access the Dynamics home https://home.dynamics.com and click the Project app, this will load the Project app:
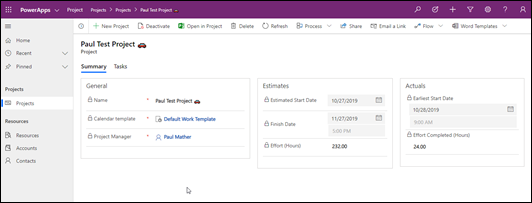
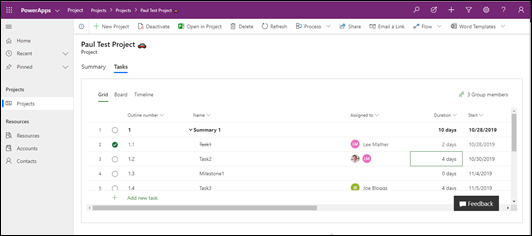
From here you can create new projects or edit / view existing projects, see below my test project opened in the Dynamics interface:
Summary View:
Tasks View:
I can edit the project directly here or for a better experience, click the “Open in Project” button to edit in the full page experience this post has covered. I will cover more of the Dynamics interface in future posts.
Extensibility Options
As the new Project is built on the Power Platform Common Data Service for Apps (CDS), you have the power of the Power Platform to extend / build on top of Project using PowerApps, Flow and Power BI. I will have many posts in the future for extending / adding features for the new Project, maybe even one or two later this week / early next!
Reporting
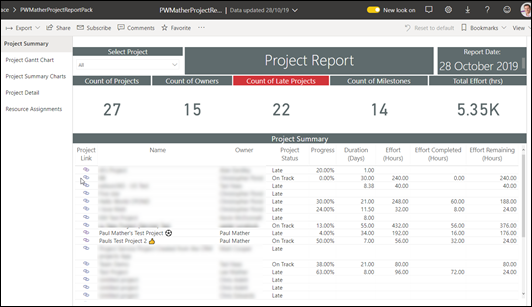
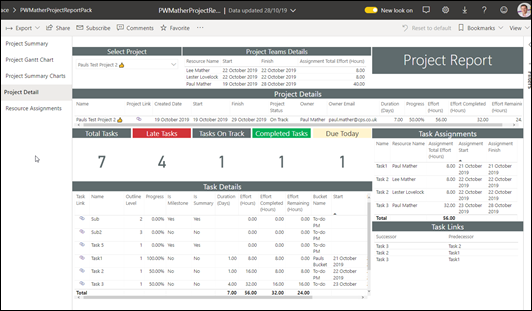
All of the data is stored in entities in the CDS so reporting is very simple from tools like Power BI. I do have a Power BI report pack for the new Project, this can be downloaded here: https://gallery.technet.microsoft.com/Power-BI-Report-Pack-4506f183 In part 2 of this getting started series I will cover the Power BI Report pack. Here are some screenshots of the reports:
You can also add Projects from the new Project (I wonder how long I will keep calling it that!) into Roadmap.
I have also created a Power BI report pack that displays both Project (CDS) and Project Online data in the same reports to help with the transition where you might be using both applications side by side, this can be downloaded here: https://gallery.technet.microsoft.com/and-Online-Power-BI-Report-d1fbca1b The reports look very similar the the Project reports above.
Summary
Well the wait is finally over, the new Project is here, go give it a try! This post covers most of the end user features, in part 2 I will cover the backend. Project Online will still be a part of the Microsoft PPM offering so I will still continue to include blog posts / videos for Project Online. I have also published an intro video here: https://youtu.be/4OeegM8ScMk
#Office365 #ProjectOnline Project Request process using #MicrosoftForms and #MicrosoftFlow #ProjectManagement #PPM #MSProject #SharePoint #PowerPlatform
|
I am a Project Server and SharePoint consultant but my main focus currently is around Project Server.
I have been working with Project Server for nearly five years since 2007 for a Microsoft Gold Certified Partner in the UK, I have also been awared with the Microsoft Community Contributor Award 2011. I am also a certified Prince2 Practitioner. This article has been cross posted from pwmather.wordpress.com (original article) |
Following on from my last post where I created an example Microsoft Flow to create a project in Office 365 Project Online using the correct Enterprise Project Type, I’ve extended this to show how to build a project request process using Microsoft Forms, Flow Approvals, SharePoint and Project Online. If you missed the last post, here it is https://pwmather.wordpress.com/2019/09/27/creating-new-projects-based-on-epts-in-office365-projectonline-using-microsoftflow-ppm-powerplatform-rest-msproject-projectmanagement/
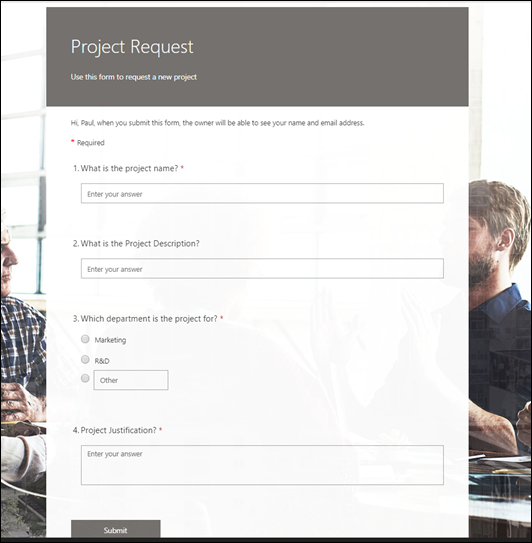
For this project request process there are a few components required, the Form and the SharePoint list then the Flow to bring it together. The form is used to capture the project requests but this could as easily have been a PowerApp. My simple form can be seen below:
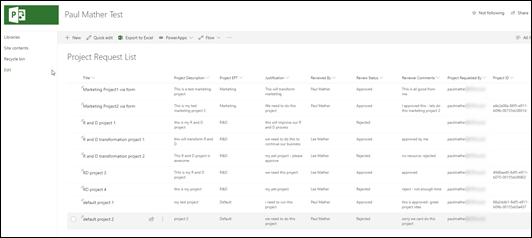
We could ask any questions we want on the form but the key part for this project request example is the department question as this is used for two purposes. The first, to get the project approvals from the correct person in that department and secondly to create the approved projects using the correct Enterprise Project Type (EPT) in Project Online. The next component is a SharePoint list to store the requests and approval responses. I created this in the Project Online Project Web App (PWA) site collection but again, this list could exist in any SharePoint Online site collection or we could have even created an entity in the Power Platform CDS to store the data. The simple list can be seen below:
The columns I have on this list are detailed below:
- Title – used to store the Project Name from the request form
- Project Description – used to store the Project Description from the request form
- Project EPT – used to store the project department from the request form
- Justification – used to store the project justification from the request form
- Reviewed By – used to store the Flow Approval reviewer
- Review Status – used to store Flow Approval status
- Reviewer Comments – used to store the Flow Approval reviewer comments
- Project Requested By – used to store the email address of the user who completed the request form
- Project ID – used to store the Project ID from Project Online for projects that get created by the Flow
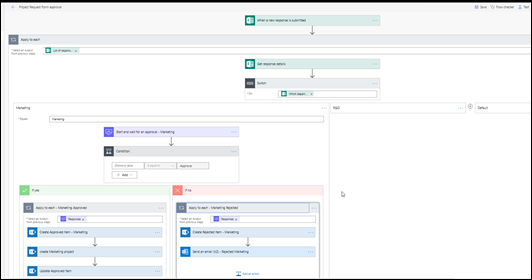
The next component is the Microsoft Flow, this is used to capture the Form responses once they are submitted, start the approvals, create the SharePoint list item on the Project Request List then if approved, create the project and update the list item. If rejected the Flow sends a rejected email to the project requester.The Flow can be seen below with one of the switch cases expanded:
I will cover the Flow in detail next but the final component required is Project Online. In my Project Online instance I have 3 EPTs, one for Marketing, one for R&D and the default Enterprise Project.
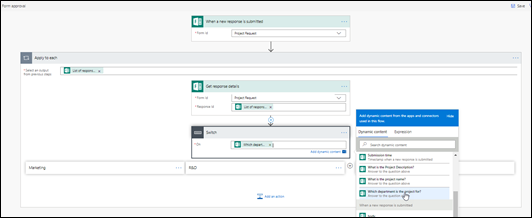
So back to the Flow, the Flow is triggered when a new form response is submitted to the Project Request form, it then uses an Apply to each loop with a list of the response notifications passed in from the trigger. The first step inside the Apply to each action is the Get response details Form action with the form response ID passed in. The Flow then uses a Switch action to have different paths based on the department value, the “Which department is the project for?” answer is used to switch on:
The Flow then has different cases in the Switch action, one for each of the possible values for the “Which department is the project for?” question:
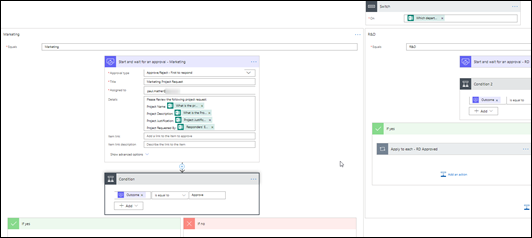
Now we will expand one of the cases to see the details and I will point out the differences between each case:
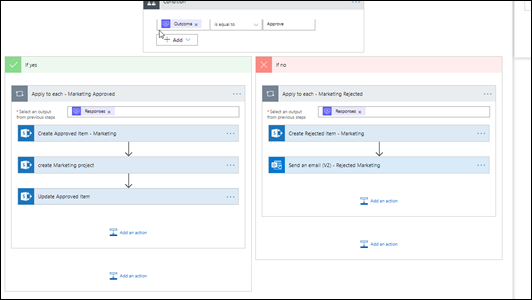
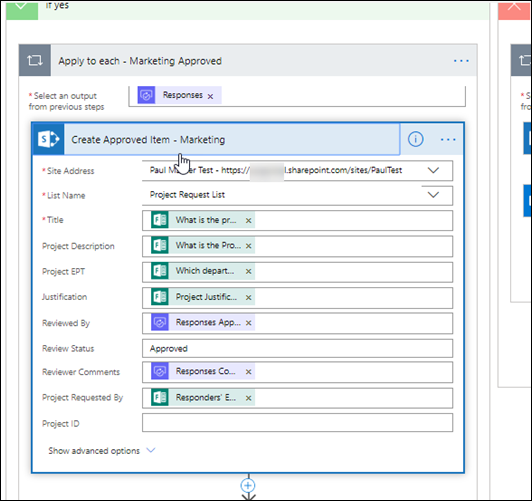
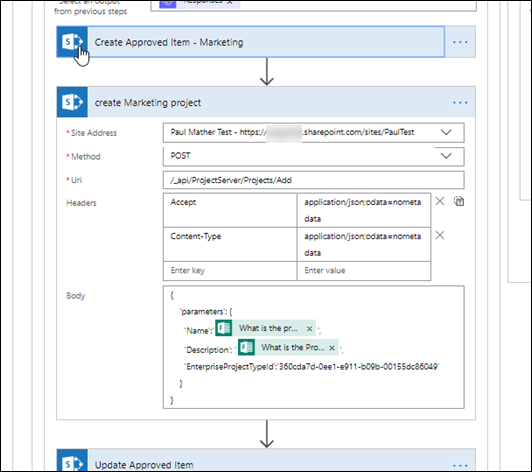
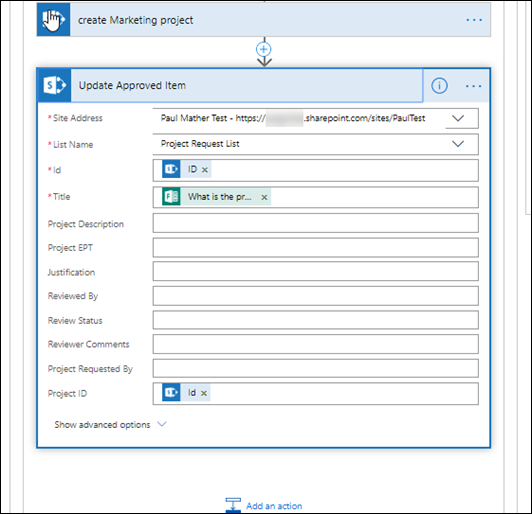
The first action in the case is a Flow Approval using the “Start and wait for an approval” action. This approval type is set to “Approve/Reject – First to response”. As this is the Marketing case, the approval title is “Marketing Project Request” and it is assigned to the user who approves new Marketing projects. I have just used my account for demo purposes! The title and approver it is assigned to could be different per department. Then in the details section we just pass in values from the “Get response details” action so that the approver knows what they are approving. Then there is a Condition action to check the outcome of the approval action, this just uses the Outcome output from the approval action. Then for approvals that were approved the Flow uses another Apply to each loop this time passing in the Approval action responses – we only have one approver but the Approvals action can have more than one response so it needs the loop. Then inside the approved loop the Flow uses the SharePoint create item action to create the list item on the Project Request List, then it uses the SharePoint HTTP action to create the project in Project Online then finally a SharePoint Update item action to update the list item with the newly created project ID. The overview can be seen below with details for these actions next:
Create item action has the Form answers and the approval reviewer and reviewers comments passed in to create the list item:
The SharePoint HTTP action posts to ProjectServer/Projects/Add API with the project name and description being passed in from the Form answers, the EnterpriseProjectTypeId is hard coded to the Marketing EPT – this GUID would be different in the other cases so the project is created with the correct EPT:
The final action for the approved request is to update the previously created list item on the project request list with the newly created project Id using the SharePoint Update item action. Here we pass in the ID from the previous Create Approved item action, the Title is required so that is set again using the Form answer and the Project ID is set using an expression body(‘create_Marketing_project’)[‘Id’]. The expression will be different for the other cases as it needs the name of the action that is used to create the project.
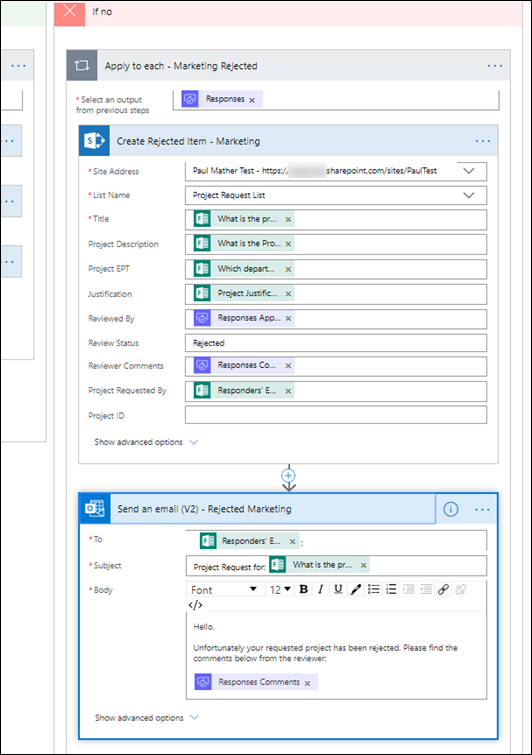
If the project request is rejected, the Flow creates the item on the list the same way is does if approved but the Review Status field is set to “Rejected” then the Flow sends an email to the user who requested the project:
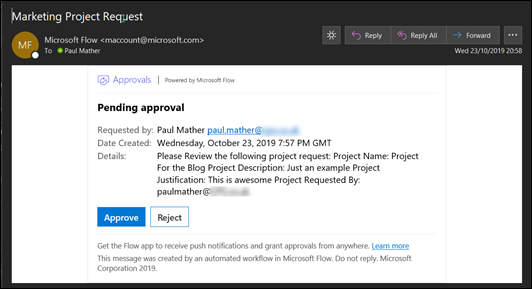
That’s it – really simple! Next I’ll show the approvals email for a requested project, this can be seen below:
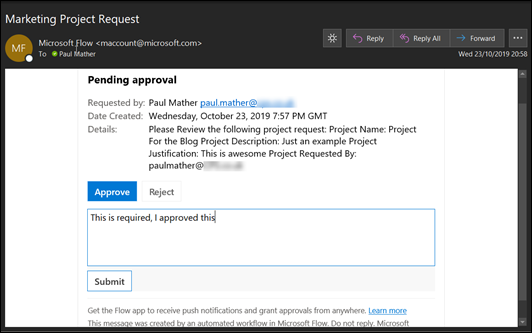
I will then approve this with some comments:
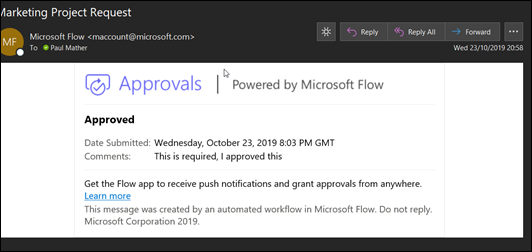
Once submitted, the email updates to show its approved:
In this example, the item is then created on the list, the project created and the list item updated with the project GUID. I will create a video in the next week or two to demo this.
A nice simple low / no code solution for building a project request process for Project Online using Microsoft Forms, SharePoint Online and Microsoft Flow, watch out for the video on my YouTube channel soon: https://www.youtube.com/channel/UC_b_pa1ADKlUqIpLK9AmR1g?sub_confirmation=1
How do I know if a SharePoint folder is also a Teams channel?
Simple… Now SharePoint will show it! It seems that this feature took just over a year and a half to be released, but well… it’s here finally! So stop moaning (that includes me who thought it was a must requirement from day 1 of Teams)!

Roadmap Featured ID: 30686
Added to Roadmap: 5/30/2018
Last Modified: 8/12/2019
Tags: Online, SharePoint, Worldwide (Standard Multi-Tenant)
The post How do I know if a SharePoint folder is also a Teams channel? appeared first on François on SharePoint, Office 365 and more technologies.
via François on SharePoint, Office 365 and more technologies http://bit.ly/2IzJgg5
|
French native Sharepoint Consultant living in London. A crossway between a designer, developer and system architect. Prefers stretching the limit of out-of-the-box features rather than breaking them into code. When not working with Microsoft Sharepoint François is often found on Web2.0 News sites and related social networking tools.
This article has been cross posted from sharepointfrancois.com (original article) |
Creating new Projects based on EPTs in #Office365 #ProjectOnline using #MicrosoftFlow #PPM #PowerPlatform #REST #MSProject #ProjectManagement
|
I am a Project Server and SharePoint consultant but my main focus currently is around Project Server.
I have been working with Project Server for nearly five years since 2007 for a Microsoft Gold Certified Partner in the UK, I have also been awared with the Microsoft Community Contributor Award 2011. I am also a certified Prince2 Practitioner. This article has been cross posted from pwmather.wordpress.com (original article) |
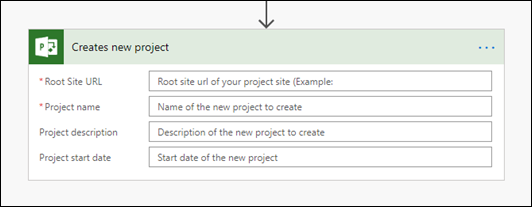
When creating projects in Office 365 Project Online you can create projects based on different types known as Enterprise Project Types, here is a link on setting these up: https://pwmather.wordpress.com/2014/01/27/getting-started-with-projectonline-part-5-ps2013-office365-project-ppm-sharepointonline-pm/ Creating a project via PWA enables you to select the correct EPT for your type of project. When creating a project programmatically you can also set the correct EPT. The default “Creates new project” Project Online Microsoft Flow action does not provide the ability to set the Enterprise Project Type, it will just use the default type. The action can be seen below:
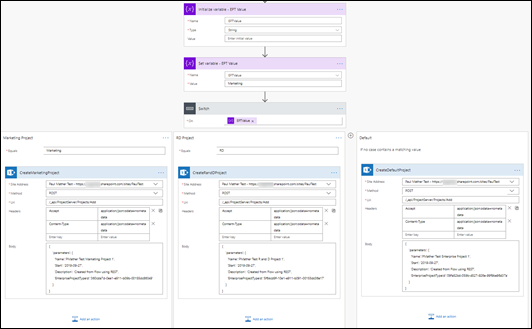
The easy solution is to use the SharePoint HTTP action to use the Project Online CSOM REST API as seen below in this example:
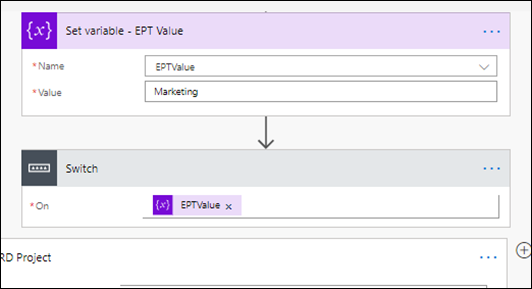
This example is very much hard coded and manual when setting the EPT value, project names etc. In a real world example these would be set from the source application requesting to create a project, but the process is the same. So assuming the source application had set the variable to Marketing as seen below, the switch action would then check the value in the variable:
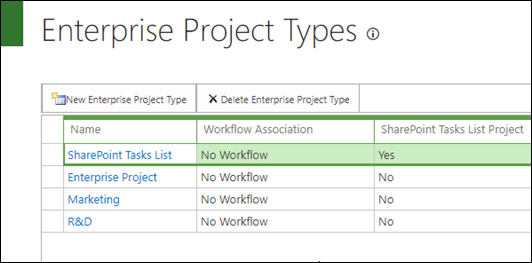
In the switch action you would have switch cases for each EPT you have / want to use. In my test PWA instance I have 3 EPTs I wanted to use – Enterprise Project, Marketing and R&D:
I have set the Switch action to have 3 cases, 2 to match the the EPT values for Marketing and RD then the 3rd as a catch all that uses the default Enterprise Project EPT.
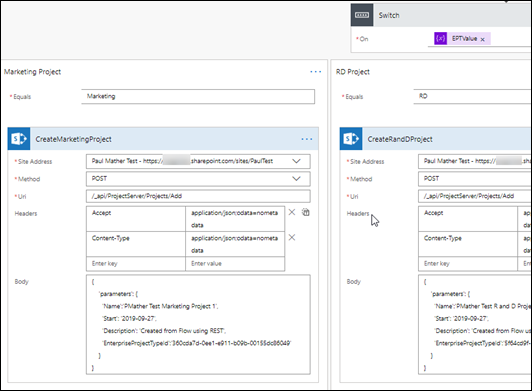
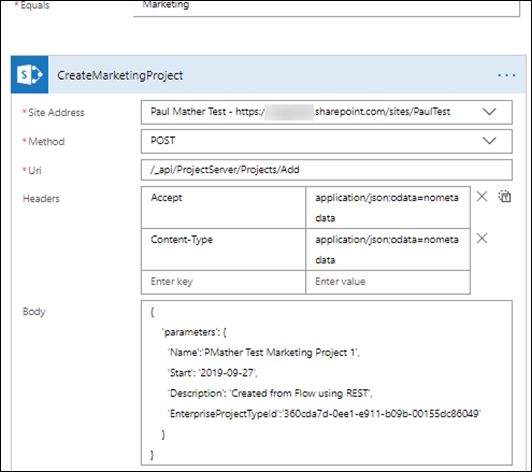
In this example case the variable value is Marketing so the Switch action would then use the CreateMarketingProject action seen below – this is the SharePoint HTTP action:
Here we call the _api/ProjectServer/Project/Add project API with a POST request and pass JSON in the body that details how to create the project as seen below:
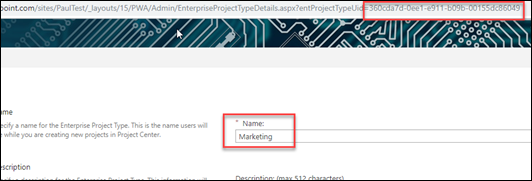
The key parameter value here for the EPT is the EnterpriseProjectTypeId, in this case this is the GUID for the Marketing EPT as seen below:
The EnterpriseProjectTypeId GUIDs are different in the other cases within the Switch action so that the projects are created using the correct EPT. Without passing in the EnterpriseProjectTypeId, the project would create using the default EPT. A simple solution for creating the correct project type in Project Online using the Power Platform application Microsoft Flow.
#ProjectOnline – how to check if a project is checked out using #MicrosoftFlow #Office365 #PPM #MSProject #PowerPlatform #ProjectManagement
|
I am a Project Server and SharePoint consultant but my main focus currently is around Project Server.
I have been working with Project Server for nearly five years since 2007 for a Microsoft Gold Certified Partner in the UK, I have also been awared with the Microsoft Community Contributor Award 2011. I am also a certified Prince2 Practitioner. This article has been cross posted from pwmather.wordpress.com (original article) |
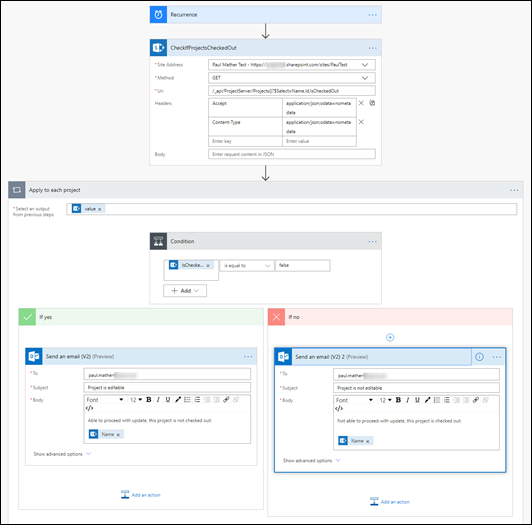
When programmatically working with projects in Office 365 Project Online, if you wish to edit a project, you will only be able to do this if the project is not already checked out. Below is a simple example using Microsoft Flow to check if the projects are checked out:
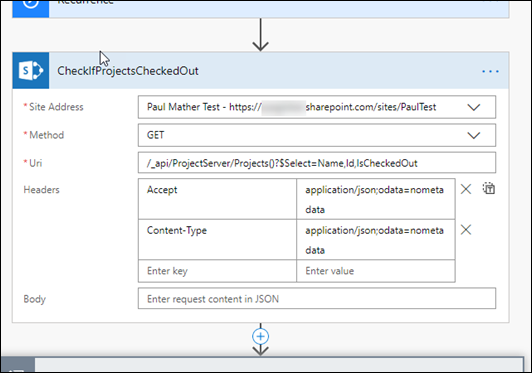
The Flow is detailed below. Firstly the Flow will query the ProjectServer API which is the CSOM REST API using a SharePoint HTTP action:
This queries the Projects endpoint and includes the IsCheckedOut property. NOTE: Use an account for the SharePoint connection that has full edit access to all project in the PWA site collection as the ProjectServer API is security trimmed.
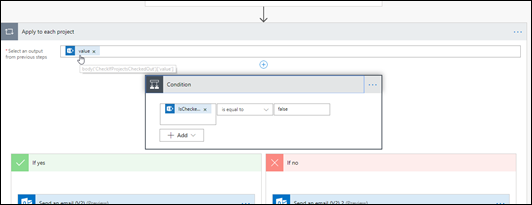
Then the Flow uses an Apply to each loop, the dataset returned from the previous action is used which is body(‘CheckIfProjectsCheckedOut’)[‘value’]. Then a condition action is used, this is where the Flow will check if the project is checked out. The value passed into the check is the IsCheckedOut property using items(‘Apply_to_each_project’)[‘IsCheckedOut’], here we check if this is false:
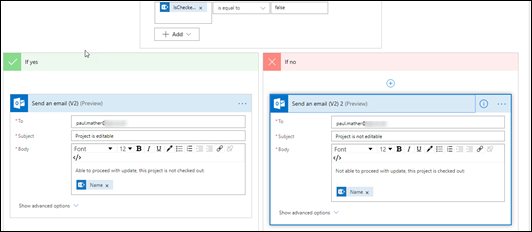
Now at this point you would continue with your project update if this check was true (project is not checked out) and not proceed with the update if this check was false (project is checked out). For the purpose of this example Flow, I just send an email but in a real world example, this is where your actions would go to update the projects, log which projects could not be updated etc.
A simple solution to help build more robust Flows for Project Online.
Introducing the reimagined Microsoft Project! #ProjectOnline #Office365 #PowerPlatform #PPM #ProjectManagement
|
I am a Project Server and SharePoint consultant but my main focus currently is around Project Server.
I have been working with Project Server for nearly five years since 2007 for a Microsoft Gold Certified Partner in the UK, I have also been awared with the Microsoft Community Contributor Award 2011. I am also a certified Prince2 Practitioner. This article has been cross posted from pwmather.wordpress.com (original article) |
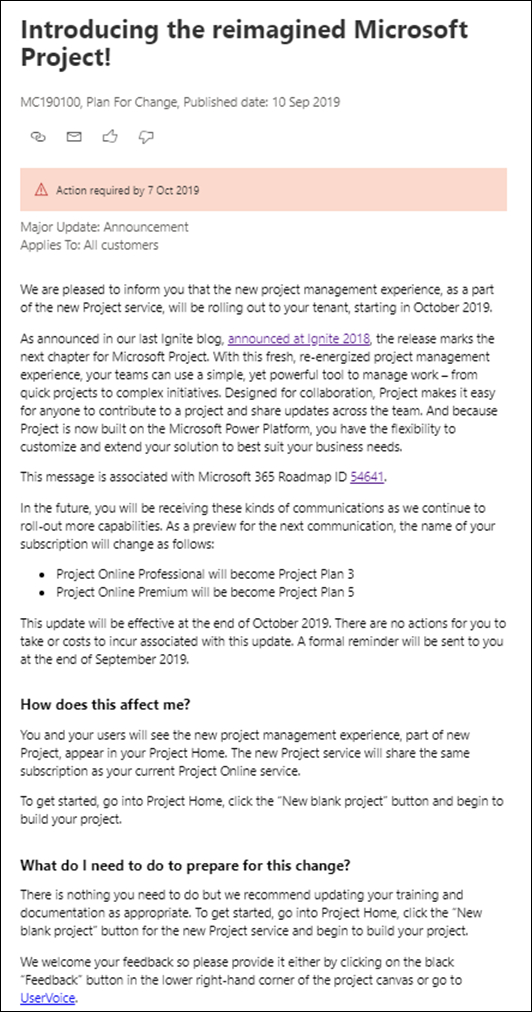
There was a nice new message in the Office 365 message center today – Introducing the reimagined Microsoft Project! This can be seen below:
This includes a link to the published roadmap item: https://www.microsoft.com/en-gb/microsoft-365/roadmap?filters=&filters=&searchterms=54641
Looking forward to the new Project going live!
#ProjectOnline and #AzureDevOps integration using #MicrosoftFlow #Office365 #PPM #AzureBoards #MSProject #PowerPlatform #ProjectManagement
|
I am a Project Server and SharePoint consultant but my main focus currently is around Project Server.
I have been working with Project Server for nearly five years since 2007 for a Microsoft Gold Certified Partner in the UK, I have also been awared with the Microsoft Community Contributor Award 2011. I am also a certified Prince2 Practitioner. This article has been cross posted from pwmather.wordpress.com (original article) |
I’ve posted quite a few posts for Project Online using Microsoft Flow recently so here is another! The last one was to chase / prompt users for in progress overdue timesheets, if you didn’t see this, here it is: https://pwmather.wordpress.com/2019/08/28/projectonline-and-adaptive-cards-in-microsoftteams-using-microsoftflow-to-chase-users-for-overdue-timesheets-ppm-projectmanagement-msproject-powerplatform-office365/
This time we will look at integrating Office 365 Project Online with Azure DevOps using my favourite Power Platform application Microsoft Flow. The Flow can be seen below:
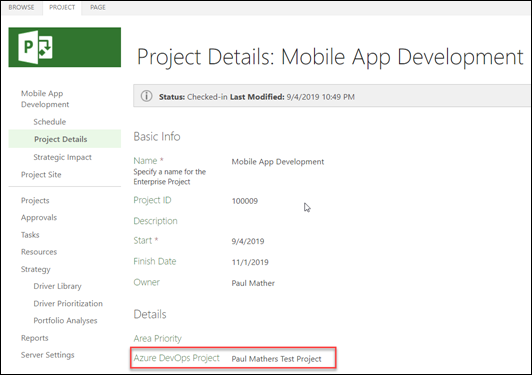
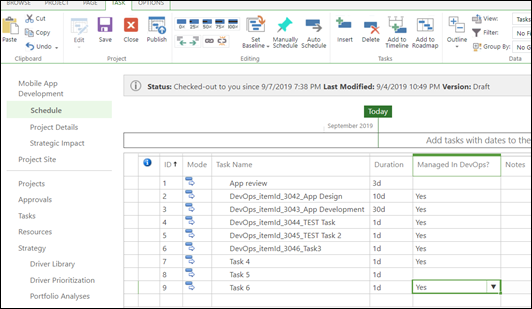
I have two Project Online Enterprise custom fields to support this process. A new project level text custom field called “Azure DevOps Project” to hold the DevOps project name and a new task level flag field called “Managed In DevOps?” to flag which tasks are managed in DevOps. Project Level field seen here in my test project:
Task Level:
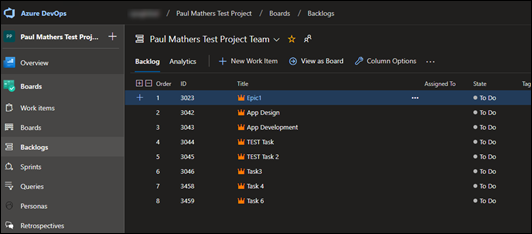
In this example test project, the process has run already for tasks 2 to 6 as you can see the task names have updated with the prefix “DevOps_itemId_{id}_” and here are the test project tasks in Azure DevOps:
When the Flow runs, Task 4 and Task 6 will be added to the backlog as Epics in this example based on the process used in this test Azure DevOps project:
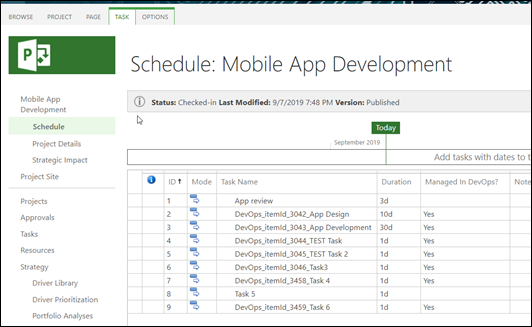
The tasks in the project are also updated with the prefix:
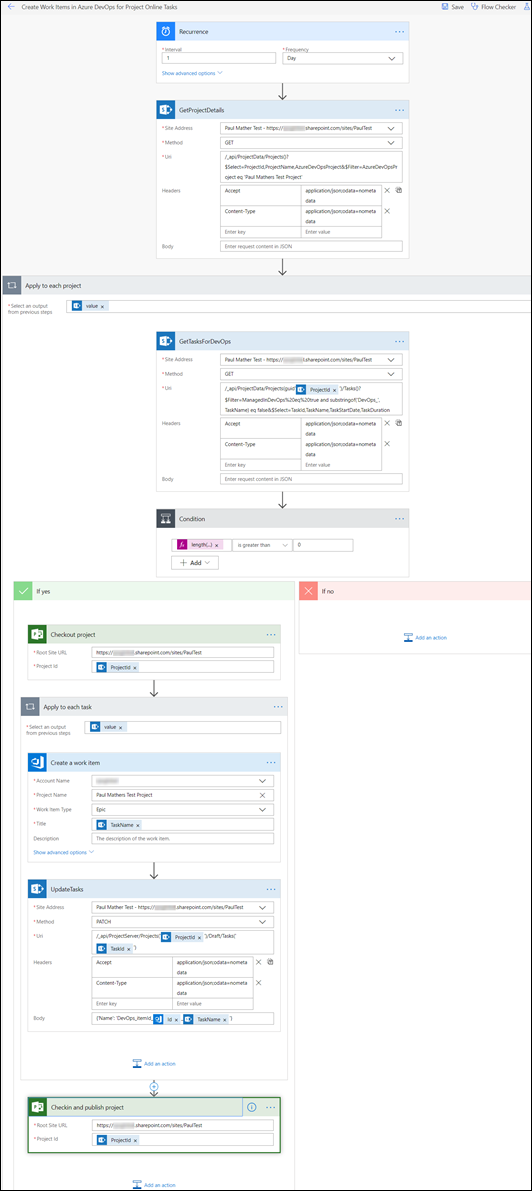
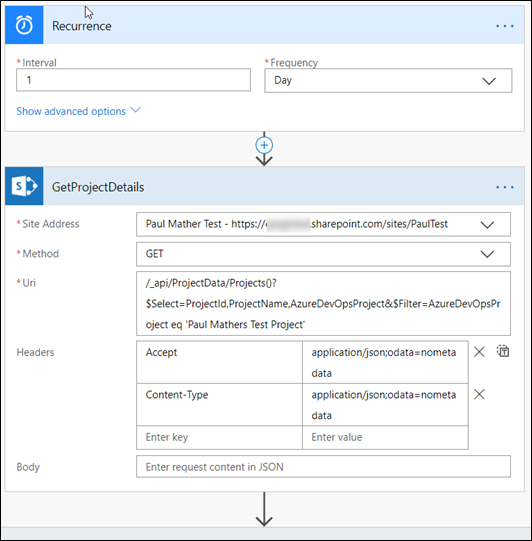
Now we will walkthrough the Flow actions. This is triggered on a schedule, in this example it runs daily, then the first action used is a SharePoint HTTP action to query the Project Reporting API to get the Project details for all Projects linked to the Azure DevOps projects. In this example, the Flow is fixed to one Azure DevOps project but you can have multiple Project Online projects creating tasks in the one Azure DevOps project. For additional DevOps projects, create additional Flows / extend as required.
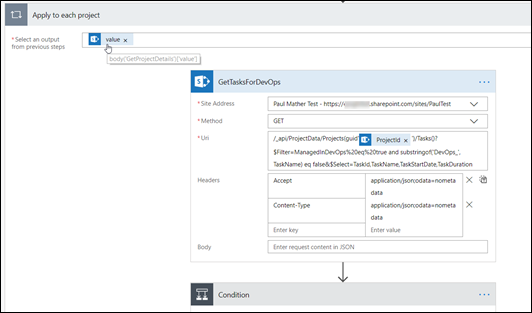
Then an apply to each action is used as the first action could return multiple projects if there are multiple projects in Project Online that have an Azure DevOps Project custom field value of “Paul Mathers Test Project”. The results from the GetProjectDetails action is passed in, then for each project in the dataset another SharePoint HTTP action is used to query the Project Reporting API to get all tasks for the current project where the task is tagged with “Yes” for the new “Managed in DevOps?” custom field and where the task name doesn’t already have the “DevOps_” prefix. The Project ID is passed into the Uri using the expression: items(‘Apply_to_each_project’)[‘ProjectId’]
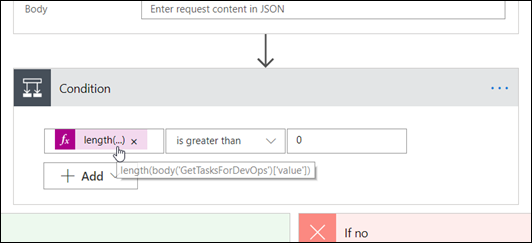
Then there is a condition action to check if there is at least 1 task in the results from the GetTasksForDevOps action:
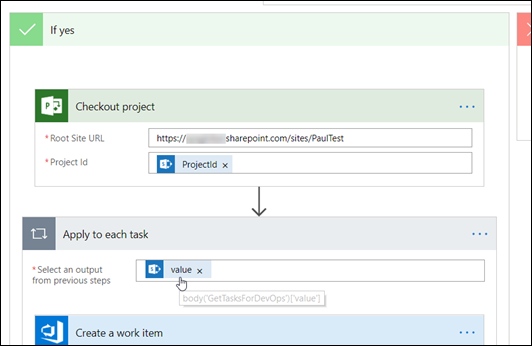
If the condition check is true, the Project is checked out using the Project Online Checkout project action, the project Id is passed in using the expression items(‘Apply_to_each_project’)[‘ProjectId’] then another Apply to each action is used and the output from the GetTasksForDevOps action is passed in:
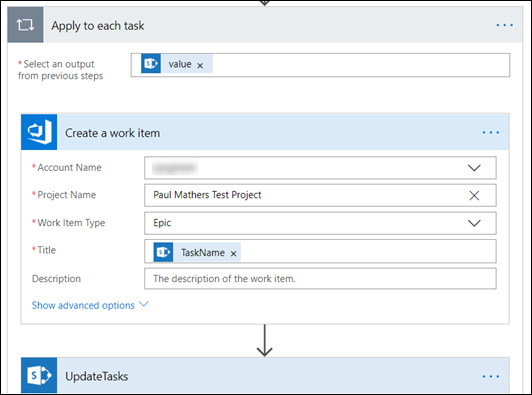
Two actions will run inside this apply to each action for each task returned in the GetTasksForDevOps action. Inside this apply to each action the Azure DevOps Create a work item action is used. The account name, project and work item type are set and fixed – set the work item type as needed based on the process used in the DevOps project. The title is dynamic using the expression items(‘Apply_to_each_task’)[‘TaskName’]:
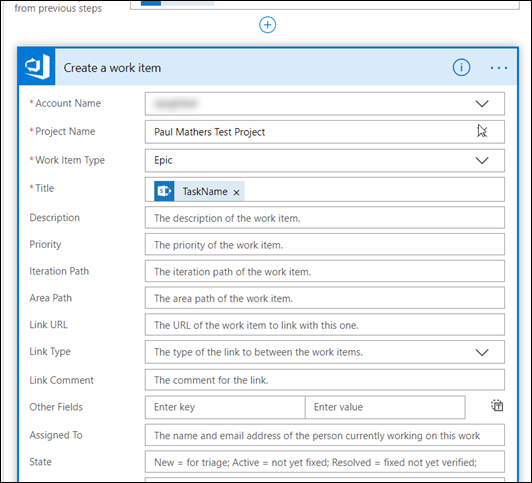
There are other properties you can set in the advanced options if required:
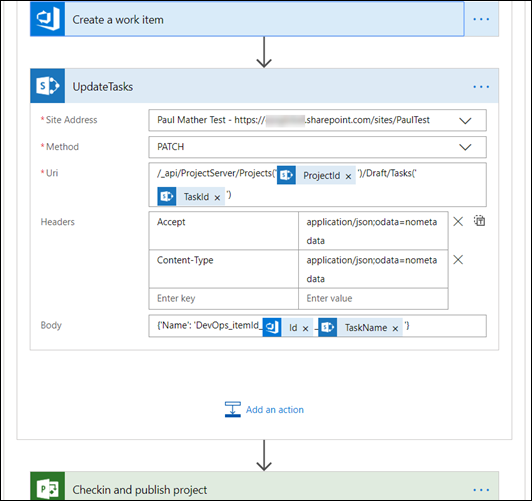
The final action inside the Apply to each task action is another SharePoint HTTP action, this time to send a PATCH request to the Project Online CSOM REST API to update the task name. The following expressions are used in the Uri items(‘Apply_to_each_project’)[‘ProjectId’] and items(‘Apply_to_each_task’)[‘TaskId’]. In the Body the task name details are inlcuded, the Id of the newly created work item is passed in from the dynamic content and also the task name using the expression items(‘Apply_to_each_task’)[‘TaskName’]:
Once the apply to each task action is completed, the final action in the true part of the condition action is the Project Online Checkin and publish project action. The project Id is passed in using the expression items(‘Apply_to_each_project’)[‘ProjectId’]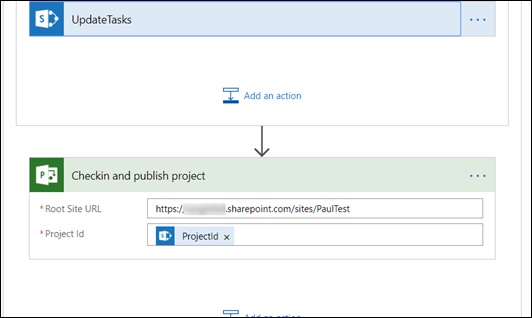
The account used in the SharePoint connection will need access to to Project Online Reporting API and also edit access to all projects. The account used in the Project Online connection will also need edit access to all projects.
That’s it, another simple no code solution for Office 365 Project Online using Microsoft Flow from the Power Platform. This is a simple example that could be extended a lot based on your requirements but hopefully this will provide you a good starting point or give you some inspiration on how to achieve your integration requirements.

















You must be logged in to post a comment.