Gitea and Jenkins with Nginx SSL Proxy on Ubuntu

Install Ubuntu 20.04

I install a minimal desktop instance.

Install packages needed for later:

apt-get install -y vim git build-essential openssh-server curl wget

Update and upgrade:

sudo -i
apt-get update
apt-get upgrade

Open the firewall ports needed for later:

ufw allow 8080
ufw allow 22
ufw allow 3000
ufw allow 80
ufw allow 443
ufw allow 8443

ufw enable
ufw status

Install Gitea

First install MariaDB Server for use with Gitea:

apt-get install -y mariadb-server
mysql_secure_installation

Set a password

Select yes to the remaining questions.

Create a database to make sure everything is working correctly, change the password to your own:

mysql -u root -p   
create database gitea;
grant all privileges on gitea.* to 'gitea'@localhost identified by 'password';
quit;

Add the Gitea repository, install Gitea and start it:

curl -sL -o /etc/apt/trusted.gpg.d/morph027-gitea.asc https://packaging.gitlab.io/gitea/gpg.key

echo "deb [arch=amd64] https://packaging.gitlab.io/gitea gitea main" | sudo tee /etc/apt/sources.list.d/morph027-gitea.list

apt-get update
apt-get install -y gitea

systemctl start gitea
systemctl enable gitea

Create the log directory:

mkdir -p /var/log/gitea

Go to the Gitea web page on your server:

http://ip.add.re.ss:3000 

Also make sure you can get there by name:

http://gitea.home.local:3000

Create the Administrator Username and password. Make changes to the Gitea configuration as you feel appropriate, however, the log path should now be:

/var/log/gitea

Change the log directory ownership:

chown gitea:gitea /var/log/gitea
<p id="On Gitea create an organization:
Dashboard -> Organization
Organization Name: Home

Add the jenkins user:
Site Administration -> User Accounts -> Create User Account
Do not require the user to change the password on next login.

People:
    jenkins
    jud

Install Jenkins

First install the Jenkins prerequisites:

apt-get install openjdk-11-jdk
java -version
openjdk version "11.0.11" 2021-04-20
OpenJDK Runtime Environment (build 11.0.11+9-Ubuntu-0ubuntu2.20.04)
OpenJDK 64-Bit Server VM (build 11.0.11+9-Ubuntu-0ubuntu2.20.04, mixed mode, sharing)

Add the Jenkins repository and install Jenkins:

wget -q -O - https://pkg.jenkins.io/debian-stable/jenkins.io.key | sudo apt-key add -

sh -c 'echo deb http://pkg.jenkins.io/debian-stable binary/ > /etc/apt/sources.list.d/jenkins.list'

apt-get update
apt-get install -y jenkins

Unlock Jenkins by go to the URL:
http://192.168.128.65:8080

cat /var/lib/jenkins/secrets/initialAdminPassword 
9c48273795be49b39aa2ba4a99ce5f93

Paste the code into the Administrator password field.

Install the suggested plugins.

Create the first Admin User.

Create the Self-signed Certificate

Back up the SSL configuration file and create a Jenkins configuration file.

cp /etc/ssl/openssl.cnf /etc/ssl/openssl.cnf.0
cp /etc/ssl/openssl.cnf /etc/ssl/jenkins.cnf

Edit the jenkins file and add the subject_alt_name stanza below in the [ v3_va ] section:

vim /etc/ssl/jenkins.cnf
[ v3_ca ]
subjectAltName = @alt_names

[ alt_names ]
DNS.1 = gitea
DNS.2 = gitea.home.local
DNS.3 = jenkins
DNS.4 = jenkins.home.local
DNS.5 = localhost
IP.1 = 127.0.0.1
IP.2 = 192.168.128.65

This is the jenkins.cnf file I used. Copy this file into the /etc/ssl directory.

cat /etc/ssl/jenkins.cnf | egrep -v ^#
HOME			= .
oid_section		= new_oids
[ new_oids ]
tsa_policy1 = 1.2.3.4.1
tsa_policy2 = 1.2.3.4.5.6
tsa_policy3 = 1.2.3.4.5.7

[ ca ]
default_ca	= CA_default		# The default ca section

[ CA_default ]
dir		= ./demoCA		# Where everything is kept
certs		= $dir/certs		# Where the issued certs are kept
crl_dir		= $dir/crl		# Where the issued crl are kept
database	= $dir/index.txt	# database index file.
					# several certs with same subject.
new_certs_dir	= $dir/newcerts		# default place for new certs.

certificate	= $dir/cacert.pem 	# The CA certificate
serial		= $dir/serial 		# The current serial number
crlnumber	= $dir/crlnumber	# the current crl number
					# must be commented out to leave a V1 CRL
crl		= $dir/crl.pem 		# The current CRL
private_key	= $dir/private/cakey.pem# The private key

x509_extensions	= usr_cert		# The extensions to add to the cert

name_opt 	= ca_default		# Subject Name options
cert_opt 	= ca_default		# Certificate field options

default_days	= 365			# how long to certify for
default_crl_days= 30			# how long before next CRL
default_md	= default		# use public key default MD
preserve	= no			# keep passed DN ordering

policy		= policy_match

[ policy_match ]
countryName		= match
stateOrProvinceName	= match
organizationName	= match
organizationalUnitName	= optional
commonName		= supplied
emailAddress		= optional

[ policy_anything ]
countryName		= optional
stateOrProvinceName	= optional
localityName		= optional
organizationName	= optional
organizationalUnitName	= optional
commonName		= supplied
emailAddress		= optional

[ req ]
default_bits		= 2048
default_keyfile 	= privkey.pem
distinguished_name	= req_distinguished_name
attributes		= req_attributes
x509_extensions	= v3_ca	# The extensions to add to the self signed cert
string_mask = utf8only

req_extensions = v3_req # The extensions to add to a certificate request

[ req_ext ]
subjectKeyIdentifier        = hash
basicConstraints        = CA:FALSE
keyUsage            = digitalSignature, keyEncipherment
nsComment           = "OpenSSL Generated Certificate"


[ req_distinguished_name ]
countryName			= Country Name (2 letter code)
countryName_default		= US
countryName_min			= 2
countryName_max			= 2
stateOrProvinceName		= State or Province Name (full name)
stateOrProvinceName_default	= Georgia
localityName			= Locality Name (eg, city)
localityName_default		= Evans
0.organizationName		= Organization Name (eg, company)
0.organizationName_default	= Home
organizationalUnitName		= Organizational Unit Name (eg, section)
organizationalUnitName_default	= Office
commonName			= Common Name (e.g. server FQDN or YOUR name)
commonName_max			= 64
emailAddress			= Email Address
emailAddress_max		= 64

[ req_attributes ]
challengePassword		= A challenge password
challengePassword_min		= 4
challengePassword_max		= 20
unstructuredName		= An optional company name

[ usr_cert ]
basicConstraints=CA:FALSE
nsComment			= "OpenSSL Generated Certificate"
subjectKeyIdentifier=hash
authorityKeyIdentifier=keyid,issuer

[ v3_req ]
basicConstraints=CA:FALSE
keyUsage = digitalSignature, nonRepudiation, keyEncipherment, dataEncipherment

[ v3_ca ]
subjectKeyIdentifier=hash
authorityKeyIdentifier=keyid:always,issuer
basicConstraints = critical,CA:true
subjectAltName = @alt_names

[ crl_ext ]
authorityKeyIdentifier=keyid:always

[ proxy_cert_ext ]
basicConstraints=CA:FALSE
nsComment			= "OpenSSL Generated Certificate"
subjectKeyIdentifier=hash
authorityKeyIdentifier=keyid,issuer
proxyCertInfo=critical,language:id-ppl-anyLanguage,pathlen:3,policy:foo

[ tsa ]
default_tsa = tsa_config1	# the default TSA section

[ tsa_config1 ]
dir		= ./demoCA		# TSA root directory
serial		= $dir/tsaserial	# The current serial number (mandatory)
crypto_device	= builtin		# OpenSSL engine to use for signing
signer_cert	= $dir/tsacert.pem 	# The TSA signing certificate
					# (optional)
certs		= $dir/cacert.pem	# Certificate chain to include in reply
					# (optional)
signer_key	= $dir/private/tsakey.pem # The TSA private key (optional)
signer_digest  = sha256			# Signing digest to use. (Optional)
default_policy	= tsa_policy1		# Policy if request did not specify it
					# (optional)
other_policies	= tsa_policy2, tsa_policy3	# acceptable policies (optional)
digests     = sha1, sha256, sha384, sha512  # Acceptable message digests (mandatory)
accuracy	= secs:1, millisecs:500, microsecs:100	# (optional)
clock_precision_digits  = 0	# number of digits after dot. (optional)
ordering		= yes	# Is ordering defined for timestamps?
				# (optional, default: no)
tsa_name		= yes	# Must the TSA name be included in the reply?
				# (optional, default: no)
ess_cert_id_chain	= no	# Must the ESS cert id chain be included?
				# (optional, default: no)
ess_cert_id_alg		= sha1	# algorithm to compute certificate
				# identifier (optional, default: sha1)


[ alt_names ] 
DNS.1 = gitea
DNS.2 = gitea.home.local
DNS.3 = jenkins
DNS.4 = jenkins.home.local 
DNS.5 = localhost
IP.1 = 127.0.0.1
IP.2 = 192.168.128.65
# End /etc/ssl/jenkins.conf

The self-signed certificate will be used for Nginx later.  Create a self-signed certificate:

openssl req -x509 -nodes -days 3650 -config /etc/ssl/jenkins.cnf -newkey rsa:2048 -keyout /etc/ssl/private/nginx-selfsigned.key -out /etc/ssl/certs/nginx-selfsigned.crt -sha256 -reqexts v3_req

Country Name (2 letter code) [US]:
State or Province Name (full name) [Georgia]:
Locality Name (eg, city) [Evans]:
Organization Name (eg, company) [Home]:
Organizational Unit Name (eg, section) [Office]:
Common Name (e.g. server FQDN or YOUR name) []:gitea.home.local
Email Address []:

Check the certificate you just created:

openssl x509 -in /etc/ssl/certs/nginx-selfsigned.crt -text -noout
openssl x509 -in /etc/ssl/certs/nginx-selfsigned.crt -noout -ext subjectAltName

Create a pkcs12 file, do not leave the password blank:

openssl pkcs12 -export -out jenkins-selfsigned.p12 -inkey /etc/ssl/private/nginx-selfsigned.key -in /etc/ssl/certs/nginx-selfsigned.crt 
Enter Export Password:
Verifying - Enter Export Password:

Use keytool for Java and Jenkins to convert from .p12 to .jks.  Just FYI new password will be added to the Jenkins configuration file:

keytool -importkeystore -destkeystore jenkins.jks -deststoretype PKCS12 -srcstoretype PKCS12 -srckeystore jenkins-selfsigned.p12

Create a directory for the jenkins keystore, and place our keystore in it:

mkdir -p /etc/jenkins
mv /etc/ssl/jenkins.jks /etc/jenkins/

chown -R jenkins: /etc/jenkins
chmod 700 /etc/jenkins
chmod 600 /etc/jenkins/jenkins.jks

Verify the .jks file:

keytool -list -v -keystore /etc/jenkins/jenkins.jks

Backup the Jenkins Configuration file:

cp /etc/default/jenkins /etc/default/jenkins.0

Edit the Jenkins configuration file to add SSL by add the following configuration stanza below:

vim /etc/default/jenkins
HTTP_PORT="-1"
HTTPS_PORT="8443"
HTTPS_KEYSTORE="/etc/jenkins/jenkins.jks"
HTTPS_KEYSTORE_PASSWORD="<your-password>"
JENKINS_ARGS="--webroot=/var/cache/$NAME/war --httpPort=$HTTP_PORT --httpsPort=$HTTPS_PORT --httpsKeyStore=$HTTPS_KEYSTORE --httpsKeyStorePassword=$HTTPS_KEYSTORE_PASSWORD"

Restart Jenkins:

systemctl restart jenkins

Navigate to Jenkins on your browser:
https://192.168.128.65:8443

Configure Nginx as an SSL Termination Proxy

Install Nginx and allow it through the firewall.

apt-get install -y nginx
systemctl status nginx

ufw allow 'Nginx Full'
ufw status

Go to web page and make sure it works:
http://192.168.128.65
http://gitea.home.local

Back up the default sites file:

cp /etc/nginx/sites-available/default /etc/nginx/sites-available/default.0

First we will set up Nginx to proxy for Gitea and Gitea will be the default redirect if you just go to the website:

cat /etc/nginx/sites-available/default | egrep -v ^#
server {
    # gitea.home.local is the default
    listen 80;
    server_name gitea.home.local;
    return 301 https://$server_name$request_uri;
}

server {
    server_name gitea.home.local;
    listen 443 ssl http2;
    include snippets/self-signed.conf;
    include snippets/ssl-params.conf;

    # Log files
    access_log /var/log/nginx/gitea.access.log;
    error_log /var/log/nginx/gitea.error.log;

    # Handle / requests
    location / {
       proxy_pass http://192.168.128.65:3000;
    }
}

Set up Nginx for SSL:

cat /etc/nginx/snippets/self-signed.conf 
ssl_certificate /etc/ssl/certs/nginx-selfsigned.crt;
ssl_certificate_key /etc/ssl/private/nginx-selfsigned.key;


cat /etc/nginx/snippets/ssl-params.conf 
# from https://cipherli.st/
# and https://raymii.org/s/tutorials/Strong_SSL_Security_On_nginx.html

ssl_protocols TLSv1 TLSv1.1 TLSv1.2;
ssl_prefer_server_ciphers on;
ssl_ciphers "EECDH+AESGCM:EDH+AESGCM:AES256+EECDH:AES256+EDH";
ssl_ecdh_curve secp384r1;
ssl_session_cache shared:SSL:10m;
ssl_session_tickets off;
ssl_stapling on;
ssl_stapling_verify on;
resolver 8.8.8.8 8.8.4.4 valid=300s;
resolver_timeout 5s;
# Disable preloading HSTS for now.  You can use the commented out header line that includes
# the "preload" directive if you understand the implications.
#add_header Strict-Transport-Security "max-age=63072000; includeSubdomains; preload";
add_header Strict-Transport-Security "max-age=63072000; includeSubdomains";
add_header X-Frame-Options DENY;
add_header X-Content-Type-Options nosniff;

Check and make sure the firewall is open:

ufw app list
Available applications:
  CUPS
  Nginx Full
  Nginx HTTP
  Nginx HTTPS
  OpenSSH

Test the Nginx configuration:

nginx -t
nginx: [warn] "ssl_stapling" ignored, issuer certificate not found for certificate "/etc/ssl/certs/nginx-selfsigned.crt"
nginx: the configuration file /etc/nginx/nginx.conf syntax is ok
nginx: configuration file /etc/nginx/nginx.conf test is successful

Make sure you can login to Gitea:
https://192.168.128.65
https://gitea.home.local

Set up Nginx to proxy for Jenkins:

Backup the Nginx configuration for Gitea:

cp /etc/nginx/sites-available/default /etc/nginx/sites-available/default.gitea.works

Change the file /etc/nginx/sites-available/default to work for Jenkins:

server {
    server_name jenkins.home.local;
    listen 443 ssl http2;
    include snippets/self-signed.conf;
    include snippets/ssl-params.conf;

    location / {
        proxy_set_header        Host $host:$server_port;
        proxy_set_header        X-Real-IP $remote_addr;
        proxy_set_header        X-Forwarded-For $proxy_add_x_forwarded_for;
        proxy_set_header        X-Forwarded-Proto $scheme;

        proxy_pass          http://192.168.128.65:8080;
        proxy_read_timeout  90;
        proxy_redirect      http://192.168.128.65:8080 https://jenkins.home.local;

        proxy_http_version 1.1;
        proxy_request_buffering off;
        add_header 'X-SSH-Endpoint' 'jenkins.home.local:50022' always;
    }
}

Check the Nginx configuration and restart:

nginx -t
systemctl restart nginx

Test that you can login to the Jenkins server.
https://192.168.128.65
https://jenkins.home.local

Backup the Nginx configuration for Jenkins:

cp /etc/nginx/sites-available/default /etc/nginx/sites-available/default.jenkins.works

Now combine the two configuration files:

cat /etc/nginx/sites-available/default  | egrep -v ^#

server {
    server_name jenkins.home.local;
    listen 443 ssl http2;
    include snippets/self-signed.conf;
    include snippets/ssl-params.conf;

    location / {
        proxy_set_header        Host $host:$server_port;
        proxy_set_header        X-Real-IP $remote_addr;
        proxy_set_header        X-Forwarded-For $proxy_add_x_forwarded_for;
        proxy_set_header        X-Forwarded-Proto $scheme;

        proxy_pass          http://192.168.128.65:8080;
        proxy_read_timeout  90;
        proxy_redirect      http://192.168.128.65:8080 https://jenkins.home.local;

        proxy_http_version 1.1;
        proxy_request_buffering off;
        add_header 'X-SSH-Endpoint' 'jenkins.home.local:50022' always;
    }
}


server {
    # gitea.home.local is the default
    listen 80;
    server_name gitea.home.local;
    return 301 https://$server_name$request_uri;
}

server {
    server_name gitea.home.local;
    listen 443 ssl http2;
    include snippets/self-signed.conf;
    include snippets/ssl-params.conf;

    # log files
    access_log /var/log/nginx/gitea.access.log;
    error_log /var/log/nginx/gitea.error.log;

    # Handle / requests
    location / {
       proxy_pass http://192.168.128.65:3000;
    }
}

Check the Nginx configuration and restart:

nginx -t
systemctl restart nginx

Now change Jenkins to listen on 127.0.0.1 and Nginx to redirect to 127.0.0.1.

Edit the file /etc/default/jenkins:

HTTP_PORT=8080
HTTP_HOST=127.0.0.1

JENKINS_ARGS="--webroot=/var/cache/$NAME/war --httpPort=$HTTP_PORT --httpListenAddress=$HTTP_HOST"

Then restart Jenkins:

systemctl restart jenkins

Change the IP address from 192.168.128.65 to 127.0.0.1 in the file /etc/nginx/sites-available/default.

server {
    server_name jenkins.home.local;
    listen 443 ssl http2;
    include snippets/self-signed.conf;
    include snippets/ssl-params.conf;

    location / {
        proxy_set_header        Host $host:$server_port;
        proxy_set_header        X-Real-IP $remote_addr;
        proxy_set_header        X-Forwarded-For $proxy_add_x_forwarded_for;
        proxy_set_header        X-Forwarded-Proto $scheme;

        proxy_pass          http://127.0.0.1:8080;
        proxy_read_timeout  90;
        proxy_redirect      http://127.0.0.1:8080 https://jenkins.home.local;

        proxy_http_version 1.1;
        proxy_request_buffering off;
        add_header 'X-SSH-Endpoint' 'jenkins.home.local:50022' always;
    }
}

Check the Nginx configuration and restart:

nginx -t
systemctl restart nginx

Make sure both Gitea and Jenkins still work.

Integrate Jenkins with Gitea:

Login to Gitea as the administrator user and create an Organization.

Create a team in Gitea and add yourself and jenkins to the team.

Now create a repository  under the Home organization:

Navigate in the Jenkins Dashboard as the Admin user:

Manage Jenkins -> Manage Plugins -> Available -> Search -> gitea

Gitea plugin

Install without restart

Navigate in the Jenkins Dashboard as the Admin user:
Manage Jenkins -> Configure System -> Gitea Servers -> Add
Server URL:
http://192.168.128.65:3000

Click Save

On the Jenkins server create a Jenkins Project:
New Item
Enter an item name
Gitea Organization Folder
Choose:
Organization Folder
OK

Gitea Organization Folder
Display Name: Gitea Integration

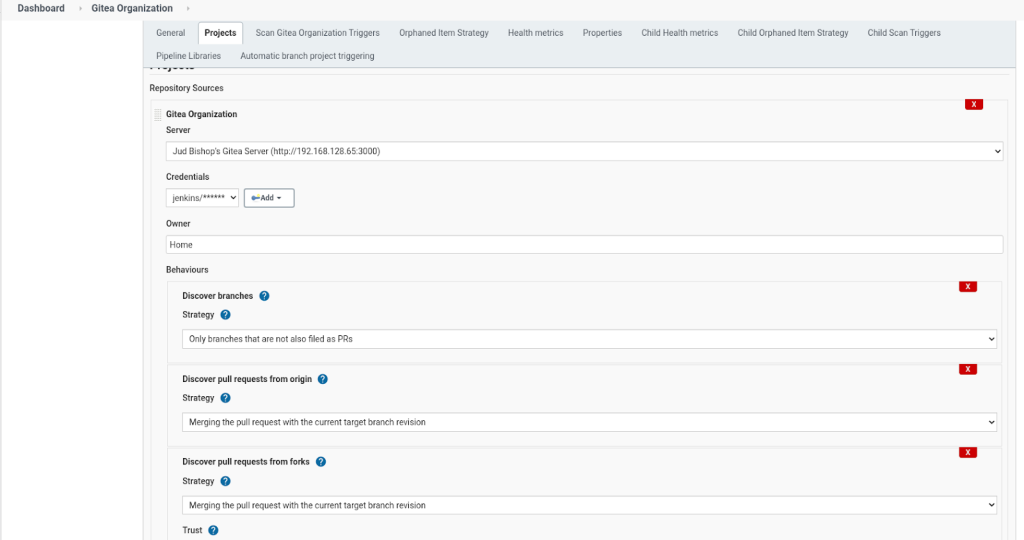
Projects -> Repository Sources -> Add ->Gitea Organization
Server will fill in automatically
Credentials
Add
jenkins

Create the repository on your development box and initialize git:

mkdir Test
cd Test
touch README.md
vim Jenkinsfile
pipeline {
    agent any

    stages {
        stage('Do nothing') {
            steps {
                sh '/bin/true'
            }
        }
    }
}
git config --global http.sslverify false
git init
git add .
git commit -m “Added README.md and Jenkinsfile”
git remote add origin https://gitea.home.local/jud/Test.git
git push -u origin master

Check the Jenkins Log:

Make the change in the Gitea configuration file so that the URL shows correctly for a repository:

vim /etc/gitea/app.ini
ROOT_URL         = https://gitea.home.local/
systemctl restart gitea

Posted in Uncategorized | Tagged , , , | Leave a comment

Cisco Language for LaTeX Listings Package

Recently I have been working on documenting Cisco code in LaTeX and could not find a language definition for Cisco configurations in the Listings package. Of course I ended up defining my own and figured I would share it here for others looking for the same information.

This is the simple LaTeX definition for the code highlighting.

% This defines the cisco language and highlights 
\usepackage{listings}
\lstdefinelanguage{cisco}{
	alsoletter={-},
	%keyword1&2&6
	morekeywords = [1]{router,router-id,ospf,ospfv3,area,nssa,stub,stubby,eigrp,bgp,rip,dmvpn,no,redis,redist,redistribute},
	%keyword3
	morekeywords = [2]{int,line,serial,range,passive,pass},
	%keyword4
	morekeywords = [3]{ip,ipv6,ipv4,tcp,ssh,telnet,cef,add.address},
	%keyword5
	morekeywords = [4]{mpls,ldp,router-id,route-target,rd,route-map,vrf,for,forward},
	%function1
	morekeywords = [5]{prefix-list,route-map,nei,neigh,neighbor,address-family,address-f,vpnv4},
	morekeywords = [6]{Verification},
	keywordstyle = [1]\color{darkblue},
	keywordstyle = [2]\color{purple},
	keywordstyle = [3]\color{magenta},
	keywordstyle = [4]\color{orange},
	keywordstyle = [5]\color{darkgreen},
	keywordstyle = [6]\color{red},
	sensitive = false,
	morecomment = [l]{!},
	morecomment = [s]{/*}{*/},
	morecomment = [s]{/**}{*/},
	commentstyle = \color{red}\bf,
	morestring = [b]",
	morestring = [b]',
	stringstyle = \color{purple}
}
\lstset{
	language={cisco},
	backgroundcolor=\color{lightgray},
	frame={trbl},
	xleftmargin=10pt,
	breaklines=true,
	columns=[l]{fullflexible},
	numbers=left,
	numberstyle={\scriptsize},
	stepnumber=1
}

Here is a link to a sample pdf output.

Posted in Code | Leave a comment

VMware Troubles

At the Circus we have been having random reboots and are struggling to figure out the culprit as no one can seem to find any errors in the logs.  In order to help narrow the scope I wrote this script to help us hunt down the culprit.

The script pings a number of infrastructure services such as gateways, ESXi hosts and VMs.  I run it every minute from one of the linux servers.

#!/bin/bash
# 2017-11-13
# Jud Bishop
# This script pings a number of infrastructure address to try and figure out
# what is going wrong with infrastructure rebooting.
#
# Just run this command to follow the ping sequence:
# grep ping-test /var/log/messages

readonly SCRIPT_NAME=$(basename $0)

log() {
echo "$@"
logger -p user.notice -t $SCRIPT_NAME "$@"
}

err() {
echo "$@" >&2
logger -p user.error -t $SCRIPT_NAME "$@"
}

for I in `cat /usr/local/bin/ping-test-servers.txt`
do
OUT="$(ping -c1 -W1 $I | egrep 'bytes\ from|loss')"
log "${OUT}"
done

The file /usr/local/bin/ping-test-servers.txt is just a list of IP addresses or server names.

192.168.1.1
192.168.1.100
dns.chainringcircus.org
vm.chainringcircus.org
physical.chainringcircus.org

Here is the crontab entry, I run it once a minute.

[linuxserver]# crontab -l
# m h dom mon dow command
* * * * * /usr/local/bin/ping-test.sh

Here is a sample of the output in the log files.

Nov 13 13:53:01 ns1 ping-test.sh: 64 bytes from dns.chainringcircus.org (192.168.1.1): icmp_seq=1 ttl=127 time=0.233 ms#0121 packets transmitted, 1 received, 0% packet loss, time 0ms
Nov 13 13:53:01 ns1 ping-test.sh: 64 bytes from vm.chainringcircus.org (192.168.1.2): icmp_seq=1 ttl=128 time=0.243 ms#0121 packets transmitted, 1 received, 0% packet loss, time 0ms
Nov 13 13:53:01 ns1 ping-test.sh: 64 bytes from physical.chainringcircus.org (192.168.1.3): icmp_seq=1 ttl=127 time=0.208 ms#0121 packets transmitted, 1 received, 0% packet loss, time 0ms


Posted in Code, Linux | Leave a comment

More Services for the Lab Server

After setting up TACACS+ and FreeRADIUS I decided to go ahead and add more services to my main test lab server. I am using CentOS in the lab, and decided to add a syslog server and an FTP server to the mix.

Rsyslogd
This is a very simple process as we use Rsyslogd as our production syslog server. First we need to uncomment some lines in the file /etc/rsyslog.conf. The most important lines are the ones at the bottom of the code listing, they tell Rsyslogd to listen on UDP port 514.

#### MODULES ####

# The imjournal module bellow is now used as a message source instead of imuxsock.
$ModLoad imuxsock # provides support for local system logging (e.g. via logger command)
$ModLoad imjournal # provides access to the systemd journal
$ModLoad imklog # reads kernel messages (the same are read from journald)
$ModLoad immark  # provides --MARK-- message capability

# Provides UDP syslog reception
$ModLoad imudp
$UDPServerRun 514

The next step is to set up the remote logging location and file format. In order to no clutter the log directory, I made a new directory.

mkdir -p /var/log/lab

Add these lines to the bottom of the /etc/syslog.conf file.

$template DynaFile,"/var/log/lab/remote-%fromhost-ip%.log"
*.* -?DynaFile

Now set up one of the lab routers for logging.

logging origin-id string CSR1
logging source-interface GigabitEthernet1
logging host 192.168.2.101

int lo0
ip address 192.168.3.10 255.255.255.0
logging event link-status

Shut and no shut the port a couple of times in order to make some logging events.

cat /var/log/lab/remote-192.168.2.1.log
Jul 11 09:02:26 192.168.2.1 161: CSR1: %LINEPROTO-5-UPDOWN: Line protocol on Interface Loopback0, changed state to down
Jul 11 09:02:26 192.168.2.1 162: CSR1: %LINK-5-CHANGED: Interface Loopback0, changed state to administratively down

Configure FTP
First add a user where the configuration files from the routers will be stored. Just to keep things simple and consistent I added the user cisco with the password CCIE. Obviously this is a lab only environment, I would never do this production.

useradd cisco
passwd cisco

For this portion of the post I am just using one of the many howto’s on the internet. Once again, I have been burned by not documenting my steps for a process so I will document them below.

Install proftpd.

yum -y install proftpd

Make a backup of the configuration file.

cp /etc/proftpd.conf /etc/proftpd.conf.0

Make sure that users are chroot’ed to their home directories.

# Cause every FTP user except adm to be chrooted into their home directory
DefaultRoot                     ~ !adm

Start up the proftpd server.

systemctl enable proftpd
systemctl start proftpd

Testing from within the lab, here is an FTP from CSR1 to TLTS1.

copy flash:def ftp://cisco:CCIE@192.168.2.101/
Address or name of remote host [192.168.2.101]?
Destination filename [def]?
Writing def !
973 bytes copied in 0.180 secs (5406 bytes/sec)

And confirm the file is on the FTP server.

ls /home/cisco/
def

Sources:
http://www.proftpd.org

Posted in CCIE, Linux | Leave a comment

General Purpose Lab Server

I have a number of servers in the lab, but my main server is a jumpbox that straddles the lab and our network named TLTS1. I wanted to be able to really test authentication in the lab so I decided to set up TACACS+ and FreeRADIUS. Here are the steps I followed.

FreeRADIUS

First install the FreeRadius rpm.

yum install freeradius freeradius-utils freeradius-doc

Edit the configuration file.

vim /etc/raddb/clients.conf

Here is my clients.conf file.

cat clients.conf | grep -v \# | awk 'NF'cat clients.conf | grep -v \# | awk 'NF'
client localhost {
   ipaddr = *
   proto = *
   secret = LAB
   require_message_authenticator = no
   nas_type = other
   limit {
      max_connections = 16
      lifetime = 0
      idle_timeout = 30
   }
}
client localhost_ipv6 {
   ipv6addr = ::1
   secret = LAB
}

client LAB {
   ipaddr = 192.168.2.0/24
   secret = LAB
   nas_type = cisco
   shortname = CSR1
}


Add a user that will be authenticated in the /etc/raddb/users file. First we will do some simple authentication, then we will setup a router. The “me” user is to test from localhost to make sure everything is working, the “cisco” user is for testing from a router in the lab.

"me" Cleartext-Password := "CCNP"
Framed-IP-Address = 192.168.1.210,
Reply-Message = "Hello, %{User-Name}"</code>

"cisco" Cleartext-Password := "CCIE"
Service-Type = NAS-Prompt-User,
Cisco-AVPair = "shell:priv-lvl=15"

Start the RADIUS server in debugging mode.

radiusd -x

Test the RADIUS server with “me” as a user from localhost.

radtest me CCNP 192.168.2.101 1813 LAB
Sending Access-Request Id 169 from 0.0.0.0:45874 to 192.168.2.101:1812
User-Name = 'me'
User-Password = 'CCNP'
NAS-IP-Address = 172.22.100.21
NAS-Port = 1813
Message-Authenticator = 0x00
Received Access-Accept Id 169 from 192.168.2.101:1812 to 192.168.2.101:45874 length 37
Framed-IP-Address = 192.168.1.210
Reply-Message = 'Hello, me'

Now test the RADIUS server from a router in the lab.

aaa new-model

radius server RAD
address ipv4 192.168.2.101 auth-port 1812 acct-port 1813
key LAB

aaa group server radius RAD
server name RAD

aaa authentication login default group RAD local
aaa authentication enable default group RAD none

line vty 0 4
login authentication default

Test the login from CSR2 to CSR1.

CSR2#telnet 192.168.2.1
Trying 192.168.2.1 ... Open

User Access Verification

Username: cisco
Password:

CSR1>exit

TACACS+
Download the sources from here.

Install the dependencies.

yum -y install flex flex-devel bison bison-devel tcp_wrappers-devel

Make and install into /usr/local/bin

tar -xvzf tacacs-F4.0.4.28.tar.gz
cd tacacs-F4.0.4.28
./configure
make
make install

Check they are installed correctly:

ls /usr/local/bin/ | grep tac && ls /usr/local/sbin/ | grep tac
tac_pwd
tac_plus

man tac_pwd
man tac_plus

Much of the rest of this post is a re-hash from FreeLinuxTutorials. I have been burned before, therefore I will take the time document my steps.

Create the configuration directory and configuration file:

mkdir /etc/tacacs
touch /etc/tacacs/tac_plus.conf

Here is a sample Tacacs+ configuration file:

# KEY
key = "LAB"

# USERS
user = cisco {
   default service = permit
   member = admin
   login = cleartext CCIE
}

# GROUP
group = admin {
   default service = permit
   service = exec {
      priv-lvl = 15
   }
}

# Enable Password
user = $enable$ {
   login = cleartext CCIE
}

accounting file = /var/log/tacacs.log

Change the permissions on the file:

chmod 600 /etc/tacacs/tac_plus.conf

Start the TACACS+ server:

tac_plus -G -C /etc/tacacs/tac_plus.conf -B 192.168.2.101 -d 4 -l /var/log/tacacs.log -p 49

Check that the TACACS+ server is running:

netstat -na | grep 49
tcp        0      0 192.168.2.101:49        0.0.0.0:*               LISTEN

Test the TACACS+ server from a Cisco IOS device:

aaa new-model
tacacs-server host 192.168.2.101
tacacs-server key LAB</code>

aaa group server tacacs+ TACS
server 192.168.2.101

aaa authentication login default group TACS local
aaa authentication enable default group TACS none

line vty 0 4
login authentication default

From a second router in the lab:

CSR2#telnet 192.168.2.1
Trying 192.168.2.1 ... Open

User Access Verification

Username: cisco
Password:

Sources:
RADIUS
https://mellowd.co.uk/ccie/?p=2777
http://www.cisco.com/c/en/us/support/docs/security-vpn/remote-authentication-dial-user-service-radius/116291-configure-freeradius-00.html

Click to access freeradius.pdf

http://www.cisco.com/c/en/us/products/collateral/ios-nx-os-software/identity-based-networking-services/whitepaper_C11-731907.html

TACACS+
https://rmohan.com/?p=2653
http://freelinuxtutorials.com/tutorials/installation-setup-of-free-tacacs-server-in-linux/
http://www.shrubbery.net/tac_plus/
https://networklessons.com/uncategorized/how-to-install-tacacs-on-linux-centos/
http://blog.marquis.co/configuring-tacacs-server-on-ubuntu-14-04lts/%5B

Posted in CCIE, Linux | Leave a comment

Backing up Lab Routers

I have put quite a bit of work into my lab routers and the configurations, enough that I have begun to worry about about how much work it would be to replace my current set up.

I have been backing up my primary server for the lab, but tonight I finally decided to back up the configurations on the routers.   Here are the commands I ran on the ten CSR 1000V routers that make up the backbone of my lab.

archive tar /create tftp://192.168.2.101/R1-ipx.tar flash:ipx
archive tar /create tftp://192.168.2.101/R1-c360.tar flash:c360
archive tar /create tftp://192.168.2.101/R1-ine.tar flash:ine

I then created a tar of all of the backups and put on my separate USB drive that I only plugin for backups. Yes I use Time Machine, but I also keep a backup of the most important files on a USB drive that is not plugged into my MAC. Paranoid maybe, but I sleep well at night.

Posted in CCIE, Routing | Leave a comment

VIRL on Bare Metal

I just fought installing VIRL on bare metal for nearly four days. I worked my way through multiple how-to’s and installed it three different times. Eventually I gave up doing it by the book and tried my own thing.

First, some back story. Linux changed the way network cards are named, and it appears that each vendor has implemented their own fix. As of version 1.2.84 VIRL is based on Lightweight Ubuntu (LUBUNTU) 14.04. Ubuntu has changed the network cards from being named eth0 through eth5 to em1 through whatever. I say whatever because it depends upon the cards you have installed.

For instance on my Dell R710 the cards were named em1, em2, em3, em4, p1p1 and p1p2. These stand for embedded network interface one through four, PCI slot 1 interface 1 and PCI slot 1 interface 2. Under the old naming scheme they would have been named eth0 through eth5.

The problem arises in that Openstack underneath VIRL is configured for eth0 through eth5. I worked my way through a number of different how-to’s, which are listed below, but I always seemed to end up with a problem.

Finally I just changed my interface back from the new naming scheme to the old ethX naming scheme.

I edited the file /etc/default/grub and added the following lines.

GRUB_CMDLINE_LINUX_DEFAULT="quiet splash"
GRUB_CMDLINE_LINUX_DEFAULT="biosdevname=0"
GRUB_CMDLINE_LINUX="biosdevname=0

Because I had been fighting with the install, I also rehosted the install to make sure my interfaces lined back up.

sudo vinstall rehost

Then I rebooted my VIRL host and everything worked. I should have followed my gut and saved myself four days of lost study time.

List of different things I tried:
https://askubuntu.com/questions/680409/problems-setting-up-internet-connection-ubuntu-server-14-04-no-eth0

https://access.redhat.com/documentation/en-US/Red_Hat_Enterprise_Linux/7/html/Networking_Guide/sec-Understanding_the_Device_Renaming_Procedure.html

http://itknowledgeexchange.techtarget.com/network-technologies/configure-cisco-virl-vmmaestro-use-external-telnet-ssh-client/

Ubuntu 14.04: renaming ethernet interfaces from “p1p1″ to “eth0″

Cisco VIRL Installation on Bare-metal Standalone Server

Cisco VIRL Installation on VMWare ESXi

https://learningnetwork.cisco.com/docs/DOC-30422

https://learningnetwork.cisco.com/docs/DOC-30519

https://learningnetwork.cisco.com/docs/DOC-32305#jive_content_id_Resetting_NTP_Servers_via_UWM

http://virl-dev-innovate.cisco.com/iso.bm.php

https://learningnetwork.cisco.com/docs/DOC-31773

Posted in CCIE, Routing | Leave a comment

Micronics Training with Narbik

I haven’t been posting much about my studies for the CCIE this time around. My studies have been all consuming as I have been trying to get in 30 hours a week on top of my normal work. I may start blogging my notes, but have not made the decision yet. It would be nice to share my notes with others as I have worked extremely hard on them, but many of my notes are quotes from sources whom I do not remember.

After taking Narbik’s class I wanted to give my thoughts on the class. First, the class will be international with a wide range of abilities. Here are is a list of guys in my class.
George from Sydney Australia
Martin from Holland
Dustin from South Dakota
Me from Alabama
Denis from Canada
Dennis from California
Mike from California
Martin from California
Joe (not his real name) from the NSA

We were broken into basically three groups. There were three of the class that were a few months away taking the lab, there were three of us that were 6 to 9 months away from the lab and three that needed to decide if they were ready to dedicate the time needed.

The class starts with the traditional, tell the class about yourself. Narbik also invites each student to detail what you need to work on. Do not be shy. In fact I would make a list before you get to class of your strengths and weaknesses because this cumulative list sets the structure of the class.

The class is also designed for each student to get out of it as much as they put into it. If decide to slack on the labs, it will only hurt yourself. The first few days are some theory, but the focus is on configuration labs. As you lab into the night or morning, Narbik gets an idea of where each student is in their studies.

I also believe each student should make a concerted effort to finish most of the Micornics Training workbooks before you get there. As I have done different labs, I have taken notes to jog my memory or clarify my understanding of a technology. Many times I recognized the technology and topology we were discussing from labs I had done and was updating my personal notes from Narbik’s notes on the board.

If a CCNA attended Narbik’s class, from the lectures they would not think the CCIE is that difficult. Narbik focuses on portions of the technologies that he has seen students not understand correctly. I had multiple “ah hah” moments where I had a misunderstanding that I corrected in my notes. But the lectures are short and to the point, doesn’t go over the basics, the class is more about fine tuning your understanding.

The first “big” lab is Thursday night, you can work as late into the next morning as you would like. Most of our class left by 3:00am Friday morning. Saturday is the big assessment lab. One student decided to wait and save the big assessment lab for when he was better prepared. I thought that was a wise decision, and in retrospect it might have been good for me to as well, but it also helped me highlight gaps in my preparation.

The second week of classes is where I got the most benefit. While there are still lectures, the labs shift from technology labs to troubleshooting labs. While I could not get all of the tickets, the labs were designed to highlight technological misunderstandings. I enjoyed these more than the configuration labs as they helped drive home portions of the technologies.

I recommend Narbik’s class. My personal opinion is that students should be close to taking the lab and probably have passed the written. I am neither of these, but the experience has changed some of my training plans, and that is invaluable.

Posted in CCIE, Thoughts | Leave a comment

Webmail with SSL Certificates

This stack is part of a larger project that I created nearly ten years ago. I am on the fourth rewrite of this for some internal email. We are in the process of migrating from Cyrus and Squirrelmail to Dovecot and RoundCube. These are my notes from that build process.

Stack:
Postfix
Dovecot
Apache
RoundCube
Maria DB

We run an ASA at the Circus, so we turn off the firewalls internally.

systemctl disable firewalld
Removed symlink /etc/systemd/system/dbus-org.fedoraproject.FirewallD1.service.
Removed symlink /etc/systemd/system/basic.target.wants/firewalld.service.
systemctl stop firewalld

Enable optional packages for RHEL.

subscription-manager repos --enable=rhel-7-server-optional-rpms
yum update

Install and start Maria DB.

yum install mariadb mariadb-server
systemctl enable mariadb
systemctl start mariadb
mysql_secure_installation

Apache install and start.

yum install httpd httpd-devel php mod_ssl
systemctl enable httpd
systemctl start httpd

Dovecot install and start.

yum install dovecot dovecot-mysql
systemctl enable dovecot
systemctl start dovecot

First we have to extract the private key from the .pfx file for use with Postfix, Apache and Dovecot. I am using an IIS key from GoDaddy to start.

Split out the private key.

openssl pkcs12 -in CircusStar.pfx -nocerts -out circusprivate-withpassword.pem

Split out the public key.

openssl pkcs12 -in CircusStar.pfx -clcerts -nokeys -out circuspublic.pem

Split out the private key without password.

openssl rsa -in circusprivate-withpassword.pem -out circusprivate-wopassword.pem

These keys will be put in the following locations for each application.

Apache
SSLCertificateFile “/etc/ssl/certs/circuspublic.pem”
SSLCertificateKeyFile “/etc/ssl/certs/circusprivate-wopassword.pem”

Postfix
SSLCertificateFile “/etc/ssl/certs/circuspublic.pem”
SSLCertificateKeyFile “/etc/ssl/certs/circusprivate-wopassword.pem”

DoveCot
ssl_cert = </etc/ssl/certs/circuspublic.pem
ssl_key = </etc/ssl/certs/circusprivate-wopassword.pem

Start on the Maria installation.

 mysql_secure_installation 

Now add a database, tables and users.

 
cat mariadb.create.virtual.tables CREATE DATABASE /*!32312 IF NOT EXISTS*/ `mailserver` /*!40100 DEFAULT CHARACTER SET latin1 */; USE `mailserver`; CREATE USER 'mailuser'@'127.0.0.1' IDENTIFIED BY 'CHANGEME'; GRANT ALL PRIVILEGES ON mailserver.* TO 'mailuser'@'127.0.0.1'; CREATE TABLE `virtual_domains` (   `id` int(11) NOT NULL auto_increment,   `name` varchar(50) NOT NULL,   PRIMARY KEY (`id`) ) ENGINE=InnoDB DEFAULT CHARSET=utf8; CREATE TABLE `virtual_users` (   `id` int(11) NOT NULL auto_increment,   `domain_id` int(11) NOT NULL,   `password` varchar(106) NOT NULL,   `email` varchar(100) NOT NULL,   PRIMARY KEY (`id`),   UNIQUE KEY `email` (`email`),   FOREIGN KEY (domain_id) REFERENCES virtual_domains(id) ON DELETE CASCADE ) ENGINE=InnoDB DEFAULT CHARSET=utf8; CREATE TABLE `virtual_aliases` (   `id` int(11) NOT NULL auto_increment,   `domain_id` int(11) NOT NULL,   `source` varchar(100) NOT NULL,   `destination` varchar(100) NOT NULL,   PRIMARY KEY (`id`),   FOREIGN KEY (domain_id) REFERENCES virtual_domains(id) ON DELETE CASCADE ) ENGINE=InnoDB DEFAULT CHARSET=utf8; INSERT INTO `mailserver`.`virtual_domains`   (`id` ,`name`) VALUES   ('1', 'securemail.chainringcircus.org'),   ('2', 'securemail4.chainringcircus.org'); INSERT INTO `mailserver`.`virtual_users`   (`id`, `domain_id`, `password` , `email`) VALUES   ('1', '1', ENCRYPT('CHANGEME', CONCAT('$6$', SUBSTRING(SHA(RAND()), -16))), 'judson.bishop.gmail.com@securemail.chainringcircus.org'),   ('1', '1', ENCRYPT('CHANGEME', CONCAT('$6$', SUBSTRING(SHA(RAND()), -16))), 'test.em@securemail4.chainringcircus.org'); CREATE DATABASE roundcubemail; GRANT ALL PRIVILEGES ON roundcubemail.* TO mail@localhost IDENTIFIED BY 'CHANGEME'; FLUSH PRIVILEGES; 

Check to make sure everything worked.

 
mysql -u root -p mailserver Enter password: 
MariaDB [mailserver]> select * from virtual_domains;
+----+---------------------------------+
| id | name                            |
+----+---------------------------------+
|  1 | securemail.chainringcircus.org  |
|  2 | securemail4.chainringcircus.org |
+----+---------------------------------+
2 rows in set (0.01 sec)

And check the users.

MariaDB [mailserver]> select * from virtual_users;

The password is going to be a long jumble that doesn't translate well to a blog. This query will omit the password field.

MariaDB [mailserver]> select id, domain_id, email from virtual_users;
+----+-----------+--------------------------------------------------------+
| id | domain_id | email                                                  |
+----+-----------+--------------------------------------------------------+
|  1 |         1 | judson.bishop.gmail.com@securemail.chainringcircus.org |
|  2 |         2 | test.me@securemail4.chainringcircus.org                |
+----+-----------+--------------------------------------------------------+

Make the directories for the two domains.

mkdir -p /var/mail/vhosts/securemail.chaincircus.org
mkdir -p /var/mail/vhosts/securemail4.chaincircus.org

Postfix is next in the stack. Here is the /etc/postfix/main.cf file.

cat /etc/postfix/main.cf | egrep -v "#|^$"
queue_directory = /var/spool/postfix
command_directory = /usr/sbin
daemon_directory = /usr/libexec/postfix
data_directory = /var/lib/postfix
mail_owner = postfix
myhostname = securemail4.chainringcircus.org
inet_interfaces = all
inet_protocols = all
mydestination =
unknown_local_recipient_reject_code = 550
mynetworks = 192.168.10.0/24
relayhost = [192.168.10.193]
alias_maps = hash:/etc/aliases
alias_database = hash:/etc/aliases
home_mailbox = Maildir/
debug_peer_level = 2
debugger_command =
	 PATH=/bin:/usr/bin:/usr/local/bin:/usr/X11R6/bin
	 ddd $daemon_directory/$process_name $process_id & sleep 5
sendmail_path = /usr/sbin/sendmail.postfix
newaliases_path = /usr/bin/newaliases.postfix
mailq_path = /usr/bin/mailq.postfix
setgid_group = postdrop
html_directory = no
manpage_directory = /usr/share/man
smtp_sasl_type = dovecot
smtp_sasl_path = private/auth
smtpd_sasl_auth_enable = yes
broken_sasl_auth_clients = yes
smtpd_sender_restrictions = permit_sasl_authenticated, permit_mynetworks
smtpd_recipient_restrictions = permit_sasl_authenticated, permit_mynetworks, reject_unauth_destination
smtpd_sasl_security_options = noanonymous
smtpd_sasl_local_domain =
helpful_warnings = yes
transport_maps = hash:/etc/postfix/transport
helpful_warnings = yes
default_destination_concurrency_limit = 3
message_size_limit = 20480000
smtpd_tls_cert_file = /etc/ssl/certs/circuspublic.pem
smtpd_tls_key_file = /etc/ssl/certs/circusprivate-wopassword.pem
smtpd_use_tls = yes
smtp_tls_loglevel = 3
smtpd_tls_received_header = yes
smtpd_tls_session_cache_timeout = 3600s
tls_random_source = dev:/dev/urandom
virtual_transport = lmtp:unix:private/dovecot-lmtp
virtual_mailbox_domains = mysql:/etc/postfix/mysql-virtual-mailbox-domains.cf
virtual_mailbox_maps = mysql:/etc/postfix/mysql-virtual-mailbox-maps.cf
virtual_alias_maps = mysql:/etc/postfix/mysql-virtual-alias-maps.cf, mysql:/etc/postfix/mysql-virtual-email2email.cf
virtual_mailbox_base = /var/mail/vhosts

This is how to enable TLS on Postfix.

smtpd_tls_cert_file = /etc/ssl/certs/circuspublic.pem
smtpd_tls_key_file = /etc/ssl/certs/circusprivate-wopassword.pem
smtpd_use_tls = yes
smtp_tls_loglevel = 3
smtpd_tls_received_header = yes
smtpd_tls_session_cache_timeout = 3600s
tls_random_source = dev:/dev/urandom

Set up the /etc/postfix/master.cf file. Make sure you have smtps and Dovecot set up.

smtps     inet  n       -       n       -       -       smtpd
  -o syslog_name=postfix/smtps
  -o smtpd_tls_wrappermode=yes
  -o smtpd_sasl_auth_enable=yes
  -o milter_macro_daemon_name=ORIGINATING

Further down add Dovecot.

# DOVECOT
dovecot   unix  -       n       n       -       -       pipe
    flags=DRhu user=vmail:vmail argv=/usr/libexec/dovecot/deliver -f ${sender} -d ${recipient}

After restarting, test that we have TLS in the preamble.

telnet 127.0.0.1 25
Trying 127.0.0.1...
Connected to 127.0.0.1.
Escape character is '^]'.
220 securemail4.chainringcircus.org ESMTP Postfix
ehlo test.org
250-securemail4.chainringcircus.org
250-PIPELINING
250-SIZE 20480000
250-VRFY
250-ETRN
250-STARTTLS
250-AUTH PLAIN LOGIN
250-AUTH=PLAIN LOGIN
250-ENHANCEDSTATUSCODES
250-8BITMIME
250 DSN

Check if Postfix is listening on 465.

ss -tnpl | grep 465
LISTEN     0      100          *:465                      *:*                   users:(("master",pid=17282,fd=22))
LISTEN     0      100         :::465                     :::*                   users:(("master",pid=17282,fd=23))

Now test port 465.

openssl s_client -connect 127.0.0.1:465
CONNECTED(00000003)
depth=0 OU = Domain Control Validated, CN = *.chainringcircus.org
verify error:num=20:unable to get local issuer certificate
verify return:1
depth=0 OU = Domain Control Validated, CN = *.chainringcircus.org
verify error:num=27:certificate not trusted
verify return:1
depth=0 OU = Domain Control Validated, CN = *.chainringcircus.org
verify error:num=21:unable to verify the first certificate
verify return:1
---
Certificate chain
 0 s:/OU=Domain Control Validated/CN=*.chainringcircus.org
   i:/C=US/ST=Arizona/L=Scottsdale/O=GoDaddy.com, Inc./OU=http://certs.godaddy.com/repository//CN=Go Daddy Secure Certificate Authority - G2
---
Server certificate
-----BEGIN CERTIFICATE-----
MIIFGjCCBAKgAwIBAgIJAIxTKDDCrcdfMA0GCSqGSIb3DQEBCwUAMIG0MQswCQYD
VQQGEwJVUzEQMA4GA1UECBMHQXJpem9uYTETMBEGA1UEBxMKU2NvdHRzZGFsZTEa
MBgGA1UEChMRR29EYWRkeS5jb20sIEluYy4xLTArBgNVBAsTJGh0dHA6Ly9jZXJ0
cy5nb2RhZGR5LmNvbS9yZXBvc2l0b3J5LzEzMDEGA1UEAxMqR28gRGFkZHkgU2Vj
dXJlIENlcnRpZmljYXRlIEF1dGhvcml0eSAtIEcyMB4XDTE1MDgyNDE0NDIzOVoX
DTE4MDkwNzE0NTQzOVowODEhMB8GA1UECxMYRG9tYWluIENvbnRyb2wgVmFsaWRh
dGVkMRMwEQYDVQQDDAoqLmVhbWMub3JnMIIBIjANBgkqhkiG9w0BAQEFAAOCAQ8A
MIIBCgKCAQEAkkXlK1db90Sb9A6mtUoGmeog06Sy8HjqVjVnAWw/KWFMjWAKyOHX
yvxtLqQWGPZ6i6Px+bZ2PK1qKalt/5bWHv7RQv53mWS+oktUcP/LC4tX39G5C9/N
KBfZUf5/sKcI7urXbAqwW5h3R50GahymBYJ2TXYN1Os6+otSzCQ9PrXKy9HN4Nqg
HCmavGDwxGi6dB9j606Xrf0lk7ZrMSSNPQFQdgKG1JGJplFt04FsfVnRsmDo+17G
i5ecT2H5mNMFX1Im0b8A/b81EUO5RXnrzuKBIdyvCBnwynPsE61zimGSAa6StZbC
AOZHtWocH/LKsGXHmeFrEtTc3CNkqThgLwIDAQABo4IBqDCCAaQwDAYDVR0TAQH/
BAIwADAdBgNVHSUEFjAUBggrBgEFBQcDAQYIKwYBBQUHAwIwDgYDVR0PAQH/BAQD
AgWgMDcGA1UdHwQwMC4wLKAqoCiGJmh0dHA6Ly9jcmwuZ29kYWRkeS5jb20vZ2Rp
ZzJzMS0xMTIuY3JsMFMGA1UdIARMMEowSAYLYIZIAYb9bQEHFwEwOTA3BggrBgEF
BQcCARYraHR0cDovL2NlcnRpZmljYXRlcy5nb2RhZGR5LmNvbS9yZXBvc2l0b3J5
LzB2BggrBgEFBQcBAQRqMGgwJAYIKwYBBQUHMAGGGGh0dHA6Ly9vY3NwLmdvZGFk
ZHkuY29tLzBABggrBgEFBQcwAoY0aHR0cDovL2NlcnRpZmljYXRlcy5nb2RhZGR5
LmNvbS9yZXBvc2l0b3J5L2dkaWcyLmNydDAfBgNVHSMEGDAWgBRAwr0njsw0gzCi
M9f7bLPwtCyAzjAfBgNVHREEGDAWggoqLmVhbWMub3JngghlYW1jLm9yZzAdBgNV
HQ4EFgQUIY0IX76FbTAW+vVmjvDyLIu3alMwDQYJKoZIhvcNAQELBQADggEBAAaY
t2a10js8OvkVjULDlQH4JGHj+6gf8yu+FfSH1dTVWxzqhLr8jPJGPG6Ib81fParj
nKh9lVDbuaKELerSt+i7v9E7YAjPc23gx8oAv0vOg9OjutKWbDMrkdSCN9NEdSzU
HB0G4145HmT6Ca/YO9PFwF5VC7WYlJu3wxoW3K/b1LMVs7xN3Hn2MqKc5KsDTkKD
+e2wN2eFP1uDetZC46Bc9lqEOaV00Ti0MjMlmBMnqX2JbDp09IVB6Gd/bIR7YhHA
lOTQYw/NZBf2AOOKpryBly+otv8mK3eHjhKdenT8O88xZpypYvIPhUSDx3SCy0Qb
n6/B2kZI6ZtQlBZqnBY=
-----END CERTIFICATE-----
subject=/OU=Domain Control Validated/CN=*.chainringcircus.org
issuer=/C=US/ST=Arizona/L=Scottsdale/O=GoDaddy.com, Inc./OU=http://certs.godaddy.com/repository//CN=Go Daddy Secure Certificate Authority - G2
---
No client certificate CA names sent
Server Temp Key: ECDH, prime256v1, 256 bits
---
SSL handshake has read 1969 bytes and written 373 bytes
---
New, TLSv1/SSLv3, Cipher is ECDHE-RSA-AES256-GCM-SHA384
Server public key is 2048 bit
Secure Renegotiation IS supported
Compression: NONE
Expansion: NONE
SSL-Session:
    Protocol  : TLSv1.2
    Cipher    : ECDHE-RSA-AES256-GCM-SHA384
    Session-ID: DD3ABB7ABA5E19C9381B356E8E2745ECA9C1E86D59AE46D98F3683707F468B43
    Session-ID-ctx:
    Master-Key: 66F6CBBAE1093686C47C222D9DFFD5D14A8ECC749F61947A7E36FB65B59941A424C48CF23ED93EC19AB492C20D2FF1E7
    Key-Arg   : None
    Krb5 Principal: None
    PSK identity: None
    PSK identity hint: None
    TLS session ticket lifetime hint: 3600 (seconds)
    TLS session ticket:
    0000 - 1b f3 d3 ab 24 9a 4e 81-16 3b ef 64 93 e1 50 7d   ....$.N..;.d..P}
    0010 - db 51 bf ef 14 ee 3c 59-0f a3 2c 4c 4a 41 5b 58   .Q....<Y..,LJA[X
    0020 - 37 d8 ab 7e 43 64 3c 54-31 fb 27 07 16 b5 78 0a   7..~Cd<T1.'...x.
    0030 - 70 ed 90 34 b2 7f 4a 76-8c 43 ea 54 a0 d0 e6 5d   p..4..Jv.C.T...]
    0040 - 51 c7 e3 3c f9 be ef d6-61 e6 23 31 61 f8 c3 14   Q..<....a.#1a...
    0050 - fe 8d 25 04 03 b0 1d 31-11 aa 35 a3 3a 1b 64 d2   ..%....1..5.:.d.
    0060 - 97 32 50 68 c5 77 ac 67-6f 4b 7a 8d be 03 0c 39   .2Ph.w.goKz....9
    0070 - 9f b1 1d 46 70 f0 36 4f-55 b8 48 9b 36 ff 92 b6   ...Fp.6OU.H.6...
    0080 - e0 64 81 92 55 46 db 76-60 f3 55 6a 30 79 a5 89   .d..UF.v`.Uj0y..
    0090 - 3b af 02 9c 7b 2e 12 1e-45 eb 2c 9a fa 62 bb a2   ;...{...E.,..b..

    Start Time: 1489503195
    Timeout   : 300 (sec)
    Verify return code: 21 (unable to verify the first certificate)
---
220 securemail.chainringcircus.org ESMTP Postfix

Now test the SQL integration with Postfix.

postmap -q securemail.chainringcircus.org mysql:/etc/postfix/mysql-virtual-mailbox-domains.cf
1

postmap -q securemail.chainringcircus.org mysql:/etc/postfix/mysql-virtual-mailbox-domains.cf
1

postmap -q test.me@securemail.chainringcircus.org mysql:/etc/postfix/mysql-virtual-mailbox-maps.cf
1

postmap -q judson.bishop.gmail.com@securemail.chainringcircus.org mysql:/etc/postfix/mysql-virtual-mailbox-maps.cf
1

Dovecot Configuration
Add the vmail user.

groupadd -g 5000 vmail
useradd -g vmail -u 5000 vmail -d /var/mail

Change ownership.

chown -R vmail:vmail /var/mail/
chown -R vmail:dovecot /etc/dovecot


Configure the file /etc/dovecot/dovecot.conf.

cat dovecot.conf | egrep -v "#|^$"
protocols = imap pop3 lmtp
!include conf.d/10-auth.conf
!include conf.d/10-ssl.conf
!include conf.d/10-logging.conf
!include conf.d/10-mail.conf
!include conf.d/10-master.conf

This leads to a chain of includes, the first of which is /etc/dovecot/conf.d/10-auth.conf.

cat /etc/dovecot/conf.d/10-auth.conf | egrep -v "#|^$"
disable_plaintext_auth = yes
auth_mechanisms = plain login
!include auth-sql.conf.ext

The end of this include is /etc/dovecot/conf.d/auth-sql.conf.ext. This sets up the MySQL configuration.

cat conf.d/auth-sql.conf.ext | egrep -v "#|^$"
passdb {
  driver = sql
  args = /etc/dovecot/dovecot-sql.conf.ext
}
userdb {
  driver = static
  args = uid=vmail gid=vmail home=/var/mail/vhosts/%d/%n
}

And finally the arguments for the MySQL query.

cat dovecot-sql.conf.ext | egrep -v "#|^$"
driver = mysql
connect = host=127.0.0.1 dbname=mailserver user=mailuser password=CHANGEME
default_pass_scheme = SHA512-CRYPT
password_query = SELECT email as user, password FROM virtual_users WHERE email='%u';

The file /etc/dovecot/conf.d/10-ssl.conf.

cat /etc/dovecot/conf.d/10-ssl.conf | egrep -v "#|^$"
ssl_cert = </etc/ssl/certs/circuspublic.pem
ssl_key = </etc/ssl/certs/circusprivate-wopassword.pem

In order to figure everything out, I used this file quite a bit. If needed, just read the comments.

cat /etc/dovecot/conf.d/10-logging.conf | egrep -v "#|^$"
log_path = syslog

This is important as it has to match your setup for Postfix.

# cat /etc/dovecot/conf.d/10-mail.conf | egrep -v "#|^$"
mail_location = maildir:/var/mail/vhosts/%d/%n
mail_home = /var/mail/vhosts/%d/%n
namespace inbox {
  inbox = yes
}
mail_privileged_group = mail
first_valid_uid = 1000
mbox_write_locks = fcntl


Finally this controls what services are started.
cat /etc/dovecot/conf.d/10-master.conf | egrep -v "#|^$"
service imap-login {
  inet_listener imap {
  }
  inet_listener imaps {
    port = 993
    ssl = yes
  }
}
service pop3-login {
  inet_listener pop3 {
  }
  inet_listener pop3s {
    port = 995
    ssl = yes
  }
}
service lmtp {
   unix_listener /var/spool/postfix/private/dovecot-lmtp {
    mode = 0600
    user = postfix
    group = postfix
   }
}
service imap {
}
service pop3 {
}
service auth {
  unix_listener /var/spool/postfix/private/auth {
	mode = 0666
	user = postfix
	group = postfix
  }
  unix_listener auth-userdb {
	mode = 0600
	user = vmail
  }
  user = dovecot
}
service auth-worker {
}
service dict {
  unix_listener dict {
  }
}

Test that the user works.

doveadm user test.me@securemail4.chainringcircus.org
field	value
uid	5000
gid	5000
home	/var/mail/vhosts/securemail4.chainringcircus.org/test.me
mail	maildir:/var/mail/vhosts/securemail4.chainringcircus.org/test.me


Test the install.  I am only going to output the certificate once at the bottom, so that you get the idea, otherwise, it's just too much text.

openssl s_client -connect 127.0.0.1:imaps
telnet 127.0.0.1 imap
Trying 127.0.0.1...
Connected to 127.0.0.1.
Escape character is '^]'.
* OK [CAPABILITY IMAP4rev1 LITERAL+ SASL-IR LOGIN-REFERRALS ID ENABLE IDLE STARTTLS AUTH=PLAIN AUTH=LOGIN] Dovecot ready.

Test that POP3S works.

openssl s_client -connect 127.0.0.1:pop3s

Check IMAPS.

openssl s_client -connect 127.0.0.1:imaps
CONNECTED(00000003)
depth=0 OU = Domain Control Validated, CN = *.chainringcircus.org
verify error:num=20:unable to get local issuer certificate
verify return:1
depth=0 OU = Domain Control Validated, CN = *.chainringcircus.org
verify error:num=27:certificate not trusted
verify return:1
depth=0 OU = Domain Control Validated, CN = *.chainringcircus.org
verify error:num=21:unable to verify the first certificate
verify return:1
---
Certificate chain
 0 s:/OU=Domain Control Validated/CN=*.chainringcircus.org
   i:/C=US/ST=Arizona/L=Scottsdale/O=GoDaddy.com, Inc./OU=http://certs.godaddy.com/repository//CN=Go Daddy Secure Certificate Authority - G2
---
Server certificate
-----BEGIN CERTIFICATE-----
MIIFGjCCBAKgAwIBAgIJAIxTKDDCrcdfMA0GCSqGSIb3DQEBCwUAMIG0MQswCQYD
VQQGEwJVUzEQMA4GA1UECBMHQXJpem9uYTETMBEGA1UEBxMKU2NvdHRzZGFsZTEa
MBgGA1UEChMRR29EYWRkeS5jb20sIEluYy4xLTArBgNVBAsTJGh0dHA6Ly9jZXJ0
cy5nb2RhZGR5LmNvbS9yZXBvc2l0b3J5LzEzMDEGA1UEAxMqR28gRGFkZHkgU2Vj
dXJlIENlcnRpZmljYXRlIEF1dGhvcml0eSAtIEcyMB4XDTE1MDgyNDE0NDIzOVoX
DTE4MDkwNzE0NTQzOVowODEhMB8GA1UECxMYRG9tYWluIENvbnRyb2wgVmFsaWRh
dGVkMRMwEQYDVQQDDAoqLmVhbWMub3JnMIIBIjANBgkqhkiG9w0BAQEFAAOCAQ8A
MIIBCgKCAQEAkkXlK1db90Sb9A6mtUoGmeog06Sy8HjqVjVnAWw/KWFMjWAKyOHX
yvxtLqQWGPZ6i6Px+bZ2PK1qKalt/5bWHv7RQv53mWS+oktUcP/LC4tX39G5C9/N
KBfZUf5/sKcI7urXbAqwW5h3R50GahymBYJ2TXYN1Os6+otSzCQ9PrXKy9HN4Nqg
HCmavGDwxGi6dB9j606Xrf0lk7ZrMSSNPQFQdgKG1JGJplFt04FsfVnRsmDo+17G
i5ecT2H5mNMFX1Im0b8A/b81EUO5RXnrzuKBIdyvCBnwynPsE61zimGSAa6StZbC
AOZHtWocH/LKsGXHmeFrEtTc3CNkqThgLwIDAQABo4IBqDCCAaQwDAYDVR0TAQH/
BAIwADAdBgNVHSUEFjAUBggrBgEFBQcDAQYIKwYBBQUHAwIwDgYDVR0PAQH/BAQD
AgWgMDcGA1UdHwQwMC4wLKAqoCiGJmh0dHA6Ly9jcmwuZ29kYWRkeS5jb20vZ2Rp
ZzJzMS0xMTIuY3JsMFMGA1UdIARMMEowSAYLYIZIAYb9bQEHFwEwOTA3BggrBgEF
BQcCARYraHR0cDovL2NlcnRpZmljYXRlcy5nb2RhZGR5LmNvbS9yZXBvc2l0b3J5
LzB2BggrBgEFBQcBAQRqMGgwJAYIKwYBBQUHMAGGGGh0dHA6Ly9vY3NwLmdvZGFk
ZHkuY29tLzBABggrBgEFBQcwAoY0aHR0cDovL2NlcnRpZmljYXRlcy5nb2RhZGR5
LmNvbS9yZXBvc2l0b3J5L2dkaWcyLmNydDAfBgNVHSMEGDAWgBRAwr0njsw0gzCi
M9f7bLPwtCyAzjAfBgNVHREEGDAWggoqLmVhbWMub3JngghlYW1jLm9yZzAdBgNV
HQ4EFgQUIY0IX76FbTAW+vVmjvDyLIu3alMwDQYJKoZIhvcNAQELBQADggEBAAaY
t2a10js8OvkVjULDlQH4JGHj+6gf8yu+FfSH1dTVWxzqhLr8jPJGPG6Ib81fParj
nKh9lVDbuaKELerSt+i7v9E7YAjPc23gx8oAv0vOg9OjutKWbDMrkdSCN9NEdSzU
HB0G4145HmT6Ca/YO9PFwF5VC7WYlJu3wxoW3K/b1LMVs7xN3Hn2MqKc5KsDTkKD
+e2wN2eFP1uDetZC46Bc9lqEOaV00Ti0MjMlmBMnqX2JbDp09IVB6Gd/bIR7YhHA
lOTQYw/NZBf2AOOKpryBly+otv8mK3eHjhKdenT8O88xZpypYvIPhUSDx3SCy0Qb
n6/B2kZI6ZtQlBZqnBY=
-----END CERTIFICATE-----
subject=/OU=Domain Control Validated/CN=*.chainringcircus.org
issuer=/C=US/ST=Arizona/L=Scottsdale/O=GoDaddy.com, Inc./OU=http://certs.godaddy.com/repository//CN=Go Daddy Secure Certificate Authority - G2
---
No client certificate CA names sent
Server Temp Key: ECDH, secp384r1, 384 bits
---
SSL handshake has read 2001 bytes and written 405 bytes
---
New, TLSv1/SSLv3, Cipher is ECDHE-RSA-AES256-GCM-SHA384
Server public key is 2048 bit
Secure Renegotiation IS supported
Compression: NONE
Expansion: NONE
SSL-Session:
    Protocol  : TLSv1.2
    Cipher    : ECDHE-RSA-AES256-GCM-SHA384
    Session-ID: A75756A316C964086D57EC8F3858BF4280CDDBB20426F1B0FCEDEDEDD14F8F62
    Session-ID-ctx:
    Master-Key: 4D2C108B898241C2F6D740946FDFF7F20397B852750B5C8999441B0A967537431D2C6465FA628944FACA504A173F45A2
    Key-Arg   : None
    Krb5 Principal: None
    PSK identity: None
    PSK identity hint: None
    TLS session ticket lifetime hint: 300 (seconds)
    TLS session ticket:
    0000 - f7 de 20 41 d4 27 18 1c-99 a6 4e e6 e9 5c 92 cf   .. A.'....N..\..
    0010 - bb 00 40 23 04 fd 38 74-93 64 17 d2 9d e8 7d 9c   ..@#..8t.d....}.
    0020 - d2 7c 70 26 59 2e bf ec-44 30 c3 de 67 95 d2 c4   .|p&Y...D0..g...
    0030 - 50 58 49 e7 55 4b 1f de-1a 97 1d 10 bb a3 f4 ad   PXI.UK..........
    0040 - 15 8b ef cd 2f c7 3a 47-e9 a0 45 66 1a 60 54 e7   ..../.:G..Ef.`T.
    0050 - 7f 92 1a 47 53 0b 39 b2-6e fb cb 78 ab 98 be dd   ...GS.9.n..x....
    0060 - 01 c9 a1 04 fd 8d b7 98-ae 1b a8 c2 1e b1 46 cc   ..............F.
    0070 - e7 dc de 8f 1f e8 1a 73-8f a2 70 39 6a c6 f5 03   .......s..p9j...
    0080 - a7 a8 99 8b 9e c2 81 3a-83 25 12 33 5e 0d ff 38   .......:.%.3^..8
    0090 - ba 5b 8a d2 13 80 17 4b-5d b2 c1 52 32 66 2f 41   .[.....K]..R2f/A

    Start Time: 1488919043
    Timeout   : 300 (sec)
    Verify return code: 21 (unable to verify the first certificate)
---
* OK [CAPABILITY IMAP4rev1 LITERAL+ SASL-IR LOGIN-REFERRALS ID ENABLE IDLE AUTH=PLAIN] Dovecot ready.

This bit me and took me a couple of hours to find it. Go ahead and check this.

postconf | grep dovecot-lmtp
virtual_transport = lmtp:unix:private/dovecot-lmtp

doveconf  | grep dovecot-lmtp
  unix_listener /var/spool/postfix/private/dovecot-lmtp {


At this point I installed Thunderbird and tested sending and receiving email.

Screen Shot 2017-03-14 at 10.53.27 AM

Enable SSL for Apache.
First go through and remove all of the Listen directives in the Apache configuration files. If you don't it will come back to bite you.

grep -ir Listen /etc/httpd
/etc/httpd/conf/httpd.conf:# Listen: Allows you to bind Apache to specific IP addresses and/or
/etc/httpd/conf/httpd.conf:# Change this to Listen on specific IP addresses as shown below to
/etc/httpd/conf/httpd.conf:#Listen 12.34.56.78:80
/etc/httpd/conf/httpd.conf:#Listen 80
/etc/httpd/conf.d/securemail.conf:Listen 192.168.1.1:443
/etc/httpd/conf.d/ssl.conf:# When we also provide SSL we have to listen to the
/etc/httpd/conf.d/ssl.conf:#Listen 12.34.56.78:443 https

The only thing I changed in the main httpd.conf is I commented out the Listen directives for port 80 and changed the DocumentRoot, however, we just want to make sure that we have Apache up and running with SSL. We will get to that in the RoundCube later. From /etc/httpd/httpd.conf.

 
DocumentRoot "/var/www/html/roundcubemail-1.2.3"
#Listen 12.34.56.78:80
#Listen 80

Next I commented out all the SSL certificate stuff in /etc/httpd/conf.d/ssl.conf.

cat ssl.conf | grep SSLC
# Use "SSLCryptoDevice" to enable any supported hardware
SSLCipherSuite HIGH:MEDIUM:!aNULL:!MD5:!SEED:!IDEA
#SSLCipherSuite RC4-SHA:AES128-SHA:HIGH:MEDIUM:!aNULL:!MD5
#SSLCertificateFile /etc/pki/tls/certs/localhost.crt
#SSLCertificateKeyFile /etc/pki/tls/private/localhost.key
#SSLCertificateChainFile /etc/pki/tls/certs/server-chain.crt
#SSLCACertificateFile /etc/pki/tls/certs/ca-bundle.crt

Set up the securemail virtual host with SSL certificates you created for Dovecot.

cat /etc/httpd/conf.d/securemail.conf
LoadModule ssl_module modules/mod_ssl.so

Listen 172.22.226.218:443
<VirtualHost *:443>
    ServerName securemail4.chainringcircus.org
    SSLEngine on
    SSLCertificateFile "/etc/ssl/certs/circuspublic.pem"
    SSLCertificateKeyFile "/etc/ssl/certs/circusprivate-wopassword.pem"
</VirtualHost>

Restart Apache

systemctl restart httpd

Browse to the web server, https://securemail.chainringcircus.org.

Screen Shot 2017-03-07 at 10.13.35 AM

Install RoundCube.
First set the timezone for PHP in /etc/php.ini, the list is here.

date.timezone = America/Chicago

Create the database for RoundCube.

mysql -u root -p <mariadb.create.roundcube
Enter password:
cat mariadb.create.roundcube
CREATE DATABASE roundcubemail;
GRANT ALL PRIVILEGES ON roundcubemail.* TO mail@localhost IDENTIFIED BY 'CHANGEME';
FLUSH PRIVILEGES;

Start the RoundCube install.

mv roundcubemail-1.2.3-complete.tar.gz /var/www/html/
cd /var/www/html/
tar -xvzf roundcubemail-1.2.3-complete.tar.gz

Browse to the configuration web site.

https://securemail.chainringcircus.org/roundcubemail-1.2.3/installer/

In order to clean up a number of missing modules and extensions. If you do not have all of these RPMs, please see one of the first steps above to enable optional packages for RHEL.

yum install -y php-xml php-mysql php-pdo php-mbstring php-intl php-ldap
systemctl restart httpd

Screen Shot 2017-03-07 at 11.21.56 AM

SecureMail
Edit the file /etc/postfix/master.cf

filter    unix  -       n       n       -       10      pipe
    flags=Rq user=filter argv=/usr/local/bin/secure-parse.multiple -f ${sender} -- ${recipient}

Sources.
http://linux.m2osw.com/setting-postfixcourier-godaddy-ssl-certificate

https://www.godaddy.com/help/apache-install-a-certificate-centos-5238

Set-up SSL encrypted connection in Postfix, Dovecot and Apache

https://github.com/roundcube/roundcubemail/wiki/Installation

http://www.tecmint.com/create-apache-https-self-signed-certificate-using-nss/

http://www.tecmint.com/setup-postfix-mail-server-and-dovecot-with-mariadb-in-centos/

http://www.tecmint.com/install-and-configure-roundcube-webmail-for-postfix-mail-server/

http://wiki.dovecot.org/TestInstallation

https://www.markbrilman.nl/2011/08/howto-convert-a-pfx-to-a-seperate-key-crt-file/

https://www.linode.com/docs/email/postfix/email-with-postfix-dovecot-and-mariadb-on-centos-7

Tips : Using openssl to extract private key ( .pem file) from .pfx (Personal Information Exchange)

http://www.tecmint.com/setup-postfix-mail-server-and-dovecot-with-mariadb-in-centos/

https://debian-administration.org/article/275/Setting_up_an_IMAP_server_with_dovecot

http://www.postfix.org/TLS_README.html

https://www.linode.com/docs/email/postfix/email-with-postfix-dovecot-and-mysql

Posted in Code, Linux | Leave a comment

Linux NAT with a Web Interface

In 2006 I wrote a web interface for Linux NAT tables. It was not pretty, but it moved NAT from the core routers or firewalls onto a server that the PC Techs could manage. The goal was to push management of creating printer NAT translations from the Senior team to the team that adds and removes the physical printers.

As of last weekend that server is finally out of service and I have been able to write up a howto and offer the code. At it’s peak we had nearly 1,000 hosts and printers combined being NATed.

When I initially wrote it, it was on two physical servers.  During one upgrade we moved it to a single virtual machine where it has run for the past six years.  I upgraded it a couple of times, but I think it’s pretty a good project to have run all of the printing in a hospital for eleven years.  At one point there was a bug in the code that allowed PC techs to create duplicate NATs.  This only became a problem when the server was rebooted.  I found that bug and fixed it shortly after.

I used Ubuntu Linux, and this is the what the /etc/network/interfaces looked like. Notice that #translate 0.0.0.0 line. This tells the scripts that there is no translate to be created, while a line #translate 192.168.1.1 tells the scripts to translate the real address to 192.168.1.1. In this manner, the /etc/network/inerfaces becomes the flat file that creates all of the NATs.

root@translate2:/var/www# cat /etc/network/interfaces
auto lo
iface lo inet loopback

#translate 0.0.0.0
auto eth0
iface eth0 inet static
address 172.22.25.194
netmask 255.255.252.0
#gateway 172.22.24.1

#translate 0.0.0.0
auto eth1
iface eth1 inet static
address 172.22.100.58
netmask 255.255.255.0
gateway 172.22.100.1

#translate 172.22.71.239
auto eth0:4
iface eth0:4 inet static
address 172.22.25.160
netmask 255.255.252.0

In order to allow the PC Techs to make the changes, I modified suidcgi.c from Sverre Huseby. Below is what I added to the suidcgi.c comments.

/**************************************************************************
 *
 *  FILE            suidcgi.c
 *  MODULE OF       suidcgi - a set UID wrapper for CGI scripts.
 *
 *  DESCRIPTION     This is a setuid wrapper, intended to run CGI scripts
 *                  accessed from the World Wide Web. The script will be
 *                  run as the user owning it, giving access to files
 *                  without making them readable and writable to all.
 *
 *  WRITTEN BY      Sverre H. Huseby <sverrehu@online.no>
 *  HACKED BY	    Jud Bishop <judson.bishop@gmail.com>
 *  			My hack has removed most of the sanity checking put
 *  			in by Sverre.  I need to manipulate iptables and
 *  			interfaces from the web and kept getting caught by
 *  			different sanity checks.  I'm sure for good reason 🙂
 *
 *  			So the point of this paragraph is this, this script
 *  			is insecure on so many levels that you should not use
 *  			it!
 *
 **************************************************************************/

In order to make the cgi set uid of root, you have to create a symlink from the .cgi to the program suidcgi.

root@translate2:/var/www/cgi-bin# ls -alh
total 96K
drwxr-xr-x 3 root root     4.0K 2015-04-30 13:57 .
drwxr-xr-x 5 root root     4.0K 2006-10-25 12:06 ..
-rwxr-xr-x 1 root root     3.5K 2006-10-30 05:54 confirm.pl
lrwxrwxrwx 1 root root        7 2013-02-12 14:05 delete_files.cgi -> suidcgi
-rwxr-xr-x 1 root root     5.6K 2012-05-10 07:33 delete_files.pl
-rwxr-xr-x 1 root root     3.6K 2009-01-09 10:56 delete.pl
lrwxrwxrwx 1 root root        7 2013-02-12 14:05 ifconfig.cgi -> suidcgi
-rwxr-xr-x 1 root root      280 2006-10-25 12:07 ifconfig.sh
lrwxrwxrwx 1 root root        7 2013-02-12 14:05 interface.cgi -> suidcgi
-rwxr-xr-x 1 root root     6.8K 2009-04-29 09:02 interface.pl
-rw-r--r-- 1 root www-data  35K 2017-01-03 08:18 iptables
lrwxrwxrwx 1 root root        7 2013-02-12 14:05 iptables.cgi -> suidcgi
-rwxr-xr-x 1 root root      322 2006-10-25 15:00 iptables.sh
lrwxrwxrwx 1 root root        7 2013-02-12 14:05 list.cgi -> suidcgi
-rwxr-xr-x 1 root root     3.5K 2006-10-30 08:08 list.pl
drwxr-xr-x 2 root root     4.0K 2013-11-21 11:01 old
-rwxr-xr-x 1 root root      288 2006-10-25 12:07 printenv
-rwsr-xr-x 1 root root     6.0K 2006-10-25 12:07 suidcgi

Here is a listing of the default web server directory.

root@translate2:/var/www/html# ls /var/www/html/ -alh
total 20K
drwxr-xr-x 2 root root 4.0K 2009-01-12 12:42 .
drwxr-xr-x 5 root root 4.0K 2006-10-25 12:06 ..
-rw-r--r-- 1 www-data www-data  284 2006-11-06 13:38 index.html
-rwxr-xr-x 1 www-data www-data 1.5K 2006-10-25 12:07 interface.html

When the server starts, it reads the /etc/rc.local script, which calls the rc.local.firewall script. This script reads the /etc/network/interfaces file and builds the iptables rules.

cat rc.local.firewall
#!/usr/bin/perl

# 2006-11-06
# Jud Bishop

# flush the default filter rule
system "iptables --flush";

# flush the nat filter
system "iptables --table nat --flush";

# delete all of the other chains
system "iptables --delete-chain";
system "iptables --table nat --delete-chain";

# Read the file into an array
open (FILE,"</etc/network/interfaces") or die "Error: can't open file /etc/network/interfaces\n $!";
        # put the file into the array
        @array = <FILE>;
close FILE or die "Error: can't close $file\n $!";

# Take all of the new lines off of the array.
foreach $j ( 0 .. $#array )
{
        chomp @array[$j];
}

foreach $j ( 0 .. $#array )
{
        if ( @array[$j] =~ /^#translate/ )
        {
                ($na, $translate) = split /\ /, @array[$j];

        } elsif (  @array[$j] =~ /^address/ ) {
                ($na, $cerner) = split /\ /, @array[$j];

                if ( $translate !~ /^0/ )
                {
			system "iptables -t nat -A PREROUTING --destination $cerner -j DNAT --to $translate";
                }
        }
}

# make the source look like the translate box
system "iptables -t nat -A POSTROUTING -o eth1 -j SNAT --to 172.22.100.58";

# enable ip forwarding
system "echo 1 > /proc/sys/net/ipv4/ip_forward";

#iptables -t nat -n -L >/var/www/cgi-bin/iptables

The process of creating or deleting a NAT works along these lines. A PC tech browses to the translate server and chooses an option:

screen-shot-2017-01-22-at-10-39-10-am

The simple HTML behind the index page, just chooses where to send the PC tech next.

<html>

<a href=interface.html>Add Translation</a>

<a href=../cgi-bin/delete.pl>Delete Translation</a> 

<a href=../cgi-bin/list.pl>Show Translations</a>

<a href=../cgi-bin/iptables.cgi>Show iptables</a>

<a href=../cgi-bin/ifconfig.cgi>Show interfaces</a>

</html>

Adding a translation walks the PC tech through the option to add a translation, confirm that it is correct and then creates it. Notice that I have pre-populated the form with some suggested IP address ranges to try and cut down on the number of errors.

screen-shot-2017-01-22-at-11-15-32-am

screen-shot-2017-01-22-at-11-16-04-am


Once the translation has been confirmed, it calls /var/www/cgi-bin/interface.pl that edits the /etc/network/interfaces file as well as add the NAT. Below is the comments section from the file. As I type this, I think about how I would have created this process differently today, however, it’s interesting to read my thoughts. This code has been in production over ten years, so one way or another it has stood the test of time.

#!/usr/bin/perl
# 2006-09-12
# Jud Bishop
#
#  I know I could be using suidperl but it has too much checking for me to be
#  able to manipulate system files.  SCARY.
#
#  I hate to think this is such a hack, but I check to make sure I get an IP
#  address coming in and I use full paths.
#
#  I also chose to turn off -T for taintedness although you see hacks left over
#  to deal with it.  When I get time I'll clean up the code.
#
#   This script reads in /etc/interfaces, finds the last interface, then adds
#   the new interface as the last one. It adds the interface to /etc/interfaces,
#   creates the interface on the fly and then adds a nat translation for it.
#   It never brings down nat, does everything on the fly.

Delete does something similar, it reads in the /etc/network/interfaces file as an array, finds the interface to delete, removes it. Then goes on toe down the interface and remove the NAT. There were no juicy comments in that file.


Posted in Code, Linux | Leave a comment