Link

ghoti143:

So you’ve got a Tumblr blog. And you craft code. From time to time, you might want to show that code off to the world. May I submit to you Google Code Prettify? This is the dogfood that Google uses to power code.google.com, so it has to be good, right? (You better say yes lest all your email,…

Personally I use Markdown on tumblr, so I slightly changed the script to:

<script type="text/javascript">
$(function() {
    $("pre &gt; code").addClass("prettyprint");
    prettyPrint();

    var toggle = $('Toggle code').click(function() {    
        $(this).next().slideToggle(); 
    });
    toggle.insertBefore('pre.collapse');

    $('pre.collapse').hide();
});
</script>
Link

Great article

Text

Reading 64 bit registry from 32bit app

By default all registry keys you access from a 32bit application are redirect to the Wow6432Node, and also the other way around, when accessing it from a 64bit program, you only see the 64bit section of the registry.

The normal way of opening a registry key is:

RegistryKey rk = Registry.LocalMachine.OpenSubKey(
"SOFTWARE\Microsoft");

EDIT: In .NET 4 you don’t have to do the P/Invoke, just use this instead:

RegistryKey regkey =
    RegistryKey.OpenBaseKey(
        RegistryHive.LocalMachine,
        RegistryView.Registry32)
    .OpenSubKey("SOFTWARE")

and

RegistryKey regkey =
    RegistryKey.OpenBaseKey(
        RegistryHive.LocalMachine,
        RegistryView.Registry64)
    .OpenSubKey("SOFTWARE")

Note that this returns a different section depending on wether the application that’s executing the code has 32 or 64 bit.

To fix this, you have to use an unmanaged api that can be P/Invoked. We add the following 2 extension methods:

public static RegistryKey Open32BitSubKey(
this RegistryKey parentKey, 
string subKeyName, 
bool writeable)

public static RegistryKey Open64BitSubKey(
this RegistryKey parentKey, 
string subKeyName, 
bool writeable)

Click “toggle code” to see the full P/Invoke code

static class NativeMethods
{
[DllImport("advapi32.dll",
    CharSet = CharSet.Unicode,
    EntryPoint = "RegOpenKeyEx")]
static extern int RegOpenKeyEx(
    IntPtr hKey,
    string subKey,
    uint options,
    int sam,
    out IntPtr phkResult);

[Flags]
public enum eRegWow64Options
{
    None = 0x0000,
    KEY_WOW64_64KEY = 0x0100,
    KEY_WOW64_32KEY = 0x0200,
}

[Flags]
public enum eRegistryRights
{
    ReadKey = 131097,
    WriteKey = 131078,
}

public static RegistryKey Open32BitSubKey(
    this RegistryKey parentKey,
    string subKeyName,
    bool writeable)
{
    return OpenSubKey(
        parentKey,
        subKeyName,
        writeable,
        eRegWow64Options.KEY_WOW64_32KEY);
}

public static RegistryKey Open64BitSubKey(
    this RegistryKey parentKey, 
    string subKeyName, 
    bool writeable)
{
    return OpenSubKey(
        parentKey, 
        subKeyName, 
        writeable, 
        eRegWow64Options.KEY_WOW64_64KEY);
}

static RegistryKey OpenSubKey(
    RegistryKey parentKey,
    string subKeyName,
    bool writeable,
    eRegWow64Options options)
{
    if (parentKey == null)
        throw new ArgumentNullException("parentKey");

    IntPtr parentKeyHandle = GetRegistryKeyHandle(parentKey);
    if (parentKeyHandle == IntPtr.Zero)
        throw new ArgumentException("Parent key is not open", "parentKey");

    eRegistryRights rights = eRegistryRights.ReadKey;
    if (writeable)
        rights = eRegistryRights.WriteKey;

    IntPtr subKeyHandle;
    int result = RegOpenKeyEx(
        parentKeyHandle,
        subKeyName,
        0,
        (int)rights | (int)options,
        out subKeyHandle);

    if (result != 0)
        Marshal.ThrowExceptionForHR(result);

    return PointerToRegistryKey(subKeyHandle, writeable, false);
}

private static IntPtr GetRegistryKeyHandle(
    RegistryKey pRegisteryKey)
{
    Type type = Type.GetType("Microsoft.Win32.RegistryKey");
    FieldInfo info = type.GetField("hkey", BindingFlags.NonPublic |
                BindingFlags.Instance);

    SafeHandle handle = (SafeHandle)info.GetValue(pRegisteryKey);

    return handle.DangerousGetHandle();
}

private static RegistryKey PointerToRegistryKey(IntPtr hKey, bool pWritable,
    bool pOwnsHandle)
{
    if (hKey == IntPtr.Zero)
        return null;
    // Create a SafeHandles.SafeRegistryHandle from this pointer - this
            // is a private class
    BindingFlags privateConstructors = BindingFlags.Instance |
                BindingFlags.NonPublic;
    Type safeRegistryHandleType = typeof(
        SafeHandleZeroOrMinusOneIsInvalid).Assembly.GetType(
            "Microsoft.Win32.SafeHandles.SafeRegistryHandle");

    Type[] safeRegistryHandleConstructorTypes = 
                new[] { typeof(IntPtr), typeof(Boolean) };
    ConstructorInfo safeRegistryHandleConstructor =
        safeRegistryHandleType.GetConstructor(
                privateConstructors,
                null,
                safeRegistryHandleConstructorTypes,
                null);
    Object safeHandle = safeRegistryHandleConstructor.Invoke(new Object[]
                                                                {
                                                                    hKey,
                                                                    pOwnsHandle
                                                                });

    // Create a new Registry key using the private constructor using the
    // safeHandle - this should then behave like 
    // a .NET natively opened handle and disposed of correctly
    Type registryKeyType = typeof(RegistryKey);
    Type[] registryKeyConstructorTypes = 
                new[] { safeRegistryHandleType, typeof(Boolean) };
    ConstructorInfo registryKeyConstructor =
        registryKeyType.GetConstructor(privateConstructors, null,
                                       registryKeyConstructorTypes, null);
    RegistryKey result = RegistryKey)registryKeyConstructor.Invoke(
                new[] { safeHandle, pWritable });
    return result;
}

}

To open the 64 bit version of the same section from a 32bit application you use:

Registry.LocalMachine.Open64BitSubKey(
    subKey,
    false);

And to open the 32bit version from a 64bit application:

Registry.LocalMachine.Open32BitSubKey(
    subKey,
    false);
Text

Workaround for Silverlight ScrollViewer bug

There’s a bug in the way the ScrollViewer works that can be triggered by dragging the “thumb” part of the scrollbar and then letting go outside of the Silverlight control. The thumb remains “active” visually; it has the visual aspects of a thumb with the mouse button down.

The effect of this is that when you move the mouse back into the Silverlight control, the scrollbar starts reacting to mouse movement, even though the mouse buttons are up. It didn’t see the OnMouseUp event, because the mouse cursor was outside the frame.

There’s a simple fix for this problem, inspired by a forum post. I didn’t like that solution because you loose the drag state when you drag away from the thumb (but are still within the silverlight control) I changed the solution provided by the forum post into something that works almost as desired. The only problem that remains is that the Thumb seems to be active when you let go of the mouse outside the Silverlight control. This is fixed as soon as you move the mouse over the Silverlight control.

<Grid x:Name="LayoutRoot" Background="White" 
      Width="Auto" 
      Height="Auto">
    <ScrollViewer HorizontalScrollBarVisibility="Visible"
                  VerticalScrollBarVisibility="Visible"
                  Width="Auto" 
                  Height="Auto"
                  x:Name="ScrollViewer"
                  LostMouseCapture="ScrollViewer_LostMouseCapture">
        <Canvas x:Name="ScrollPanel" Width="800" Height="1500">
        </Canvas>
    </ScrollViewer>
</Grid>

The event that’s most suitable for working around the problem seems to be LostMouseCapture that gets hooked in line 9. In the event handler we search for the thumbs on both scrollbars, and call CancelDrag to get rid of the dragging state.

private void ScrollViewer_LostMouseCapture(
    object sender, MouseEventArgs e)
{
    FrameworkElement fe = VisualTreeHelper.GetChild(ScrollViewer, 0) 
        as FrameworkElement;
    if (fe == null)
        return;

    //find the vertical scrollbar
    ScrollBar sb = fe.FindName("VerticalScrollBar") as ScrollBar; 
    if (sb != null)
    {
        //Get the scrollbar's thumbnail. This is the element that
        //remains stuck in the "drag" state
        Thumb thumb = (Thumb)((FrameworkElement)VisualTreeHelper
            .GetChild(sb, 0)).FindName("VerticalThumb");
        //cancel the operation
        thumb.CancelDrag();
    }
    sb = fe.FindName("HorizontalScrollBar") as ScrollBar;
    if (sb != null)
    {
        //Get the scrollbar's thumbnail. This is the element that 
        //remains stuck in the "drag" state
        Thumb thumb = (Thumb)((FrameworkElement)VisualTreeHelper
            .GetChild(sb, 0)).FindName("HorizontalThumb");
        //cancel the operation
        thumb.CancelDrag();
    }
}

Text

Silverlight zooming with wheel mouse

You can hook mouse wheel events as described in a previous post to do other things, besides just scrolling the scroll viewer, for instance for zooming in and out the entire scene.

<Grid x:Name="LayoutRoot" Background="White" 
      Width="Auto" 
      Height="Auto">
    <ScrollViewer HorizontalScrollBarVisibility="Visible"
                  VerticalScrollBarVisibility="Visible"
                  Width="Auto" 
                  Height="Auto"
                  x:Name="ScrollViewer">
        <Canvas x:Name="ScrollPanel" Width="800" Height="1500">
            <Canvas.RenderTransform>
                <ScaleTransform x:Name="ZoomTransform" />
            </Canvas.RenderTransform>
        </Canvas>
    </ScrollViewer>
</Grid>

This “OnMouseWheelTurned” changes the zoom. In this example, we check wether the Shift key is pressed so we can use the ‘normal’ mousewheel actions for other stuff like scrolling the ScrollViewer

private void OnMouseWheelTurned(Object sender, HtmlEventArgs args)
{
    double delta = 0;
    ScriptObject e = args.EventObject;

    if (e.GetProperty("wheelDelta") != null) // IE and Opera
    {
        delta = ((double)e.GetProperty("wheelDelta"));
        if (HtmlPage.Window.GetProperty("opera") != null)
            delta = -delta;
    }
    else if (e.GetProperty("detail") != null) // Mozilla and Safari
    {
        delta = -((double)e.GetProperty("detail"));
    }

    // Enable zooming when the shift key is pressed
    if (args.ShiftKey)
    {
        if (delta &gt; 0)
        {
            ZoomTransform.ScaleX += 0.1;
            ZoomTransform.ScaleY += 0.1;
        }
        else if (delta &lt; 0)
        {
            // Don't let the scale go to zero or below
            if (ZoomTransform.ScaleX &gt; 0.1 &amp;&amp;
                ZoomTransform.ScaleY &gt; 0.1)
            {
                ZoomTransform.ScaleX -= 0.1;
                ZoomTransform.ScaleY -= 0.1;
            }
        }

        if (delta != 0)
        {
            // Prevent the default action (scrolling the page) and
            // return false if we handled the wheel event
            args.PreventDefault();
            e.SetProperty("returnValue", false);
            return;
        }
    }
}
Text

Adding mouse wheel support in Silverlight 2.0

By default the ScrollViewer control in Silverlight 2.0 doesn’t scroll when using the mouse wheel. The only way to scroll using the mouse is by clicking/dragging the scrollbars.

The best way I’ve found to solve this, is by handling the javascript “onmousewheel” event, on the silverlight control. I have my control hosted in ASP.NET, and pass it an InitParam that contains the ASP.NET ClientID of the Silverlight control itself. I’m sure there must be a better way the get at the control from inside Silverlight, but I haven’t found it (yet).

The code below finds the Silverlight html element, and attaches the onmousewheel event.

HtmlElement slElement = 
    HtmlPage.Document.GetElementById(_silverlightHost);
slElement.AttachEvent("onmousewheel", OnMouseWheelTurned);

In the handler, ScrollViewer is the viewer itself; ScrollPanel is the panel contained within the ScrollViewer.

private void OnMouseWheelTurned(Object sender, HtmlEventArgs args)
{
    double delta = 0;
    ScriptObject e = args.EventObject;

    if (e.GetProperty("wheelDelta") != null) // IE and Opera
    {
        delta = ((double)e.GetProperty("wheelDelta"));
        if (HtmlPage.Window.GetProperty("opera") != null)
            delta = -delta;
    }
    else if (e.GetProperty("detail") != null) // Mozilla and Safari
    {
        delta = -((double)e.GetProperty("detail"));
    }
    
    if (
        // Override to horizontal scrolling when Ctrl is pressed.
        !args.CtrlKey &&
        // Use vertical scrolling if there's something to scroll
        ScrollPanel.ActualHeight > ScrollViewer.ActualHeight &&
        ScrollViewer.ComputedVerticalScrollBarVisibility == 
            Visibility.Visible)
    {
        ScrollViewer.ScrollToVerticalOffset(
            ScrollViewer.VerticalOffset - delta);
    }
    else if (ScrollViewer.ComputedHorizontalScrollBarVisibility == 
        Visibility.Visible)
    {
        ScrollViewer.ScrollToHorizontalOffset(
            ScrollViewer.HorizontalOffset - delta);
    }

    if (delta != 0)
    {
        // Prevent default, and return false, to make sure the page 
        // itself doesn't respond to the mousewheel
        args.PreventDefault();
        e.SetProperty("returnValue", false);
    }
}

Text

.NET Interop - Targeting x86 vs x64 vs AnyCpu

AnkhSvn uses a .NET library called SharpSvn as a wrapper on the Subversion C library. SharpSvn.dll is a mixed assembly, meaning it contains both IL-code (platform independent) and native code (platform dependent). We keep getting questions on how to deal with this when writing applications for 32bit and 64bit operating systems. Scott Hanselman also talks about this confusion between 32bit and 64bit when using .NET in detail.

By default when you create a new executable in Visual Studio, the executable is compiled for “AnyCpu”. This means that the .NET runtime executes the assembly on the ‘best match’ available. This means it’ll run as a 32bit application on Win32 and a 64bit application on Win64. See this MSDN article how this is done

This works fine for applications that only contain platform independent IL code. However if you try to execute an AnyCpu application that links to a 32bit mixed mode assembly, the program starts in 64bit mode on 64bit system. When it tries to load the 32bit assembly, you get a BadImageFormatException, because the 64bit program cannot execute the 32bit native code.

For most applications the solution to this is quite simple. If they run well on a 32bit system, it means the 32bit address space is large enough for the memory needs of the application. In this case the 'fix’ is to change the project properties of the executable to target 32bit. This changes the header of the resulting executable, telling the .NET runtime to load the application as a 32bit application on both Win32 and Win64. This way you’ll be able to use SharpSvn (or other mixed mode assemblies just fine).

For applications that require a 64bit address space, the solution is just as simple; they should target the 64bit platform. They cannot run well (or not at all) on a 32bit OS in the first place. Microsoft Exchange 2007 for instance, is targeted at 64bit only. SharpSvn provides a 64bit build for applications that need to be able to address that much memory.

The third option would be to create 2 versions of your program; one that targets 32bit, and one that targets 64 bit. The reason could be that the 64bit program can handle larger sets of data, or use a faster algorithm. When using this approach the installer has to figure out on what system the program is being deployed, and then pick appropriate assembly. This choice leads to much more testing work, because the program has to be able to run in 32bit address space, and the extra feature or smarter algorithm in the 64bit version has to be tested as well.

The SharpSvn mailing list contains a post that describes other ways to create a mixed 32bit/64bit application than switching 32bit and 64bit dlls in the installer.

Edit: Rico Mariani has written a post on why Visual Studio shouldn’t be a 64-bit process. If this is true for Visual Studio, it’s most likely also the case for other applications using SharpSvn. Ofcourse applications other than Source Control have different needs and characteristics

Text

PowerShell Cmdlets - adding/overriding members

Scott Hanselman described how to “spot-weld” new properties on existing types using the types.ps1xml file. When writing your own Cmdlets this might not be the best way to modify the objects you return. In this post I’m going into how to change existing types in code using ETS Properties based on a SharpSvn/Subversion cmdlet. A common use-case would be to fix a function that returns a string instead of a FileInfo or Uri instance (that can be passed along the pipeline).

The main trick is not to return the plain object, but a PSObject wrapping the plain object. The PSObject allows you to add and remove custom properties and methods from C# code.

This is the code before overriding propeties and extending the pipeline object

protected override void ProcessRecord()
{
    Client.Info(
        GetTarget<SvnTarget>(),
        SvnArguments,
        delegate(object sender, SvnInfoEventArgs e)
        {
            e.Detach();

            WriteObject(e);
        });
}

And its output.

Get-SvnInfo | % { $_.Path.GetType() }

IsPublic IsSerial Name        BaseType
-------- -------- ----        --------
True     True     String      System.Object

SvnInfoEventArgs has a Path property of type String. For a Cmdlet it’s more usual to write FileInfo objects to the pipeline, so we need to remove the original Path property, and provide a new one.

The properties/methods that seem to make most sense here are: * CodeProperty/CodeMethod Allows you to write C# code behind a new property or method, this is the most flexible, and can only be added from C# code. In PowerShell you would write a ScriptProperty or ScriptMethod instead, implementing it in PowerShell. * AliasProperty Exposes an existing property with another name, nice for creating a consistent PowerShell API on top of a non-existing API * NoteProperty This is just a readonly Key/Value

Adding a new property with the same name overrides the existing one

protected override void ProcessRecord()
{
    Client.Info(
      GetTarget<SvnTarget>(),
      SvnArguments,
      delegate(object sender, SvnInfoEventArgs e)
      {
          e.Detach();

          PSObject obj = new PSObject(e);
          obj.Properties.Add(new PSCodeProperty(
              "Path",
              GetType().GetMethod("GetPath")));

          WriteObject(obj);
      });
}

public static FileInfo GetPath(PSObject obj)
{
    SvnInfoEventArgs e = obj.BaseObject as SvnInfoEventArgs;
    if (e == null)
        return null;

    return new FileInfo(e.Path);
}

The method represented by MethodInfo has to be public, static, non-void and take one parameter of type PSObject to work.

This overrides the Path property:

Get-SvnInfo | % { $_.Path.GetType() }

IsPublic IsSerial Name          BaseType
-------- -------- ----          --------
True     True     FileInfo      System.IO.FileSys...

If you have “spot-welded” on extra properties on FileInfo, those will also be present on $_.Path ofcourse.

Text

SourceServer indexing and Subversion

This is a walkthrough about using source server indexed PDBs using Visual Studio 2005 or 2008, as described in a MSDN Magazine article. The next post will talk about producing source server indexed PDB files.

Visual Studio 2008 can also be configured to use a Symbol Server that provides source server indexed PDBs for debugging through the .NET Framework source code. SourceServerSharp enables you to produce PDBs for your own assemblies with similar possibilities.

  1. Install Subversion Command-line binaries and make sure svn.exe is in the path. This happens automatically when you use the installer.

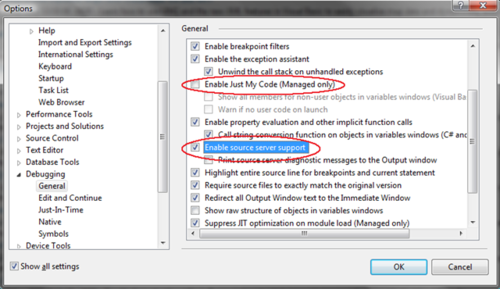
  2. Configure source server inside Visual Studio 2005 or 2008:

    • Turn off ‘Enable Just My Code (Managed only)’
    • Turn on 'Enable source server support’

Configure source server support

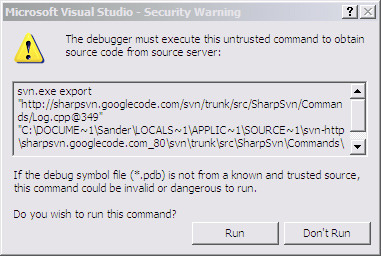
  1. You are now set-up, but when you are debugging and step into code outside your solution that is source server indexed, or hit an exception in that code, the following dialog comes up:

Visual Studio Security Warning

To prevent this create a file called srcsrv.ini in %ProgramFiles%\Microsoft Visual Studio 8\Common7\IDE\ containing:

[trusted commands]
svn.exe export
Text

Updating file inside MSI for major upgrade

This post describes how to create a new msi that can be installed as a major upgrade based on an existing one (that support major upgrades), whilst patching/updating some files. This is useful when it’s easier to patch an existing msi than it is to create a new one.

Cabarc to create new cabinet containing the patched files:

CabArc.exe n mypatch.cab c:\patch\*.dll

MsiFiler to correct version information:

MsiFiler.exe -d myinstaller.msi -v -s c:\patch\

MsiDb to insert new cabinet in msi (optional):

MsiDb.exe -d myinstaller.msi -a mypatch.cab

Open myinstaller.msi in Orca and:

  • Insert a new Guid into PackageCode because we are changing the msi.

    To do this in Orca, go to ‘View -> Summary Information’ and click the 'New GUID’ button next to the Package Code. It’s also possible to configure Orca to always change the PackageCode when saving, under 'Options -> Database’

  • Insert a new Guid into ProductCode to allow major upgrade
  • Change the ProductVersion to a higher version number, and change the Upgrade table accordingly.
  • Change sequence in the File table for the patched file(s)
  • Add reference to mypatch.cab in Media table:

    • DiskId should be a new unique number
    • Cabinet should be ’#mypatch.cab’ because the cabinet was inserted in the msi.

      It’s also possible to keep the cabinet file external, in that case call it 'mypatch.cab’

    • LastSequence should correspond to the highest sequence number of the file in the File table.

      For example, if the highest number before patching is 72, and we added 3 files, LastSequence should be 75, and 3 entries in the File table should use Sequence 73, 74 and 75. LastSequence and Sequence is the only link between files and cabinets.

Orca, MsiDb, MsiFiler and CabArc are all part of the Windows Platform SDK